Using sparc.client for data movement in SPARC
Objectives
The objective of this tutorial is to demonstrate how to use the sparc.client Python library to facilitate moving data through existing tools for SPARC-compatible analysis and visualization. Specifically, we will cover searching SPARC data, downloading files from Pennsieve, analyzing MBF XML files, mapping downloaded files in MAP Client, and exporting VTK files.
Prerequisites
Before starting this tutorial, make sure you have the following prerequisites installed:
- Python (3.10 or 3.11),
- sparc.client Python library,
- MAP Client Scaffold Mapping Tools; and,
- Example search tool.
Setup
Downloading and installing Python is well documented here. Follow these instructions if Python is not already available on your system. At this time we only have support for Python 3.10 and 3.11. We will be adding support for Python 3.12 soon.
Create a virtual environment to place all the code into, this also allows us to isolate the code from the system Python:
python -m venv venv_sparc_client_tutorial
# Activate virtual environment on Windows:
venv_sparc_client_tutorial\Scripts\Activate
# Activate vitrual environment on a *nix based system:
source venv_sparc_client_tutorial/bin/activate
sparc.client can be installed with:
pip install sparc.clientThe mapping tools can be installed by following these installation instructions.
The example search tool can be retrieved with:
git clone https://github.com/sparc-map-core/pythonclientsearchtool.gitThe example search tool is the complete application for searching the SPARC portal, analyzing, and retrieving files. We cover the structure of the application and its use in the following sections.
SPARC Search Tool
In this tutorial we will create a simple single document interface to interact with the SPARC portal and connect between different SPARC tools.
The SPARC search tool application is created using the Qt Framework Python bindings PySide6. We won't go too heavily into the creation of the application but try and skim through how to put together a PySide6 based application. There are good resources available on the Qt website for a more in-depth look at how PySide6 can be used to create an application.
To create the layout of the widgets that make up the interface for our simple application we use Qt Designer to simplify the interface design. Qt Designer describes an interface in an XML format, to use this user interface definition in Python we need to use the user interface compiler pyside6-uic to convert it into Python code. Qt Designer allows us to visually design our interface, this is a much easier way of constructing an interface than doing this same job by hand. The XML file we created for this tutorial is available here.
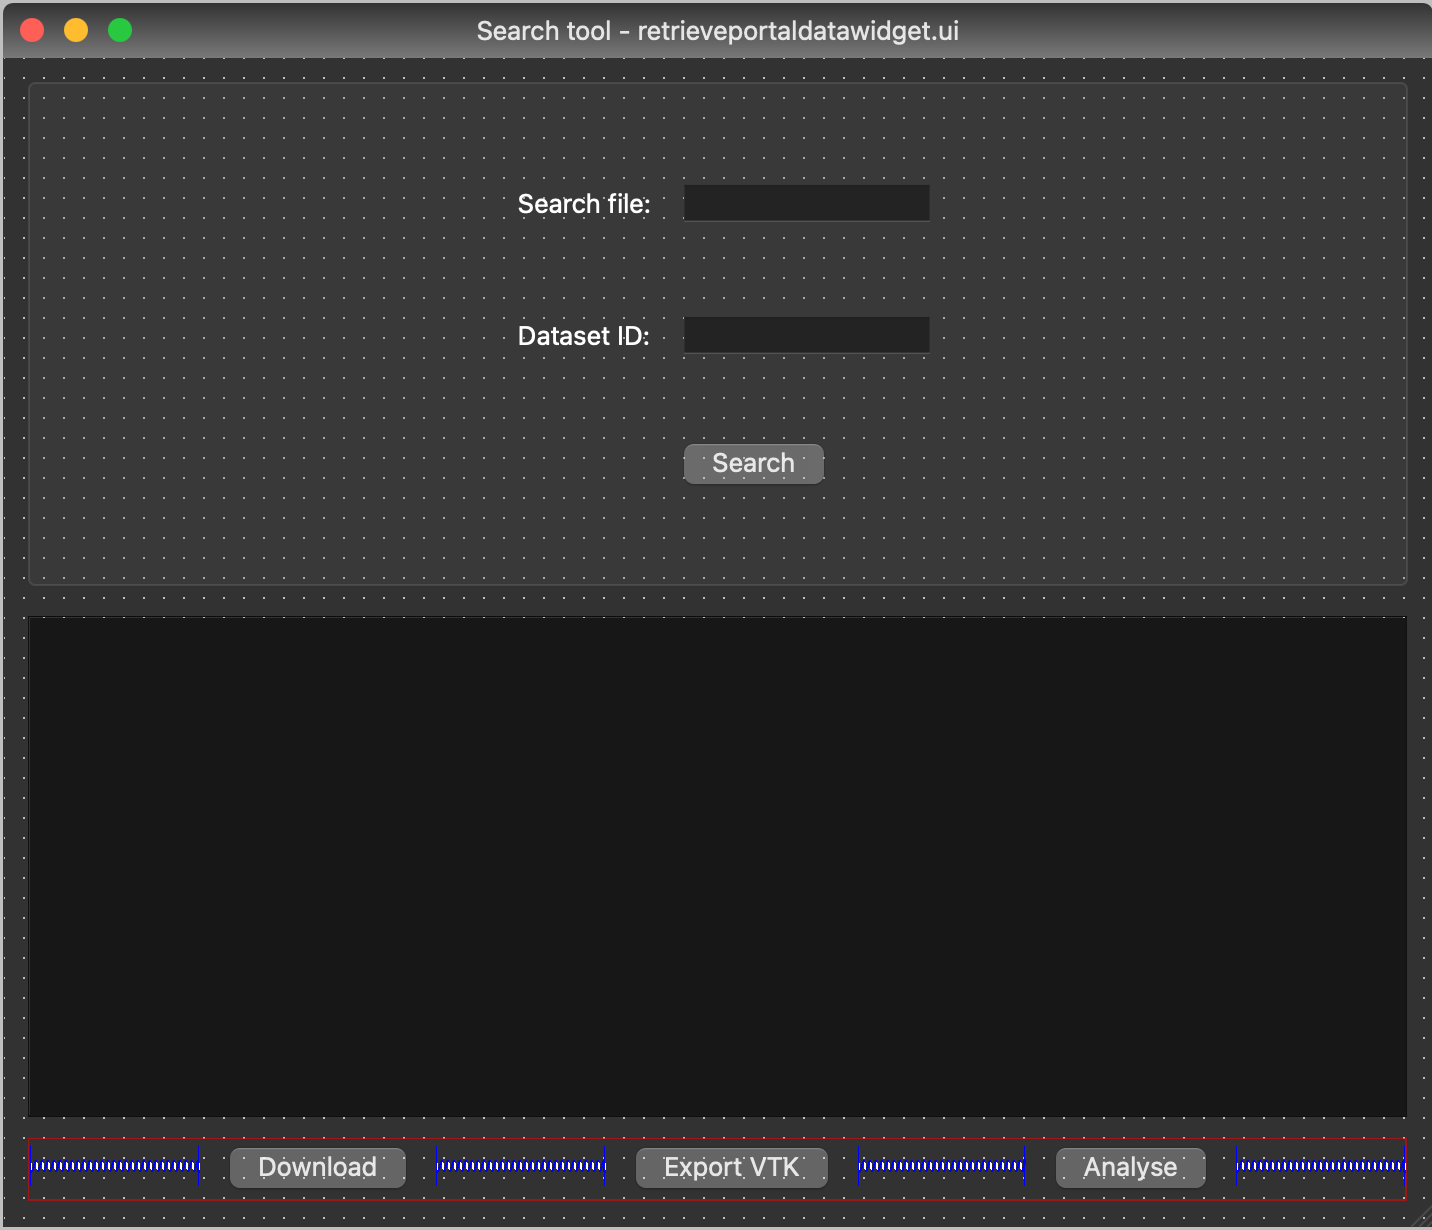
Figure 1: Qt Designer rendition of interface widgets laid out.
To create the python module needed by the application we compile the XML user interface description to python with the following command:
pyside6-uic qt/retrieveportaldatawidget.ui -o src/ui_retrieveportaldatawidget.pyHere we assume that the current directory is the root directory of the SPARC search tool repository we cloned during setup and that the virtual environment the software is installed into is currently active.
The entry point for the software is encapsulated much the same as a C++ application might be created. The implementation of user interaction with the application is separated into its own python module retrieveportaldatawidget.
The file main.py constructs the application object, constructs the interface, shows the user interface, and runs the event loop. There is also a small bit of python code to handle the different ways a python script can be called.
main.py
import sys

from PySide6.QtWidgets import QApplication

from retrieveportaldatawidget import RetrievePortalDataWidget


def main():
    app = QApplication(sys.argv)
    widget = RetrievePortalDataWidget()
    widget.show()
    sys.exit(app.exec())


if __name__ == '__main__':
    main()
The implementation of the application interface is a little longer and we will break it down into manageable chunks to explain each section. (The complete implementation of the application interface is available in the file retrieveportaldatawidget.py.)
The first thing we do is import the packages from the libraries we are going to use. The PySide6 library handles all the application widgets, we import our interface from ui_retrieveportaldatawidget, and we import the services and helpers that we are using from the sparc.client library.
from PySide6 import QtGui, QtWidgets

from ui_retrieveportaldatawidget import Ui_RetrievePortalDataWidget

from sparc.client.services.pennsieve import PennsieveService
from sparc.client.zinchelper import ZincHelper
The PennsieveService package facilitates searching and downloading files from Pennsieve, while the ZincHelper package aids in analyzing and exporting dataset files compatible with other SPARC tools. These two packages do all the work the rest helps to present information to the user.
When we construct the RetrievePortalDataWidget, we initialise the variables used in storing data, setup the user interface, prepare the services the application uses, and setup some event listening and interface management.
class RetrievePortalDataWidget(QtWidgets.QWidget):

    def __init__(self, parent=None):
        QtWidgets.QWidget.__init__(self, parent)

        self._model = None
        self._selection_model = None
        self._list_files = None

        self._ui = Ui_RetrievePortalDataWidget()
        self._ui.setupUi(self)

        self._pennsieve_service = PennsieveService(connect=False)
        self._zinc = ZincHelper()

        self._make_connections()
        self._update_ui()
The next two methods that we will look at are simple methods that setup the applications response to the user clicking buttons and making selections. We also look at here how we modify the state of the user interface based on changes to the data presented to the user and the users response to the data.
    def _make_connections(self):
        self._ui.pushButtonSearch.clicked.connect(self._search_button_clicked)
        self._ui.pushButtonDownload.clicked.connect(self._download_button_clicked)
        self._ui.pushButtonExportVTK.clicked.connect(self._export_vtk_button_clicked)
        self._ui.pushButtonAnalyse.clicked.connect(self._analyse_button_clicked)

    def _update_ui(self):
        ready = len(self._selection_model.selectedRows()) > 0 if self._selection_model else False
        self._ui.pushButtonAnalyse.setEnabled(ready)
        self._ui.pushButtonDownload.setEnabled(ready)
        self._ui.pushButtonExportVTK.setEnabled(ready)
        self._ui.comboBoxAnalyse.setEnabled(ready)
The next methods that we will look at are the methods that get called when a button on the interface is clicked. This is where the sparc.client is used to actually interact with the SPARC eco-system.
When the search button is clicked we simply call the _retrieve_data method. When the download button is clicked the Pennsieve service is used to download the selected file. When the VTK button is clicked the Zinc helper is used to create a VTK export from an MBF Biosciences source file. And when the analyse button is clicked both the Pennsieve tool and the Zinc helper is used to download a file and analyse the file and report on whether it is suitable for fitting to a Zinc Scaffold or not.
    def _search_button_clicked(self):
        self._retrieve_data()

    def _download_button_clicked(self):
        indexes = self._ui.tableViewSearchResult.selectionModel().selectedRows()
        for index in indexes:
            self._pennsieve_service.download_file(self._list_files[index.row()])

    def _export_vtk_button_clicked(self):
        indexes = self._ui.tableViewSearchResult.selectionModel().selectedRows()
        for index in indexes:
            self._zinc.get_mbf_vtk(self._list_files[index.row()]['datasetId'], self._list_files[index.row()]['name'])

    def _analyse_button_clicked(self):
        indexes = self._ui.tableViewSearchResult.selectionModel().selectedRows()
        for index in indexes:
            QtWidgets.QApplication.setOverrideCursor(QtCore.Qt.CursorShape.WaitCursor)
            try:
                self._pennsieve_service.download_file(self._list_files[index.row()])
                try:
                    organ = self._ui.comboBoxAnalyse.currentText()
                    result = self._zinc.analyse(self._list_files[index.row()]['name'], organ)
                except ValueError:
                    result = "Input file must be an MBF XML file"
            finally:
                QtWidgets.QApplication.restoreOverrideCursor()

            dlg = QtWidgets.QMessageBox(self)
            dlg.setWindowTitle("Analyse result")
            dlg.setText(result)
            dlg.exec_()
The retrieval of data from the SPARC Portal requires a bit of manipulation to get the reported information into a relatively nice presentation for the user. The _retrieve_data and _set_table methods perform this work. The _set_table method is conforming the data to suit the PySide6 QTableView widget and the Qt documentation does a good job of this so we will not repeat that here. The _retrieve_data method again makes use of the Pennsieve service to download all files that match the user inputted filename. Here we limit the response to 100 entries, we have other options that we could follow here, pagination, lazy loading, etc. but for this simple tool we will omit this type of functionality.
    def _set_table(self, file_list):
        self._model = QtGui.QStandardItemModel(0, 3)
        self._model.setHorizontalHeaderLabels(['Filename', 'Dataset ID', 'Dataset Version'])
        for row in range(len(file_list)):
            item = QtGui.QStandardItem("%s" % (file_list[row]["name"]))
            self._model.setItem(row, 0, item)
            item = QtGui.QStandardItem("%s" % (file_list[row]["datasetId"]))
            self._model.setItem(row, 1, item)
            item = QtGui.QStandardItem("%s" % (file_list[row]["datasetVersion"]))
            self._model.setItem(row, 2, item)

        self._ui.tableViewSearchResult.setModel(self._model)
        self._ui.tableViewSearchResult.horizontalHeader().setStretchLastSection(True)
        self._ui.tableViewSearchResult.horizontalHeader().setSectionResizeMode(QtWidgets.QHeaderView.ResizeMode.ResizeToContents)
        self._selection_model = self._ui.tableViewSearchResult.selectionModel()
        self._selection_model.selectionChanged.connect(self._update_ui)

    def _retrieve_data(self):
        # Get user’s input
        filename = self._ui.lineEditSearch.text()
        dataset_id = self._ui.lineEditDatasetID.text()
        # Use sparc.client to retrieve files
        self._list_files = self._pennsieve_service.list_files(
            limit=100,
            query=filename,
            dataset_id=dataset_id,
        )
        # Display the search result in a table view.
        self._set_table(self._list_files)
That in about 100 lines of Python code is an application that can interact with the SPARC Portal and provide a way for users to connect either other parts of the SPARC eco-system or their own data pipelines.
In the following sections we will cover how the search tool works from the user interface perspective.
Search SPARC Data
This section demonstrates how the simple search tool for finding files in Pennsieve works.
- Launch the search tool.
- With the virtual environment activated we can run a command for a terminal type application like so (from the root directory of the local Python client search tool repository):
-
python main.py
- Search for datasets: Utilize keyword search and filters to identify datasets matching your mapping needs.
- For example we could wish to search for data related to mice

- Preview details: View information such as filename, dataset ID, and dataset version.

Figure 3: Display of the response from the SPARC Portal given a search term of mice.
Download files from Pennsieve
This section details downloading the chosen datasets from the search results:
- Refine your search: Apply additional filters if needed.

Figure 4: Python client search tool with a search term of mice and a refinement to only search dataset 314.
- Select desired files: Choose the files you need from the search results list.
- Click the download button: Initiate the download process. The download button will download the selected file to your local computer.

Figure 5: Python client search tool highlighting a selected entry in a query response, and the Download button.
Export MBF segmentation file as VTK file
This section demonstrates exporting the MBF segmentation data as a VTK file:
- Select files: Choose the desired file(s) from the search results.
- Click the export VTK button: Initiate the export process. This will automatically retrieve the data and create the VTK file.

Figure 6: Python client search tool highlighting a selected entry in a query response, and the Export VTK button.
Downloading the dataset file is not necessary, as these functions automatically handle the data retrieval. After successfully running the code, you can find an VTK file named '208_mice_atria_TH_tracing.vtk' in your current directory.
The exported VTK file can be viewed in any VTK viewer.
Analyze MBF XML file
For the selected file, we can use sparc.client to analyze the file and check if it's suitable for Scaffold fitting or mapping.
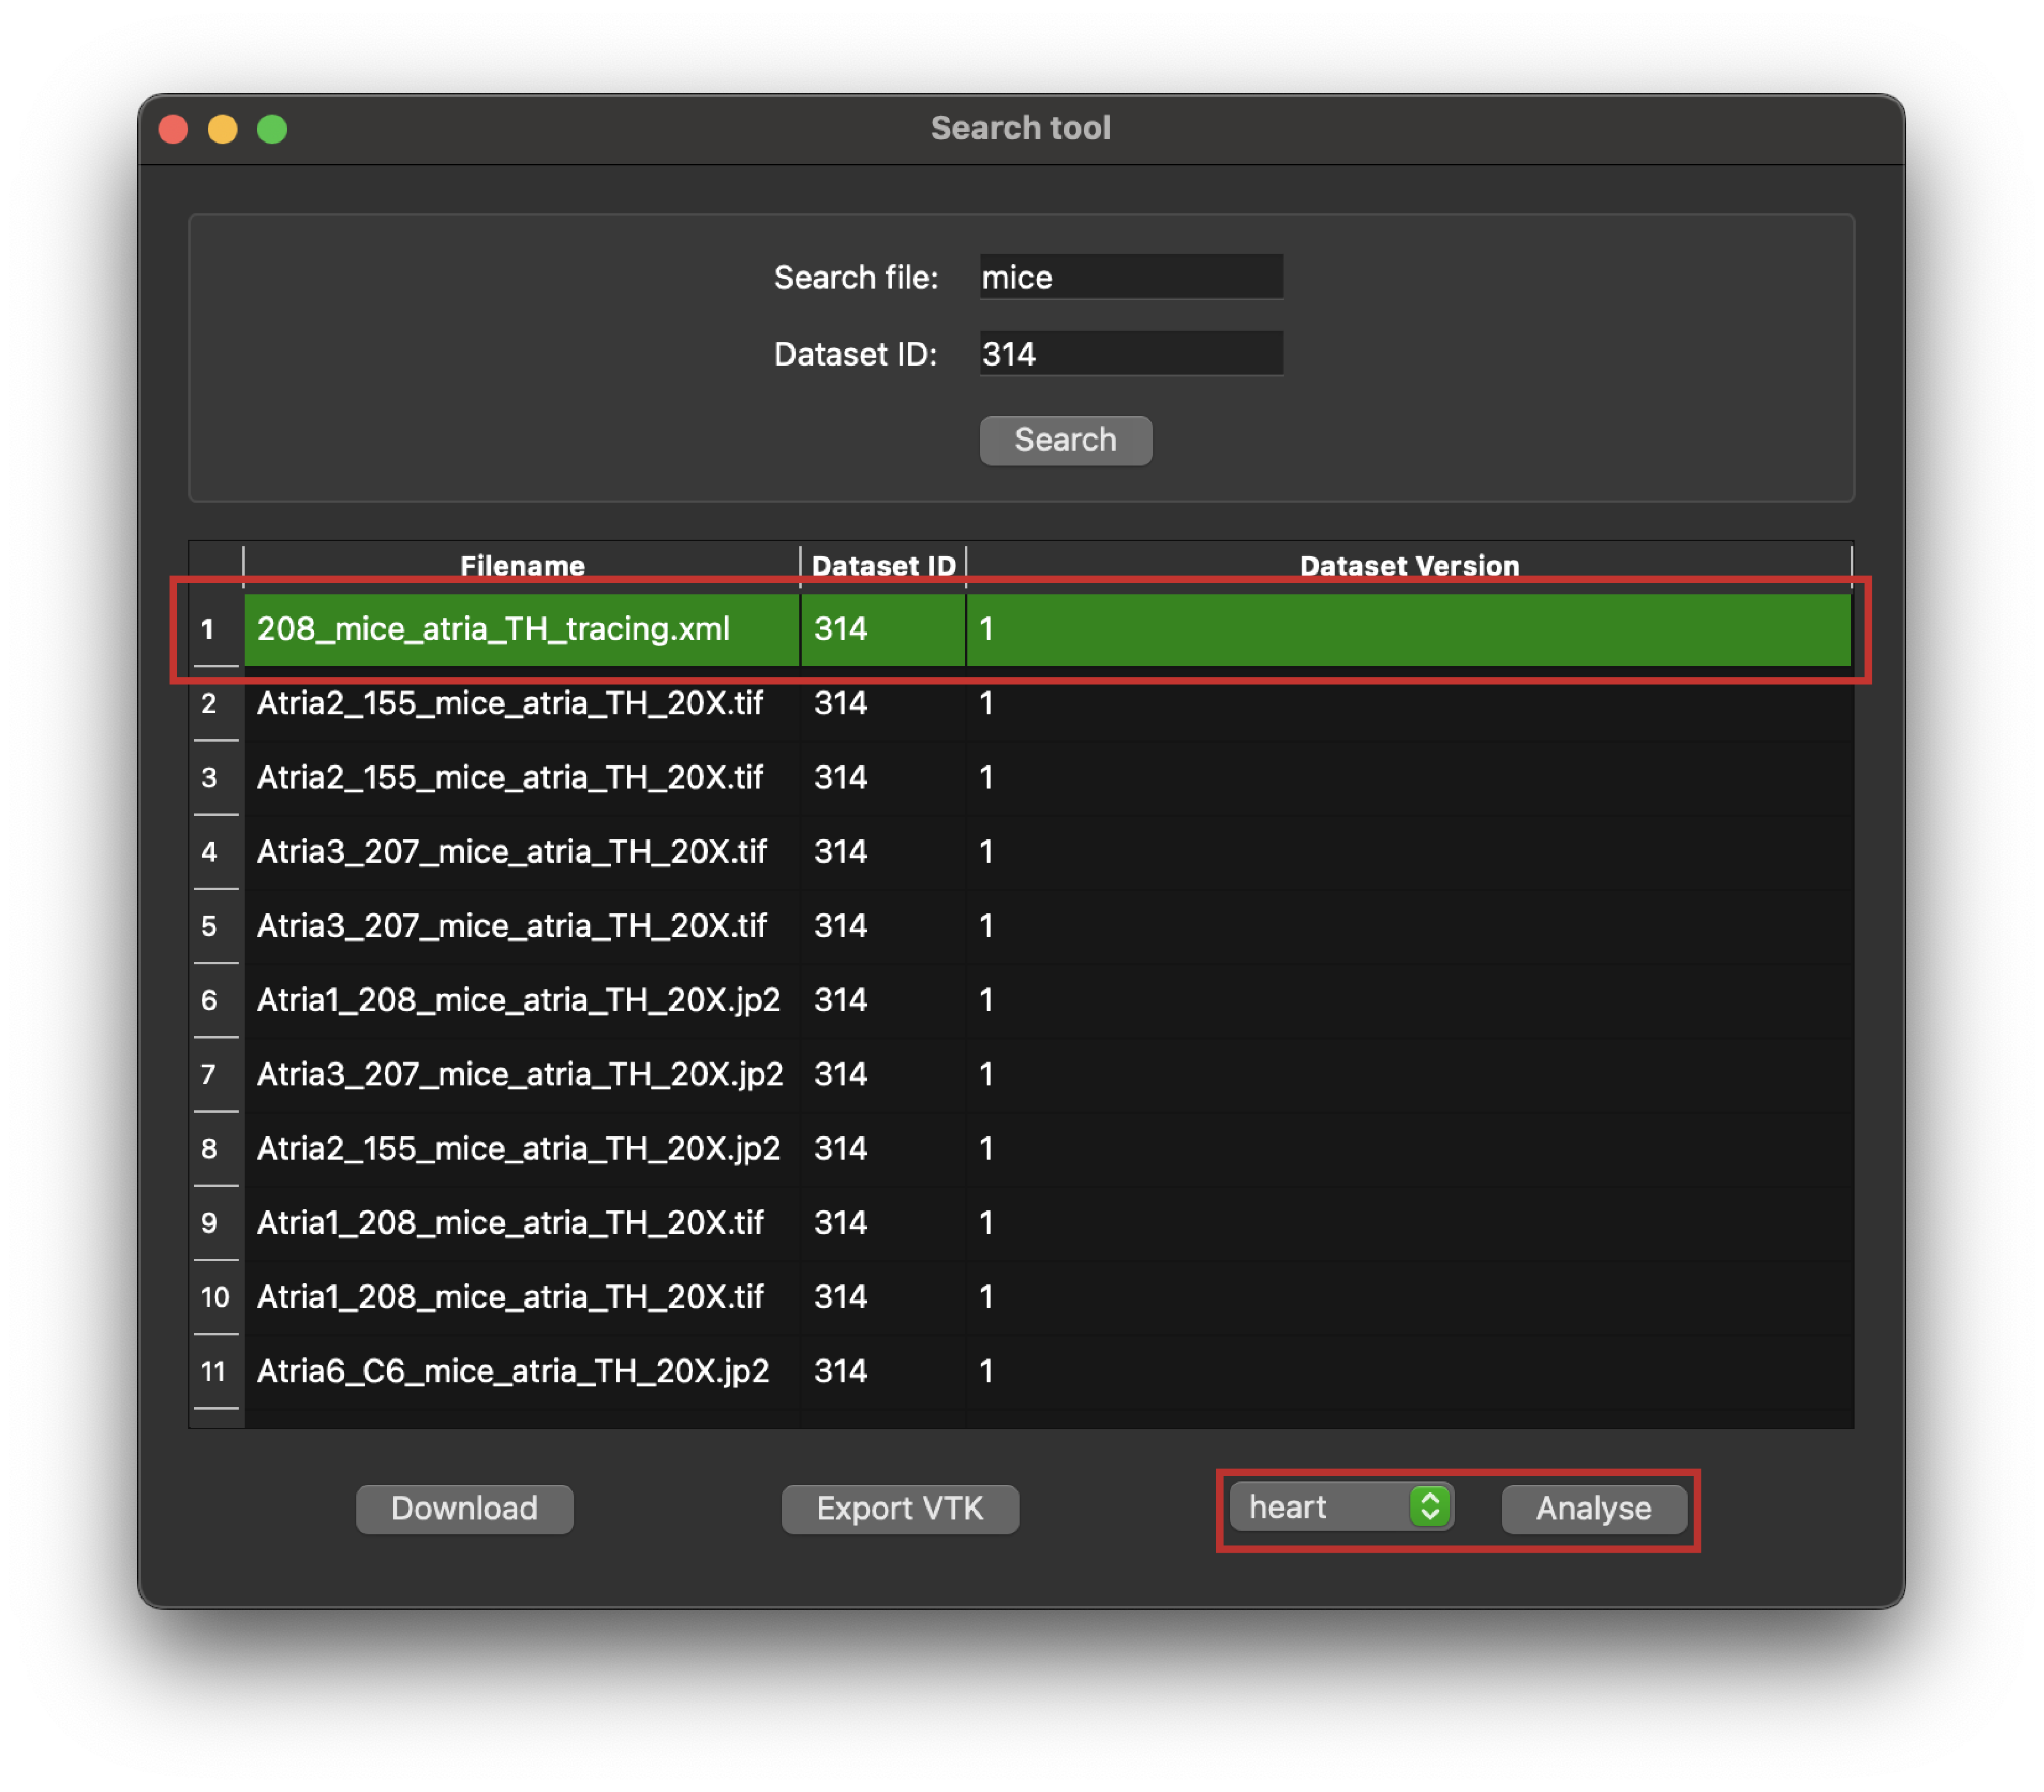
Figure 7: Python client search tool highlighting a selected entry in a query response, the organ selection box, and the Analyse button
By matching the selected file and an organ correctly we will get a positive response on the suitability of fitting or mapping the selected file with MAP Client mapping tools. In this tutorial, we use the '208mice_atria_TH_tracing.xml' as an example. So in the_organ selection box we choose "heart" as the appropriate organ Scaffold for analyzing the file against. This operation can take a little time if the data file is complex.

Figure 8: Python client search tool showing the result of analysing an MBF Bioscience XML file.
Map downloaded MBF XML file in MAP Client
For the downloaded MBF XML file, if the analysis results indicate that it is suitable for mapping, we can visualize and map it in the mapping tool.

Figure 9: MAP Client mapping tools showing a workflow with a configuration dialog open showing the configuration of a File Chooser step with the File input highlighted and the Ok button highlighted.
To configure the location of the MBF XML file providing the data to embed, follow these steps:
- Launch MAP Client Mapping Tools
- Configure the workflow
- Right-click on the File_Chooser icon and click on the Configure option or left-click on the red gear icon to open the Configure Dialog pop-up window.
- Select the downloaded MBF XML file using the file selection tool.
- Click the "OK" button.
- Run the workflow
- Select "Execute" from the workflow menu or click the "Execute" button at the bottom right.

Figure 10: MAP Client mapping tools ScaffoldMaker step showing the default visualisation of an MBF Bioscience mouse heart segmentation.
NoteThis tutorial primarily focuses on using sparc.client to export data files for seamless data manipulation. More details about using the Scaffold Mapping Tools can be found here.
Conclusion
By effectively utilizing sparc.client, you can streamline your dataflow within the SPARC eco-system. This tutorial illustrates how tools in the SPARC eco-system can be used to extend or create new functionality to suit the users own requirements.
Updated about 1 year ago