Create Your Protocol
Learn how to write an open protocol for SPARC using Protocols.io
This document is part of a series related to the Data Submission to SPARC Process:
Every dataset published on the SPARC Portal MUST have a published protocol associated with it. One way to do this is to publish a protocol manuscript, another way is to publish your protocol using Protocols.io.
Benefits of the Protocols.io platform:
- It allows collaborative development of protocols.
- It promotes consistency of protocols.
- Protocols are stored in the industry standard archive and backed up just like manuscripts.
- It is easy to cite protocols (DOI is easily available, and versions are used).
- Protocols can be referenced in manuscripts (in Materials and Methods and/or References).
- Protocols can be reviewed and published in PLoS One.
- And the best part – it’s free to you, and you can use your protocols beyond SPARC!
Checklist
Open Checklist
But first, let’s check to make sure you’ve done everything up to this point:
-
Talked to curation team -
Requested access to the appropriate Pennsieve workspace - Experimental protocol has been created on Protocols.io
- All required metadata files have been completed
- Temporary link to unpublished protocol has been added to dataset_description file
- All folders/metadata files are named as set forth in the SDS file system
- All subject & sample names are CONSISTENT across all references in the SDS
- All human subjects have been de-identified
- All data, metadata and associated files/info have been organized into the SDS file system
- All experimental data has been organized by subject and sample in the Primary Folder
- All required top-level folders include required manifest files
- Dataset has been uploaded onto Pennsieve
- Verify the completeness of the upload
- Dataset has been submitted for review
Completed all the checked boxes? Continue onward!
Steps
This part is a bit confusing, so before we get nitty gritty, we wanted to provide a quick overview of the steps:
- Create an account on Protocols.io
- Talk to the Curation team to determine if you need to link to a specific workspace.
- Write your protocol but DO NOT publish it or reserve the Digital Object Identifier (DOI), because once you publish and get a DOI, no more edits can be made.
- Get the shareable link for the protocol, then place the link in your “dataset_description” metadata file. DO NOT publish the protocol.
- Curation team will review and make suggestions for your protocol to be more consistent with other investigators in the project.
- Publish protocol: Once reviewed for completeness and consistency, you will be asked to publish the protocol and obtain a DOI (both of these are buttons that you press). Please let the curation team know that you have done this step so that we can update your dataset metadata files.
Before Getting Started
Before we go through the steps, there are some important things you need to know! Please be sure to read through all these, as they may save you much time and effort. I mean, have we steered you wrong so far?
Protocol Inclusion Requirements
Every protocol that will be accepted by the SPARC Curation Team must include the following:
- Title - must be specific to the dataset.
- Abstract- a brief description putting methods in context.
- Experimental design - include the number of subjects, groups, treatments, measurements, and inclusion/exclusion criteria.
- Species used in the study - provide vendor name, catalog numbers, and Research Resource Identifiers (RRIDs)*. The species given in the protocol must match the species described in the associated dataset.
- Reagents, equipment, and tools used in the study – provide vendor names, catalog numbers, RRID, and links to supplier websites.
- Techniques and methods used in the study - must match the associated dataset.
*RRIDs are ID numbers assigned to help researchers cite key resources (antibodies, model organisms, software projects, etc.) in the biomedical literature to improve the transparency of research methods. You can find the links to search or request RRIDs in the section Additional Resources below.
Digital Object Identifier
This has already been discussed but bears mentioning again. You will receive a DOI from Protocols.io when you officially publish the protocol. But you won’t publish at first – you’ll create a temporary link that the SPARC Team can use to review. Then, when given confirmation from us, you’ll publish to get the DOI.
Once received, the DOI should be provided to the SPARC Curation team immediately via email so the “dataset_description” metadata file and the Pennsieve website can be updated before the dataset publication.
Step 1: Join a Protocols Workspace
Alright, with all that in mind, it is time to create and upload your protocol! As mentioned, these concurrent steps all relate to how to do that through the Protocols.io platform.
- Before you can join the dedicated SPARC or RE-JOIN workspace, you need to create an account.
- Once your account has been created, send a request to join the appropriate workspace (i.e., SPARC or RE-JOIN). The workspace administrator, Anita Bandrowski, monitors membership, and you can reach out to her via email ([email protected]) or with a Protocols.io message. In the request, be sure to include the email you used to create the account.
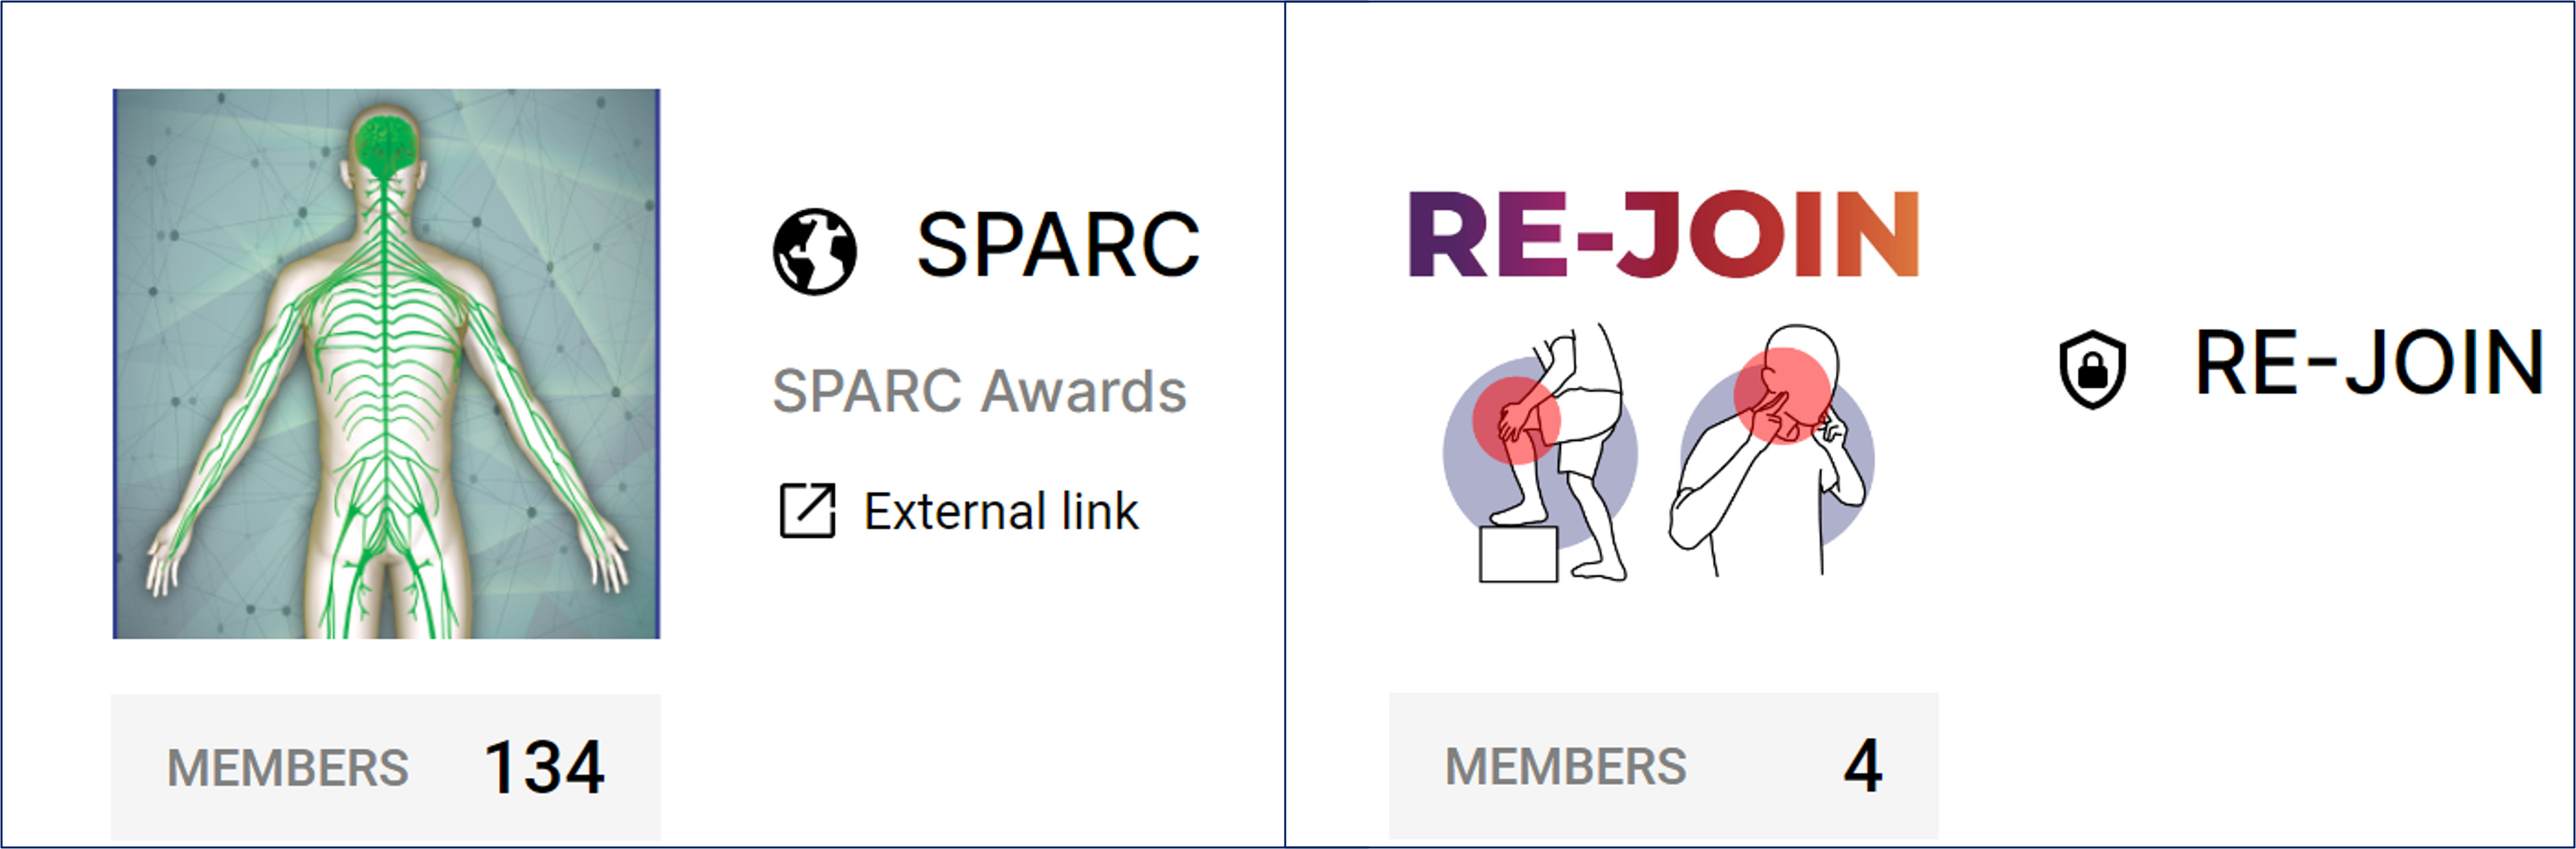
Please note, if you can’t find the official SPARC or RE-JOIN workspace, please do not create one – contact the Curation Team instead ([email protected]) and you will be assisted.
Once your request is accepted, you will see the SPARC or RE-JOIN workspace listed on the left panel under your workspaces in the Protocols.io platform.
Step 2: Create a New Protocol
Now that you can access the workspace, you can create your protocol!
As you get started, keep in mind the platform saves changes automatically, so you needn’t worry about that. You can also preview your protocol at any time by hitting the “View” button. Then, just hit the “Edit” button to get back to editing.
And at the end of this step:
- DO NOT PUBLISH your protocol.
- Share your protocol with your Principal Investigators, granting them permission to edit, share, and publish the protocol.
Follow the workflow below, which will walk you through the four main sections in the Protocols.io template – Steps, Description, Guidelines & Warnings, and Materials. If your experiment requires multiple protocols, you will complete these steps for each protocol first, then create a Collection, which is discussed in our SPARC Data FAQs.
-
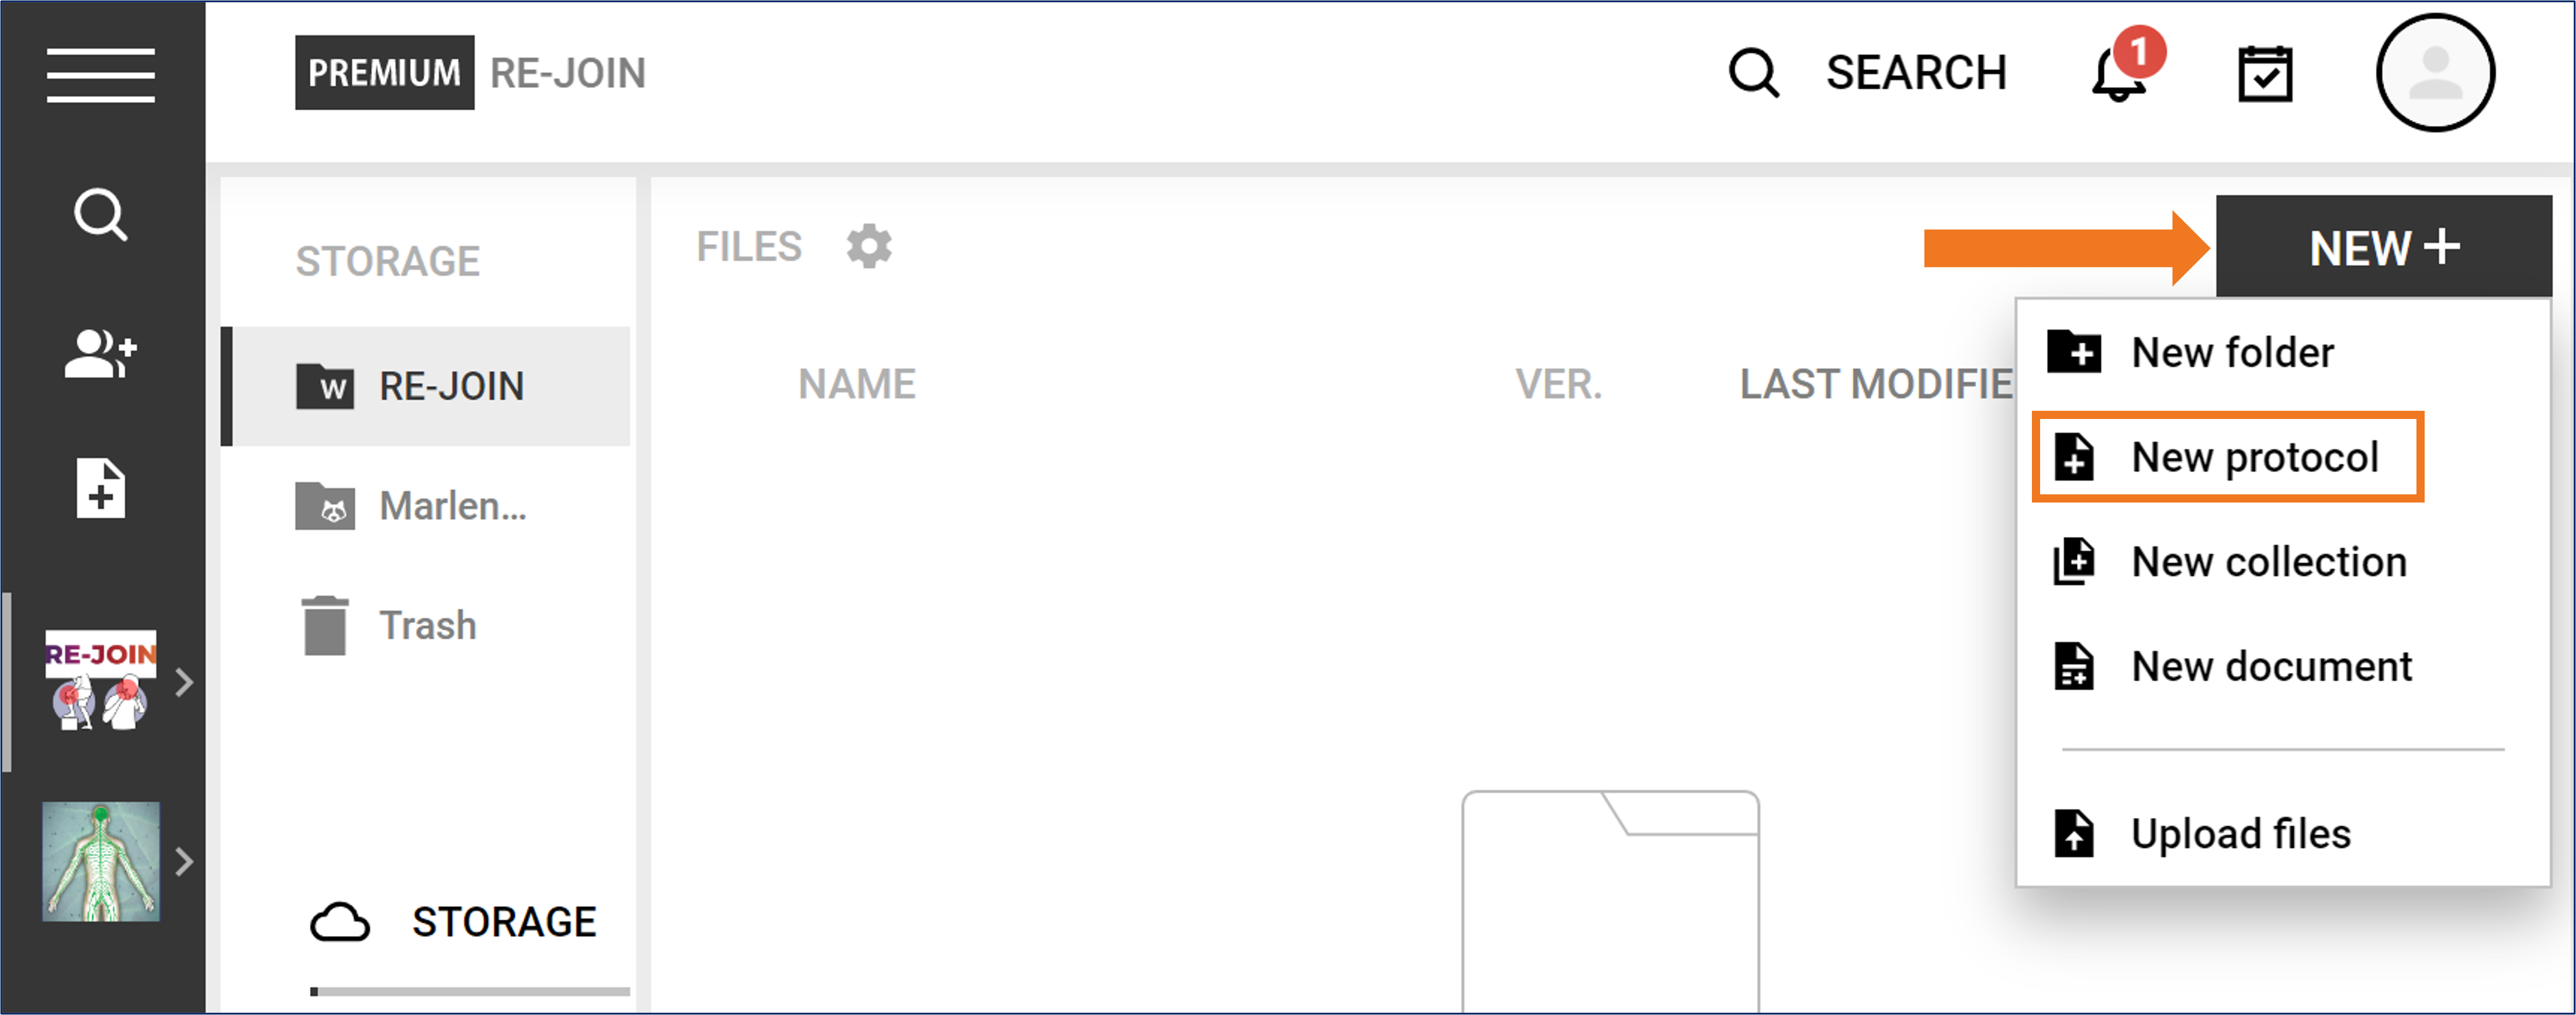
Log in to your Protocols.io account.
-
Click the “NEW +” button in the upper right corner of the screen.
-
Choose “New Protocol” from the drop-down menu.
-
In the pop-up window, click on the arrow next to “workspace” to choose the appropriate workspace folder and hit “CONTINUE.”
-
Choose “Generic,” then click “Create”.
-
Add a descriptive title.
- Avoid abbreviations for anatomical regions and techniques.
- Do not include the lab name or grant number.
- Include information on the technique used, species, and purpose.
-
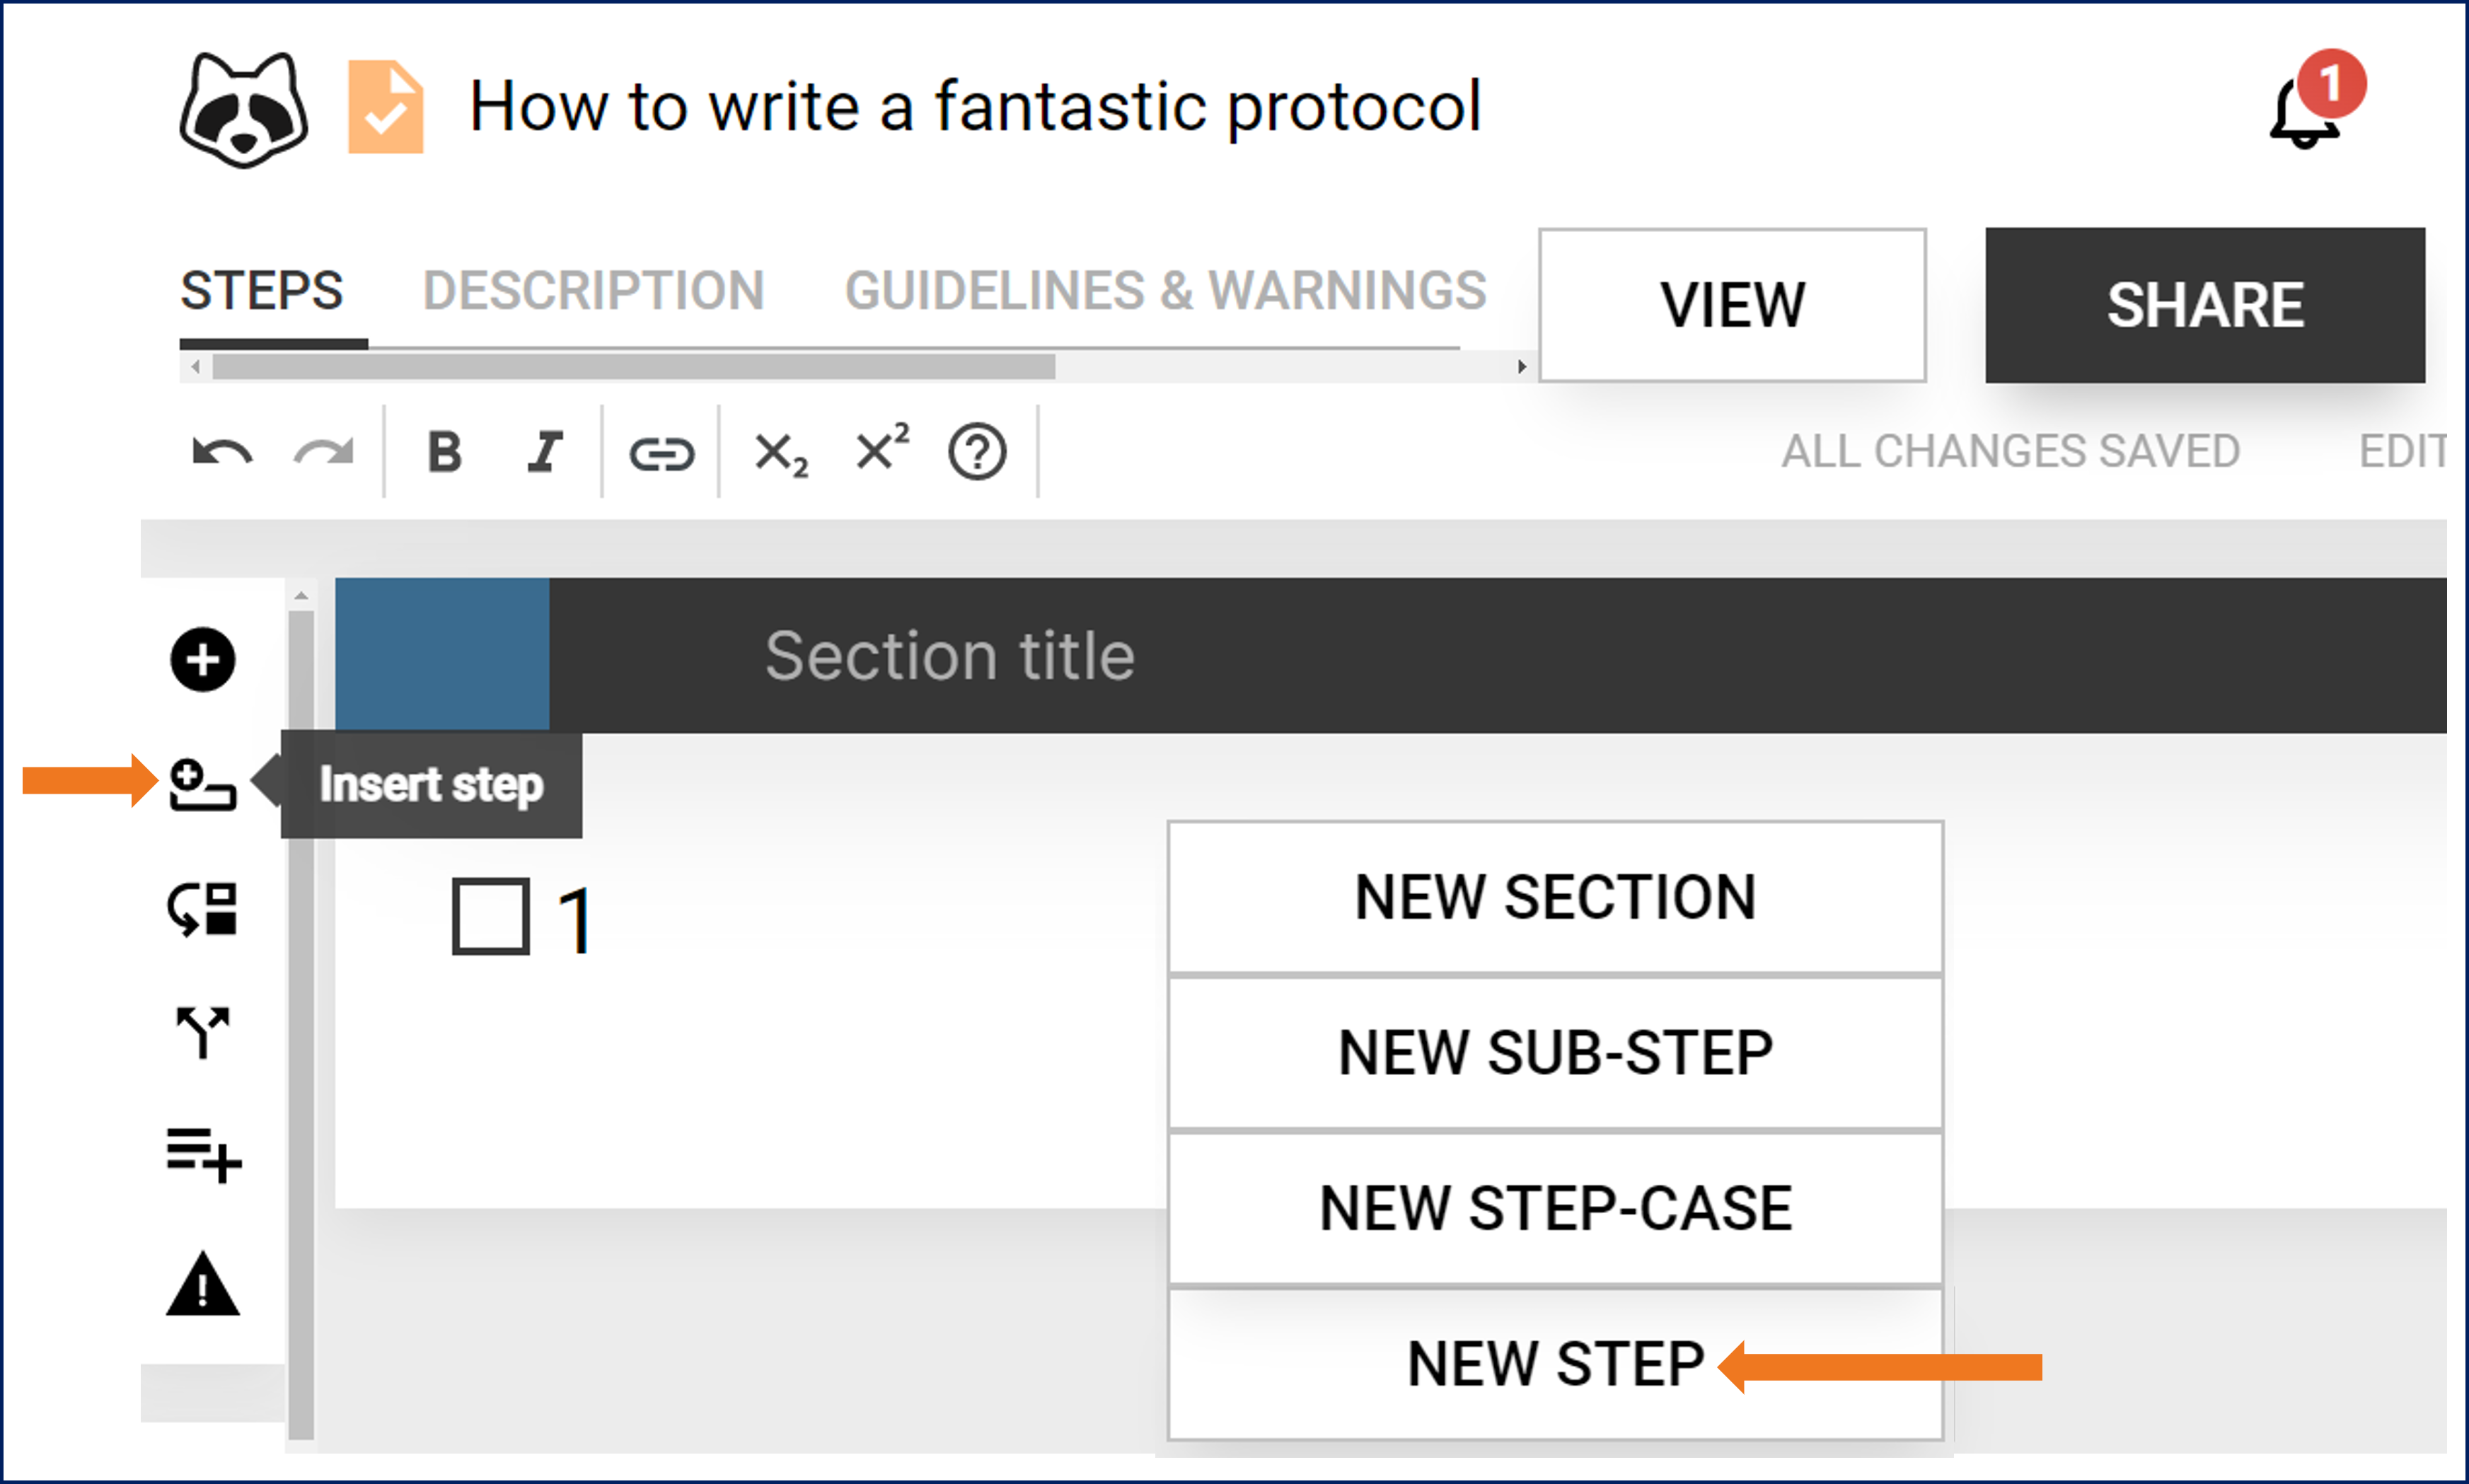
Click the Steps Tab to write and edit the main body of the protocol.
- To add a new step or new section, hover over the “NEW STEP” button and choose accordingly. Alternatively, hover over the icons on the left side of the protocol and click the insert section or step icon.
-
If adding a new section, add a section title.
-
Enter text in the field of Step 1.
- You can also add photos and movies if applicable.
-
Repeat step 6a – 6d for all steps (and sections of steps) of your protocol.
-
Click the Description Tab to:
- Add authors and their affiliations.
- Add a thumbnail image for your protocols.
- Add an abstract providing a brief summary of the protocol.
- Add keywords.
- Add a full citation if the protocol is part of a published manuscript.
-
Click the Guidelines & Warnings Tab
- In the “Guidelines” field, provide any useful information complementing the protocol (references, guidelines, etc.).
- In the “Before Starting” field, add information the reader should have before starting the experiment.
- This section will appear before the first step of the protocol.
- In the “Safety Warnings” field, enter any hazards and safety precautions.
- In the “Ethics Statement” field, you need to indicate to future users of your protocol that ethic approval should be obtained before performing experiments. You also must include if you obtained approval for the protocol, and if so, include the name of the IACUC or equivalent committee, and any relevant permit numbers.
- Check the “Sensitive Content Warning” box if the protocol has graphic content some people may find disturbing.
- Check the “Confidential Warning” box if the content of your protocol is confidential, or protected by property rights.
-
Click the Materials Tab
Step 3: Get Link and Add to ‘Dataset_Description’ File
At this point, your protocols are ready for review! Remember, you won’t be publishing until after review.
IMPORTANT: DO NOT click the option to “Reserve DOI.” This reserves a DOI without officially publishing the protocol to keep it private until publication, but even if the DOI is obtained in this way, the protocol can’t be edited. So don’t choose this option.
Instead, we are going to create a link that you can include in your “dataset_description” file:
- In Protocols.io, click the “SHARE” button.

- In the pop-up window, click the link icon in the upper-right corner (next to the x).
- Copy the private link from the “Shareable link” window.

- Paste the link into the “dataset_description” file in the “Related protocol, paper, dataset, etc.” section, in the line “Identifier”.
- One link per column starting from column D.

Step 4: Sharing Protocol with Principal Investigator
Many protocols are created by someone else other than the Principal Investigator (PI). If this is you, you will need to share your protocol with the PI. To do that:
- In Protocols.io, click the “SHARE” button
- In the pop-up window, in the “Share with email” box, type the PI’s email address and click “ADD”. You should see the email address listed in the “People with access” section.
- Hover over the eye icon to the right of the email address, and choose the “Can edit and publish” option.
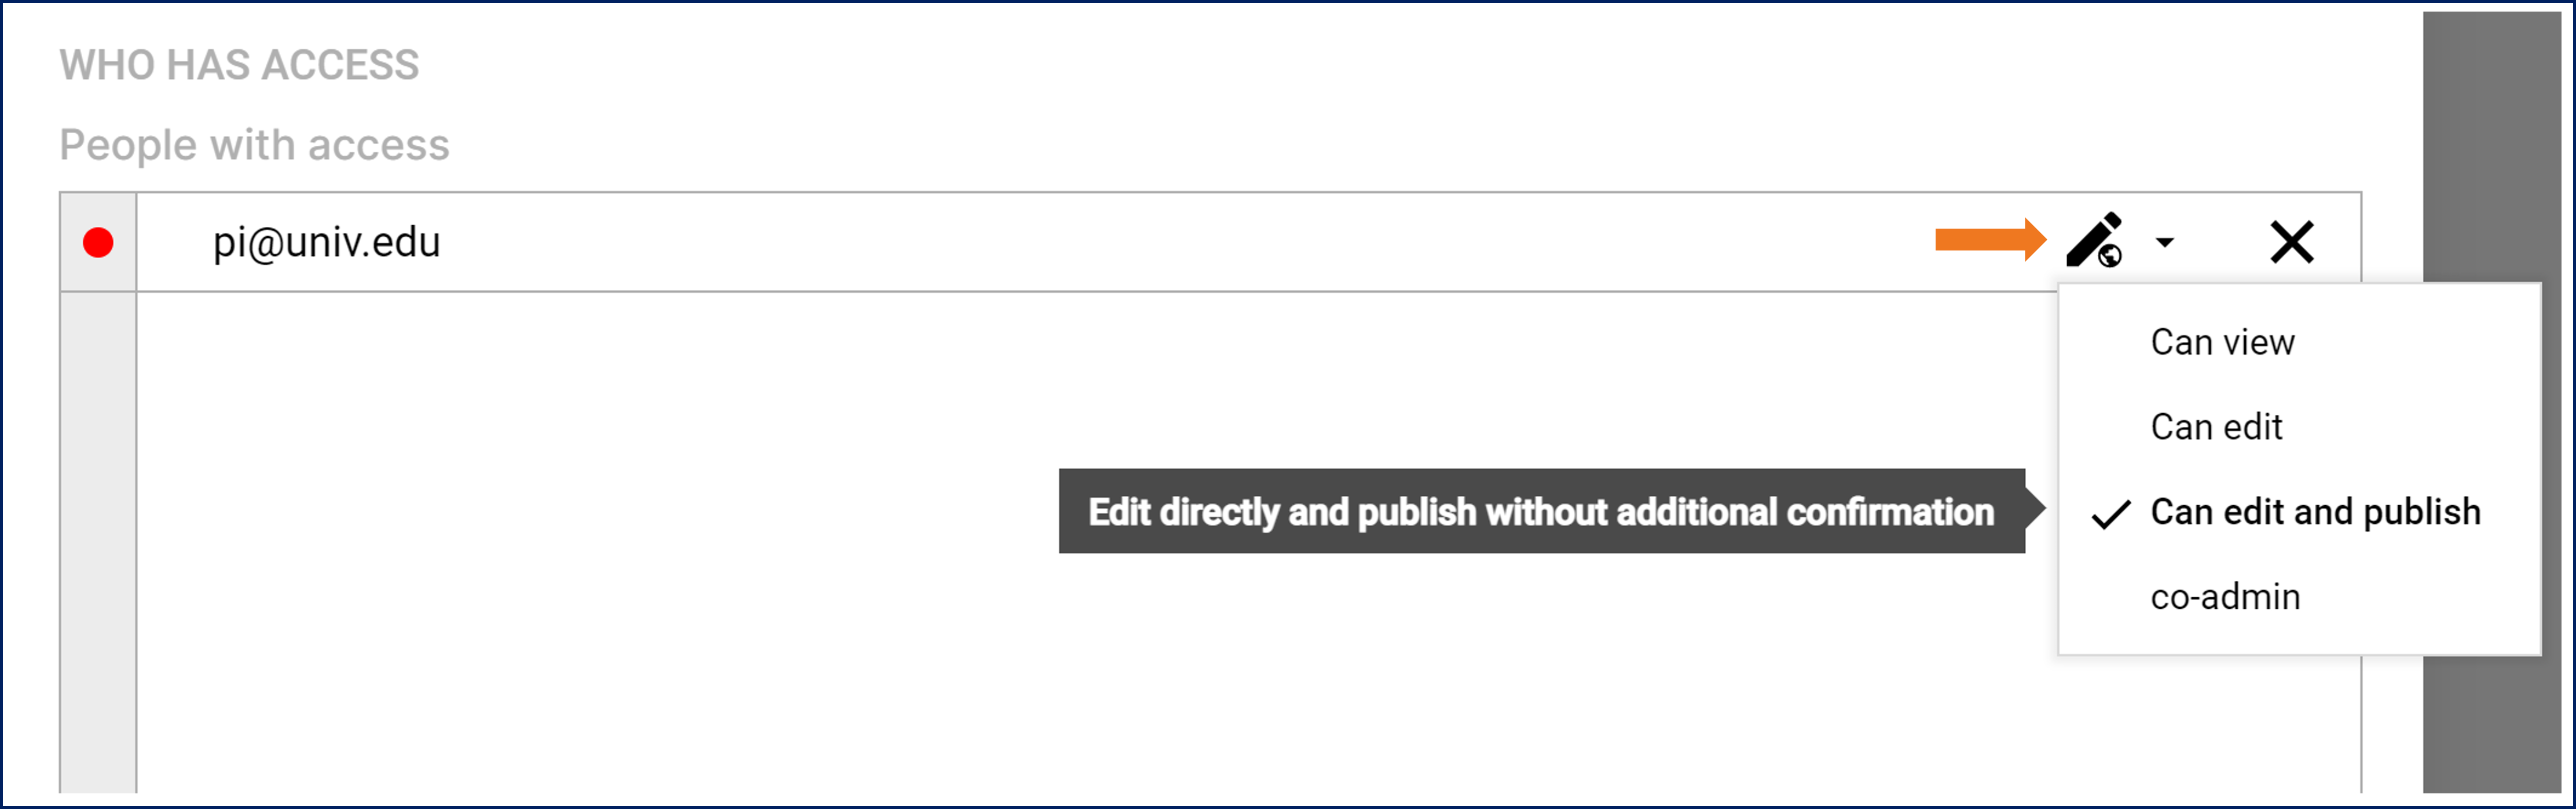
- Click "SAVE".
- Confirm that your PI has access to the protocol.
Moving on…Sort of
At this point, curators will review the protocol for metadata completeness and consistency with the other protocols in the project. This is expected to take a little time. But, it’s important to mention, you will be coming back to this page once you have received confirmation from the curation team that your protocol is good to publish.
Step 5: AFTER REVIEW - Publish Protocol
Once you have confirmation from the curation team please publish and share it in your Protocols.io workspace:
- Log in to Protocols.io and select the protocol you wish to publish.
- In Editing mode, click on the “MORE” button below the protocol title.
- Choose “Publish” from the dropdown menu.
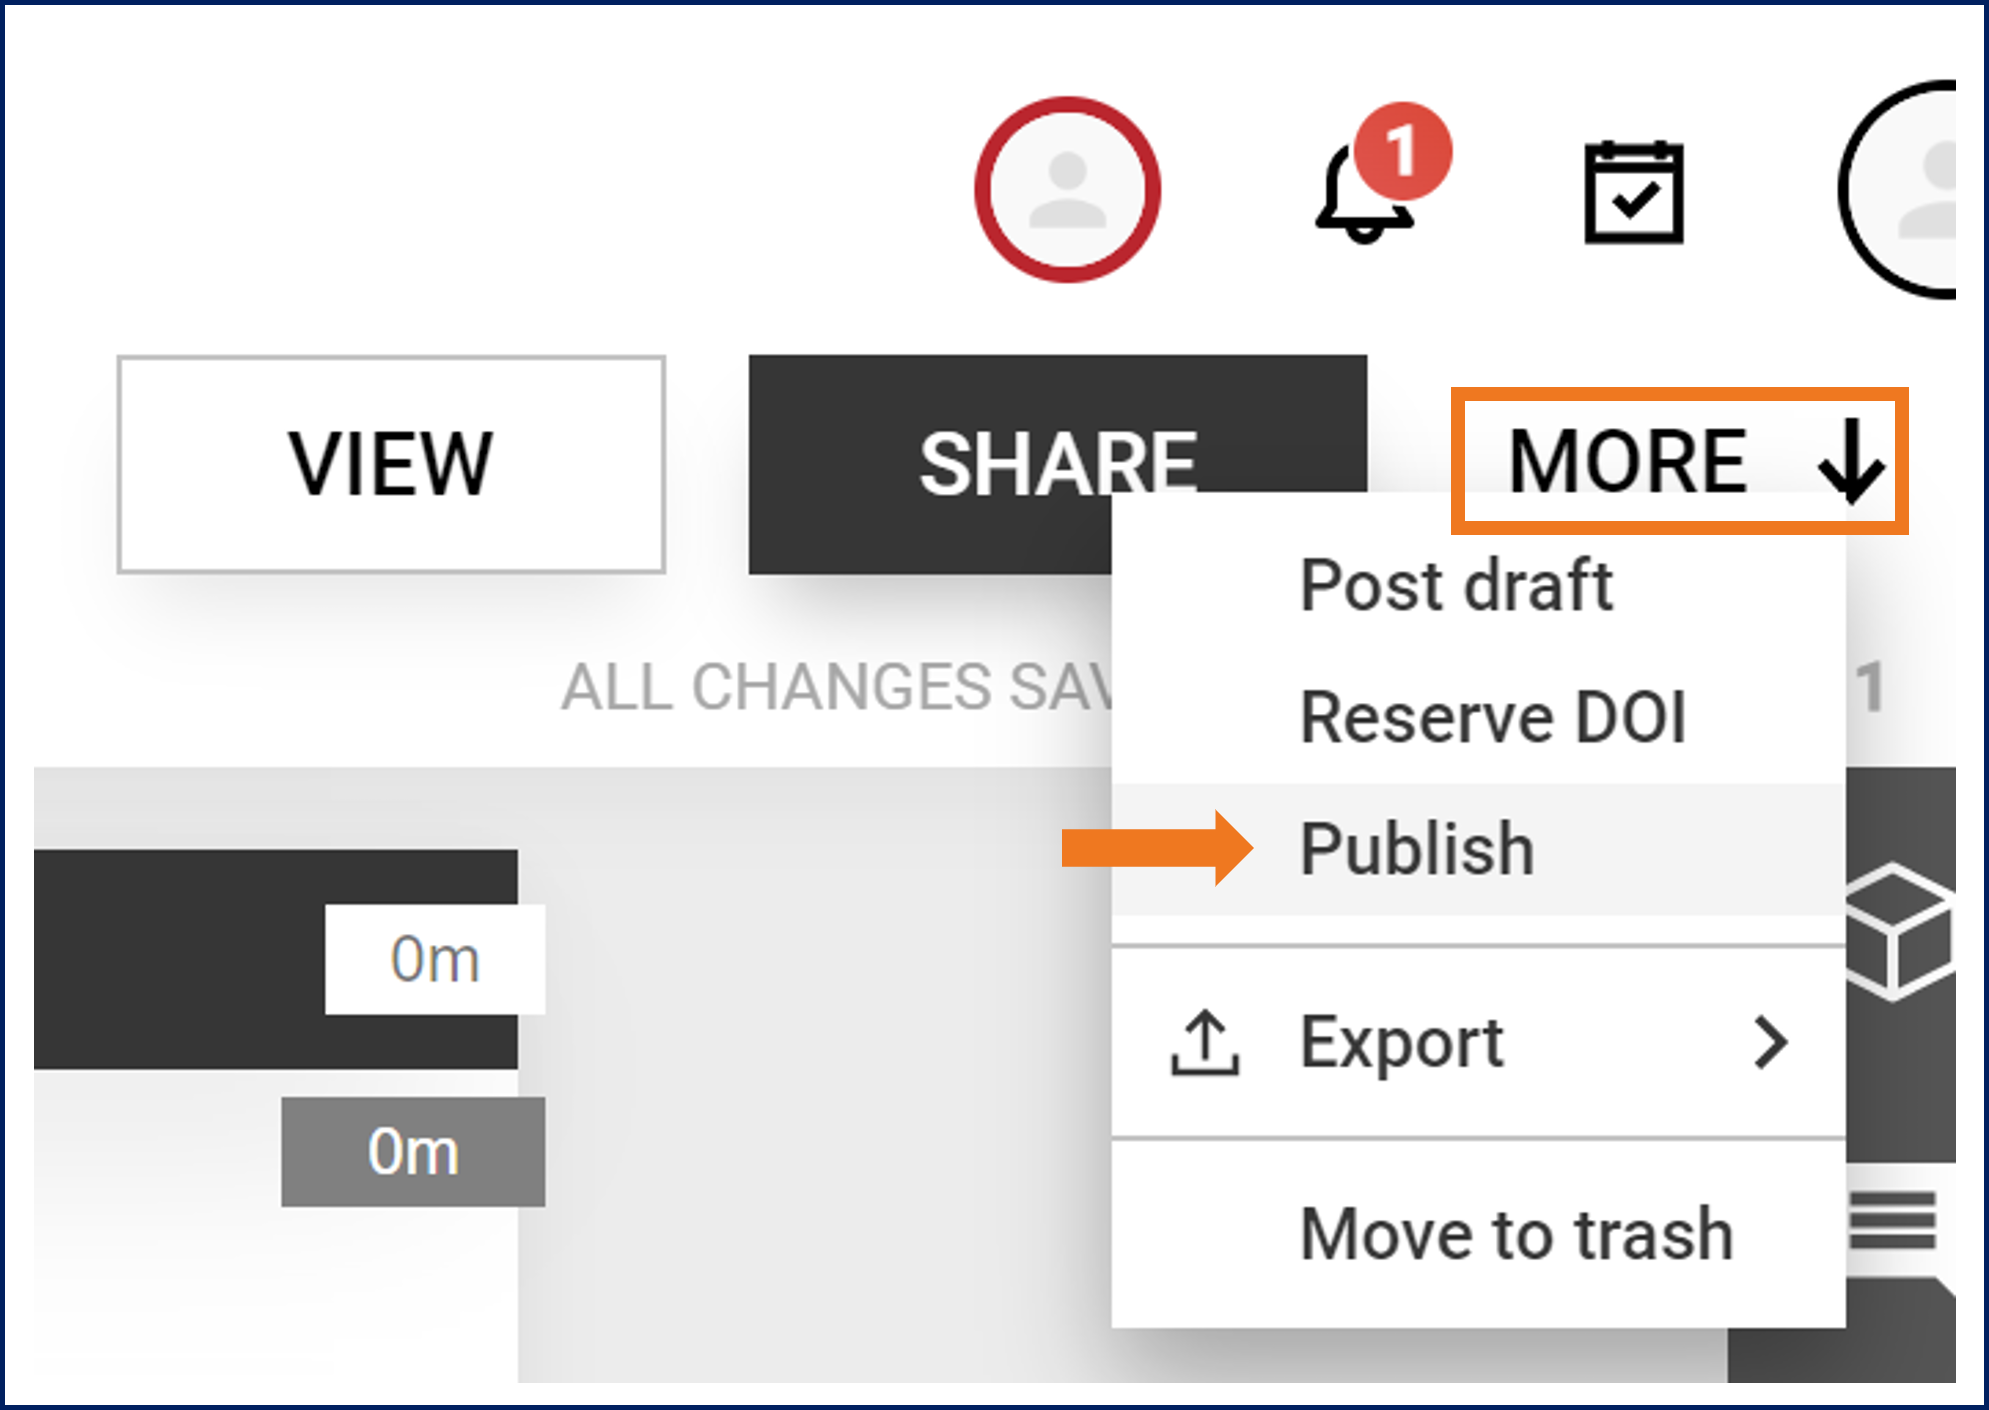
- Follow the prompts from the Publish Wizard.
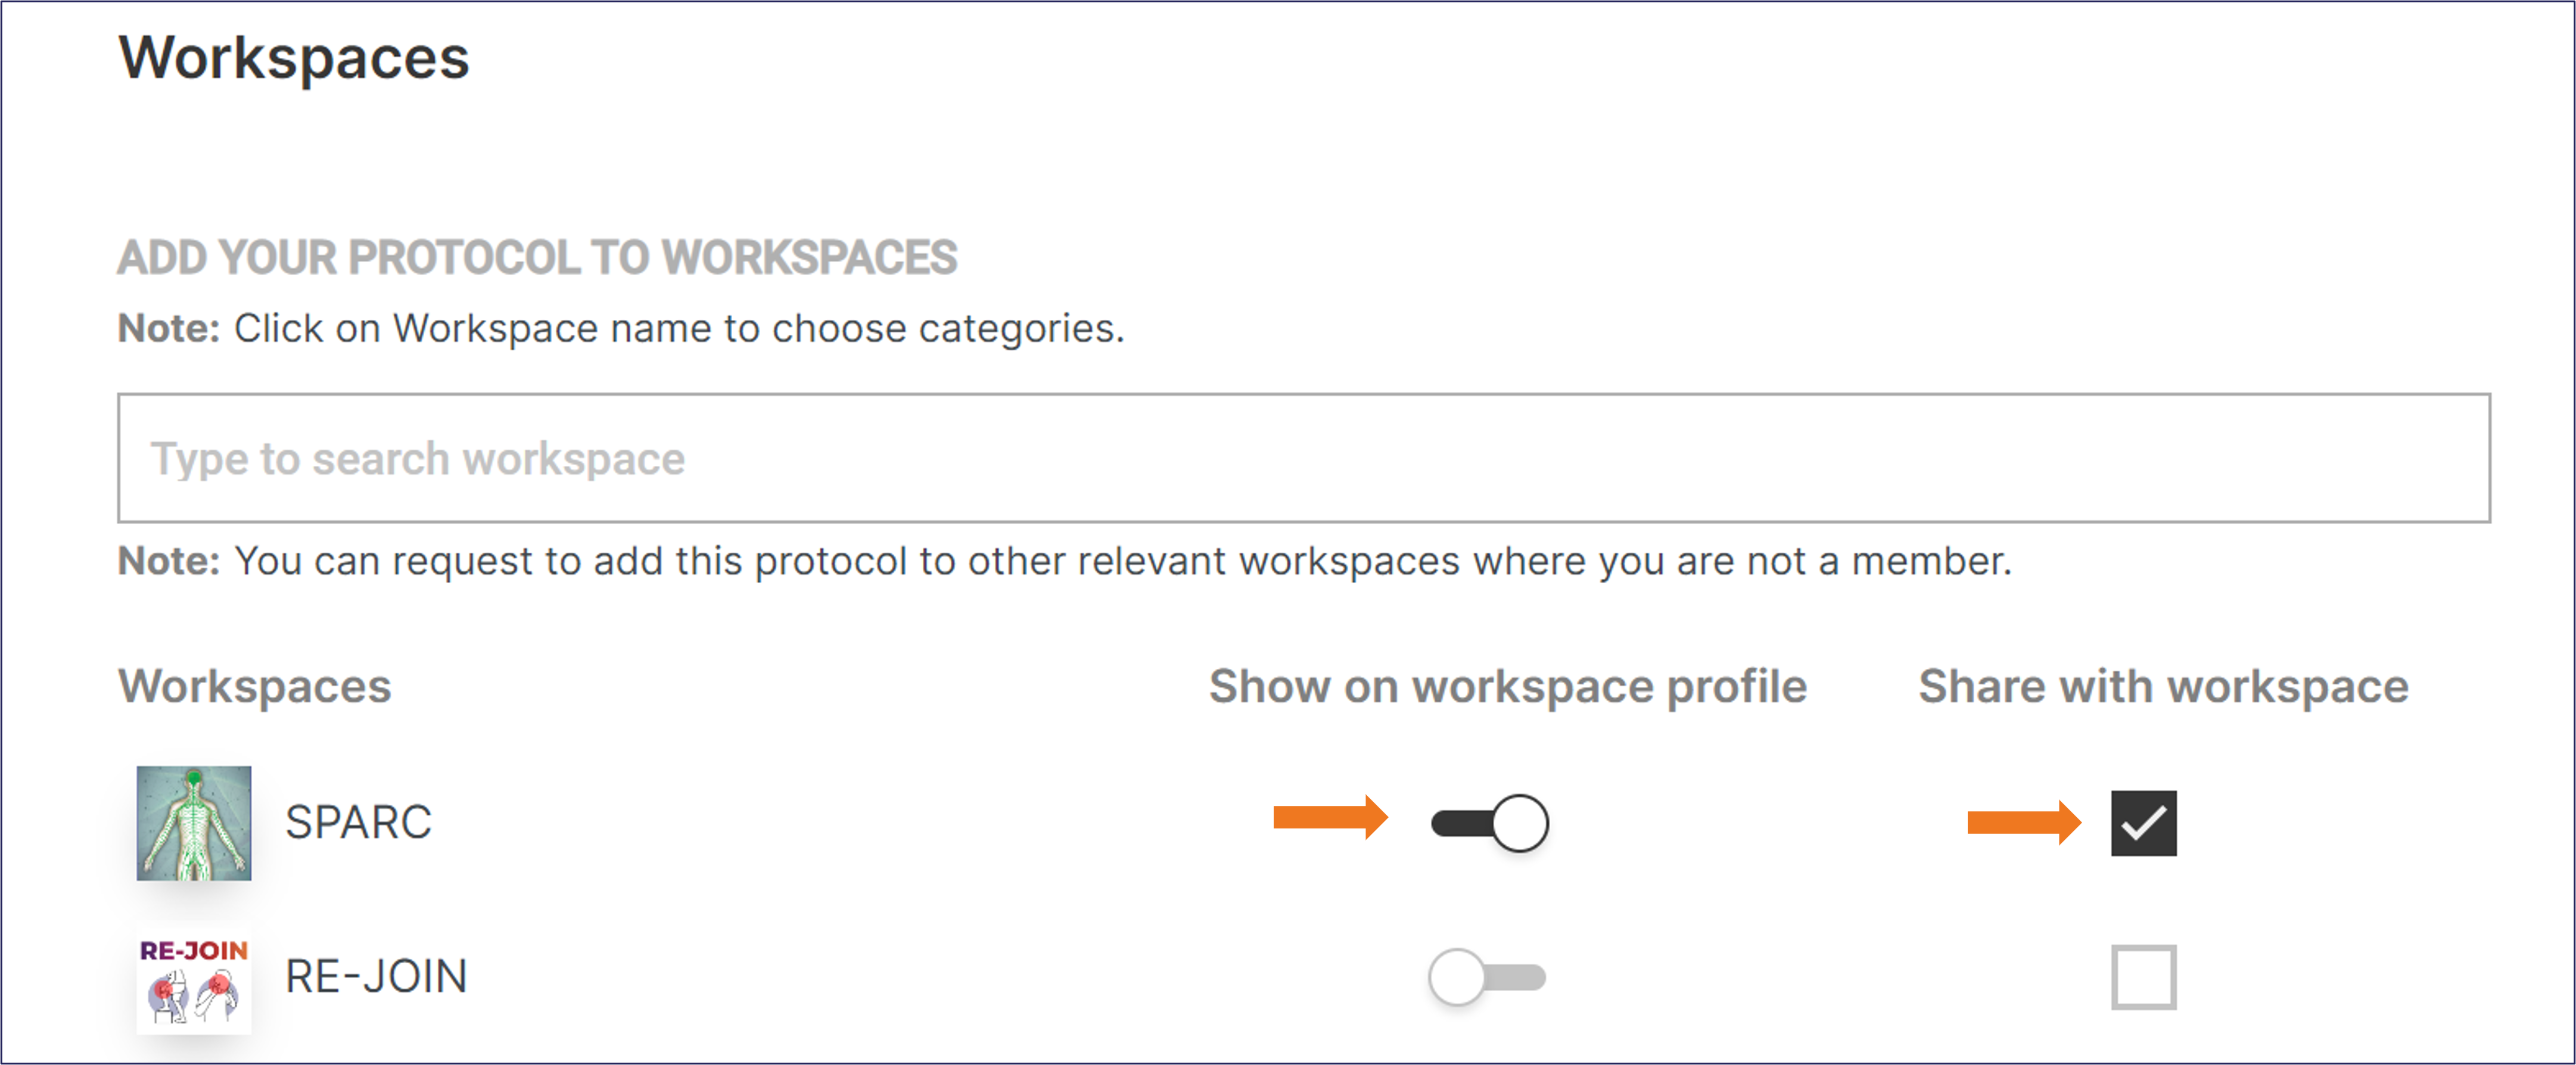
- When prompted with “Add Workspace,” type your workspace (SPARC or RE-JOIN) in the “Type to Search Workspace” line to share the protocol with the group*
- IMPORTANT: Before moving to the final step, make sure that:
- The slider under “Show on Workspace Profile” is marked black.
- You checked the box under “Share with Workspace".
- Publish and Receive DOI.
- Confirm on Protocols.io.
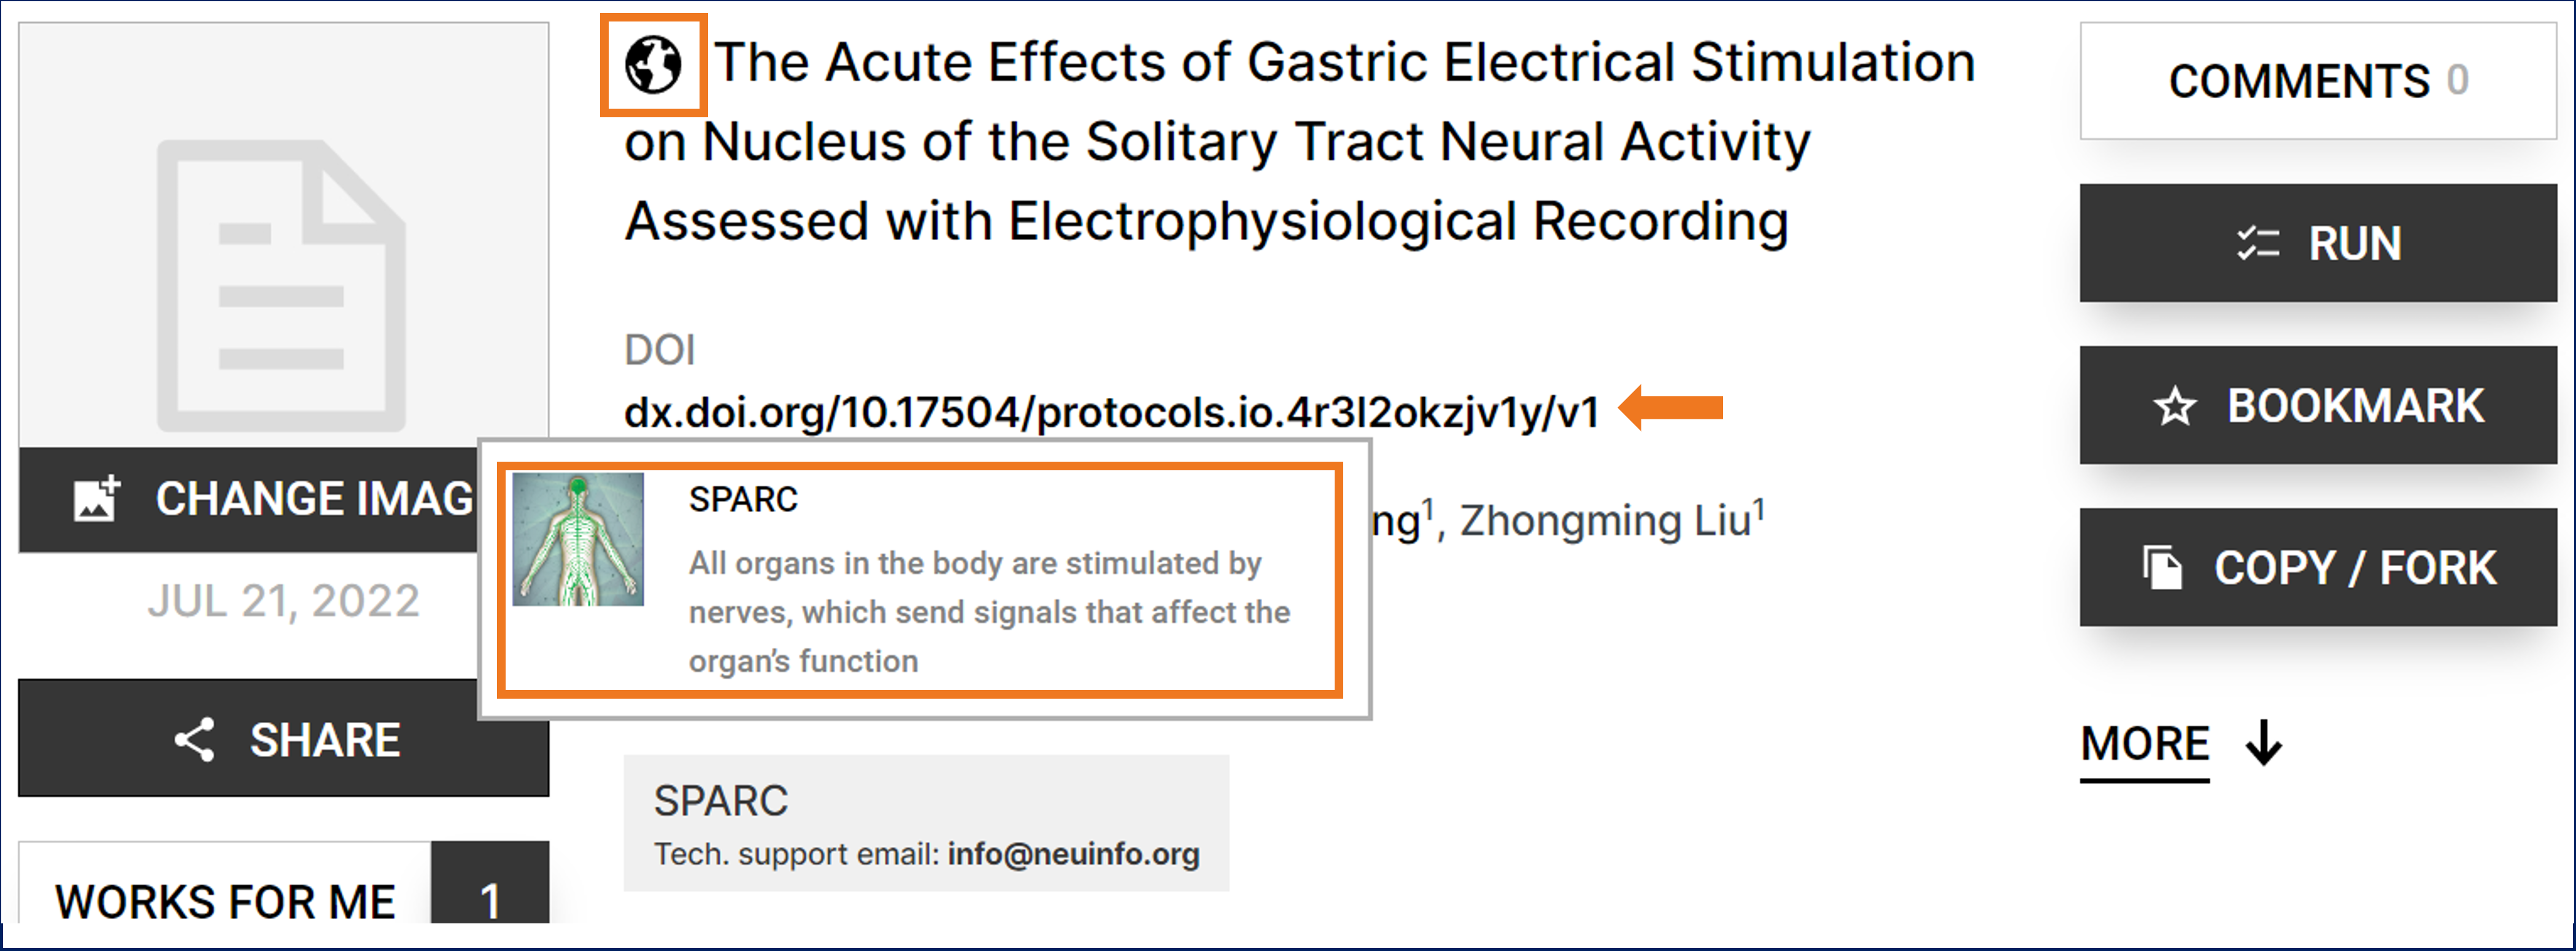
- All protocols properly published will have:
- The globe icon next to the protocol title.
- Workspace affiliation and logo when hovering over the workspace name.
- A DOI.
- All protocols properly published will have:
Please note, if you created the protocol outside of the workspace, you can also share with the correct group by clicking the “SHARE” button, then type the name of your group (for us SPARC or RE-JOIN) in the pop-up window. Hit save, and it’s shared!
Step 6: Send DOI to SPARC
The last step is the easiest! You just need to share your DOI by email to the SPARC Curation Team ([email protected]).
Please be sure to share that ASAP, as the “dataset_description” file will need to be updated, and the protocols will need to be annotated and linked. This all has to be done before publication of your dataset, so please send the DOI immediately!
Additional Resources
A list of additional resources you may find useful while creating and publishing your protocol:
- Should you have any questions or issues with the protocol process:
- Join us for our open office hours via Zoom (details here)
- Email [email protected].
- Read SPARC Data Submission FAQs.
- Visit protocols.io for additional help, tutorials, and webinars.
- To search or request RRIDs for antibodies, cell lines, organisms, and equipment, visit scicrunch.org/resources
- For Tools and General Resources on SPARC, click here.
Next Step
The next step is to start prepping your metadata! So if you’re ready, you can click here to get started.
Updated 11 months ago