Running a Cardiovascular System Model on o²S²PARC from the SPARC Portal
With this tutorial you will learn how to open, run and modify a computational dataset, which provides insights on the acute cardiac effects of vagus nerve stimulation. The model has been contributed by non-SPARC investigators at the Medical University of Vienna and published on the SPARC Portal. It can be interactively explored, execute and modified thanks to the the interactive coding environment provided by the o²S²PARC Platform. This model was also extensively covered in the webinar: From Models to Heartbeats: Computational Design of Vagus Nerve Stimulation for Cardiac Health.
Prerequisites
- An active o²S²PARC account: if you don't have an account on o²S²PARC, please go to https://osparc.io/ and click on "Request Account". This will allow you to take advantage of the full o²S²PARC functionality.
- Basic knowledge of the JupyterLab environment: if you wish to only run the code and visualize the results, you really need only the basics. See here for an introduction.
- Optional: basic Python knowledge: this is only required if you would like to customize the model or the visualizations.
Getting Started
Before starting, be sure to be logged in o²S²PARC (by visiting https://osparc.io/). If you are not logged in, you will see an error message prompting you to log in.
Then visit the dataset page on the SPARC Portal, it will appear as Figure 1 below.
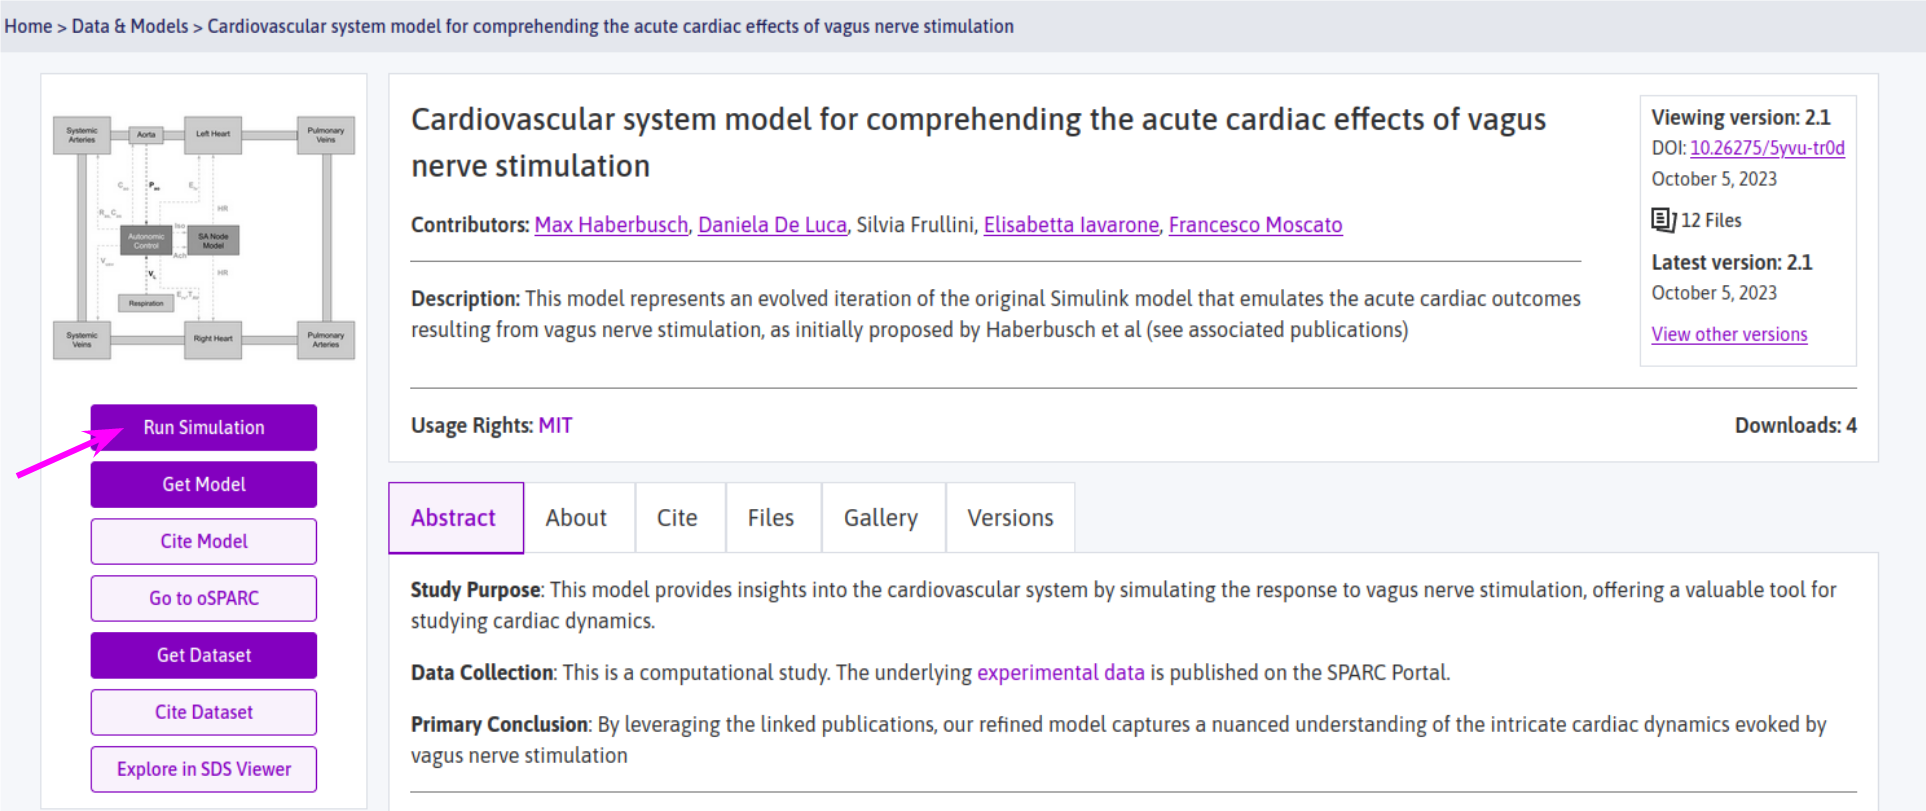
Figure 1: Cardiovascular system model dataset on the SPARC Portal
Then click on the Run Simulation button (see arrow in Figure 1). This will open an instance of the model on the o²S²PARC platform in a new browser tab.
Interacting With The Model On o²S²PARC
Once the model is ready, you will be inside the o²S²PARC platform and a README.ipynb file will be open. It provides some information on how to leverage the full functionality of JupyterLab inside o²S²PARC. You can learn more about different JupyterLab "flavors" in o²S²PARC in this webinar.
To run the model (Figure 2):
- Go to the left-most column (file browser)
- Double click on the
tutorial.ipynbfile
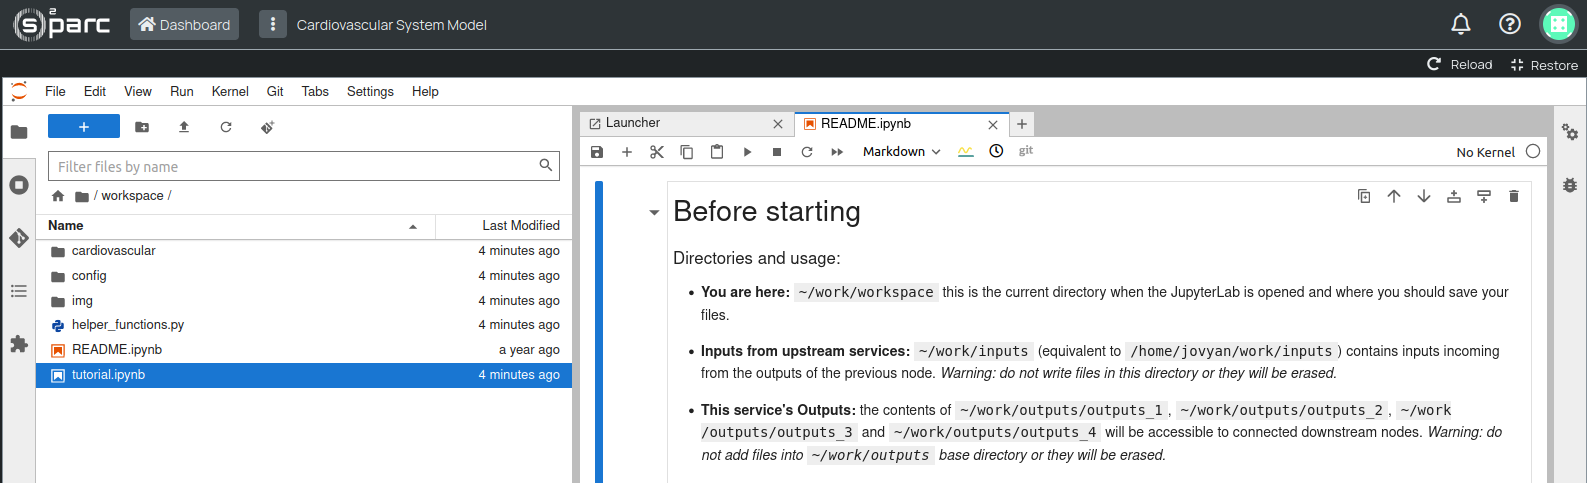
Figure 2: JupyterLab scripting environment on o²S²PARC
Did you know? "ipynb" stands for stands for “Interactive Python Notebook”. It is a file format used by Jupyter Notebook to store and share documents that contain live code, narrative text and much more)
Run A Simulation
You are now ready to learn more about the model and run simulations. Scroll down to learn more about the model (as shown in Figure 3). The data contributors have supplied explanatory text along with the code, thanks to the integration of the Markdown language in the Jupyter Notebook.
Figure 3: Jupyter Notebook with documentation and code to execute
Running the simulation:
- Go on the top menu (the one starting with "File", "Edit", etc..)
- Click on "Run"
- Then click on "Run All Cells"
This will run the model with the default parameters (see later how to modify them).
Simulation progress: once the simulation is launched, the execution of the notebook will stop at the "Perform the Simulation" step. The "[*]" on the left-hand side of the code block means that the simulation is running and you cannot yet execute the rest of the code (Figure 4).
The model has been written so that it is able to report the simulation progress, which is visualized by a progress bar (see Figure 4 below). With the default parameters, the simulation should take around 25 minutes.
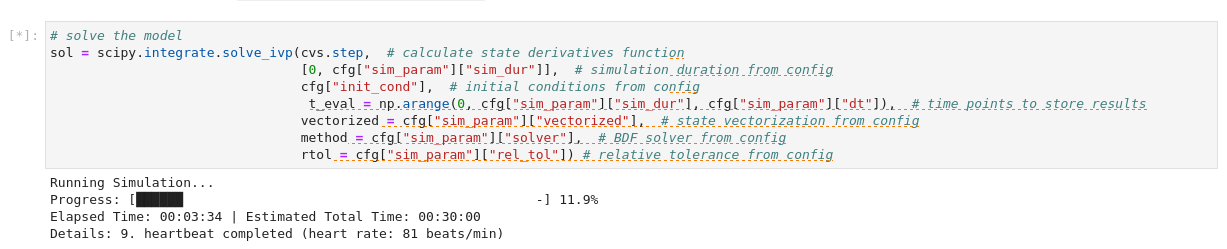
Figure 4: code to execute the model and displaying the simulation progress
Visualize the results: once the simulation has completed, the last code block will take care of visualizing the results: one figure will show different hemodynamics results (e.g. pressures and volumes) and another one will show the vagal cardiac control (Figure 5).
For example, we can see that increasing the Vagal Efferent Firing is associated with increased Acetylcholine Concentration and decreased Heart Rate (see Figure 5 below). A decrease in heart rate is a desirable therapeutic effect for heart-transplanted patients, who often suffer from increased basal heart rate. To learn more about these results, you can watch a reply of this webinar.
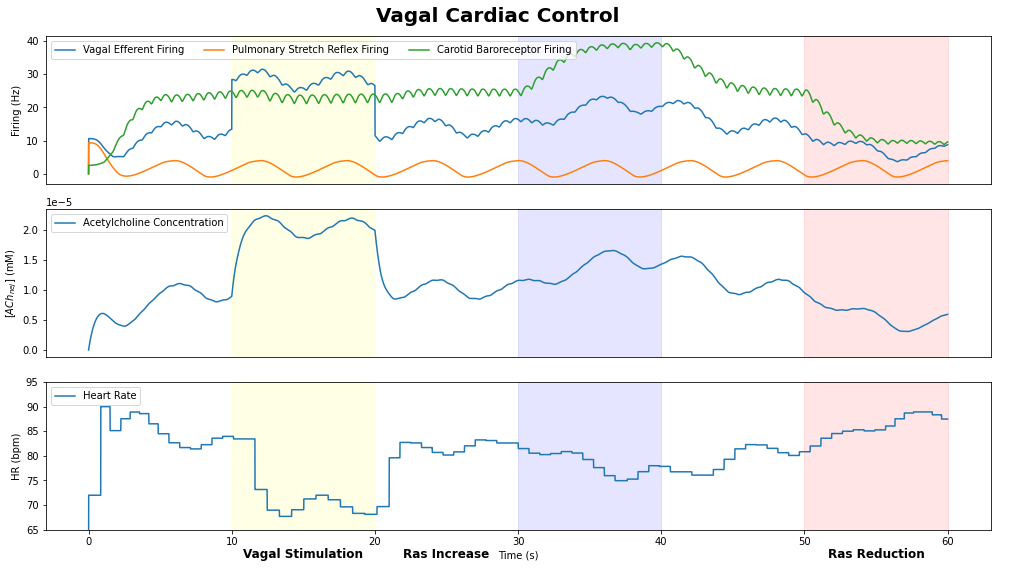
Figure 5: graphs showing the output of the model simulation
Run A Simulation With Different Parameters
All the parameters are specified in a .json file. Parameters can be changed before running a simulation. The changes will not have any effect if you change them while a simulation is a running.
Edit the model parameters: access the parameters file by going in the left-most column (file browser):
- Double-click on the
configfolder to open it - Right-click on the
config.jsonfile - Select
Open Withand then chooseEditor - The file will open in a new JupyterLab tab, where you can change the parameter values. Do not edit the parameter names or any other text, otherwise the model will not be able to recognize them anymore.
- When you are done with editing, save the file. Saving works exactly as in any text editor, so we omit a detailed explanation here.
More Advanced Use-cases
Thanks to the powerful coding and documentation environment provided by JupyterLab and the model documentation written by the dataset contributors, you are prepared to ask some questions to the model. For example, you can extend it so that it is easier to run with multiple parameter combinations and analyze the results of different simulations.
Close And Save The model
Once you are satisfied with the model and simulation, you can close the corresponding o²S²PARC Study that was created for you.
Save and Close: in the o²S²PARC world, this is achieved by clicking on the Dashboardbutton on the top left-hand side corner (Figure 6).
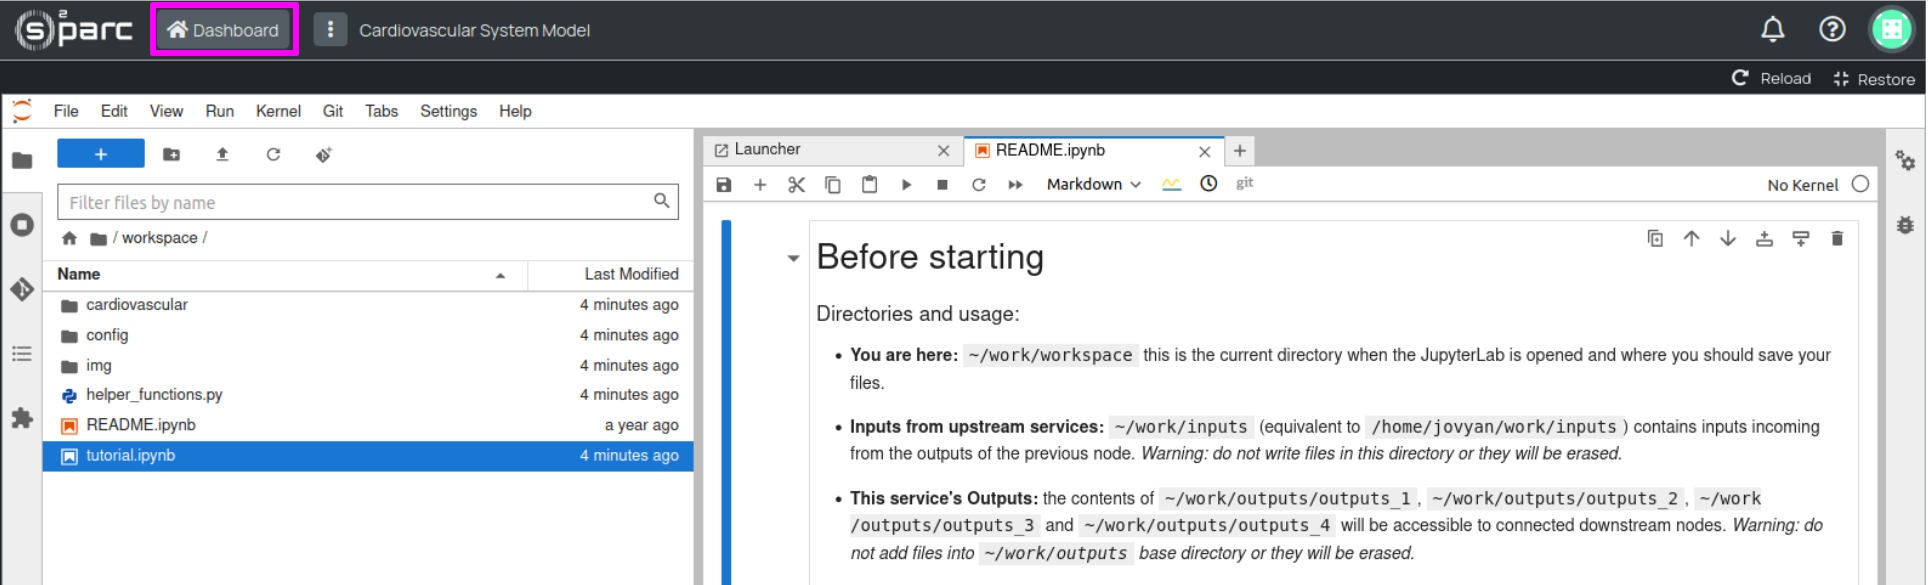
Figure 6: click on the "Dashboard" button (pink rectangle) to save and close a study on o²S²PARC
When you do so, you will be brought to the o²S²PARC Dashboard. You will see a key icon on the Study card (Figure 7). This means that the model data and all your work is being saved to the o²S²PARC cloud storage. You can go back to your project any time, by just visiting https://osparc.io/. By default, the Study will be named "Cardiovascular System model", but we highly recommend you to rename it, so that it will be easier to find. You can also add a custom thumbnail, tags, etc. You can learn more about this functionality on the o²S²PARC User Manual.
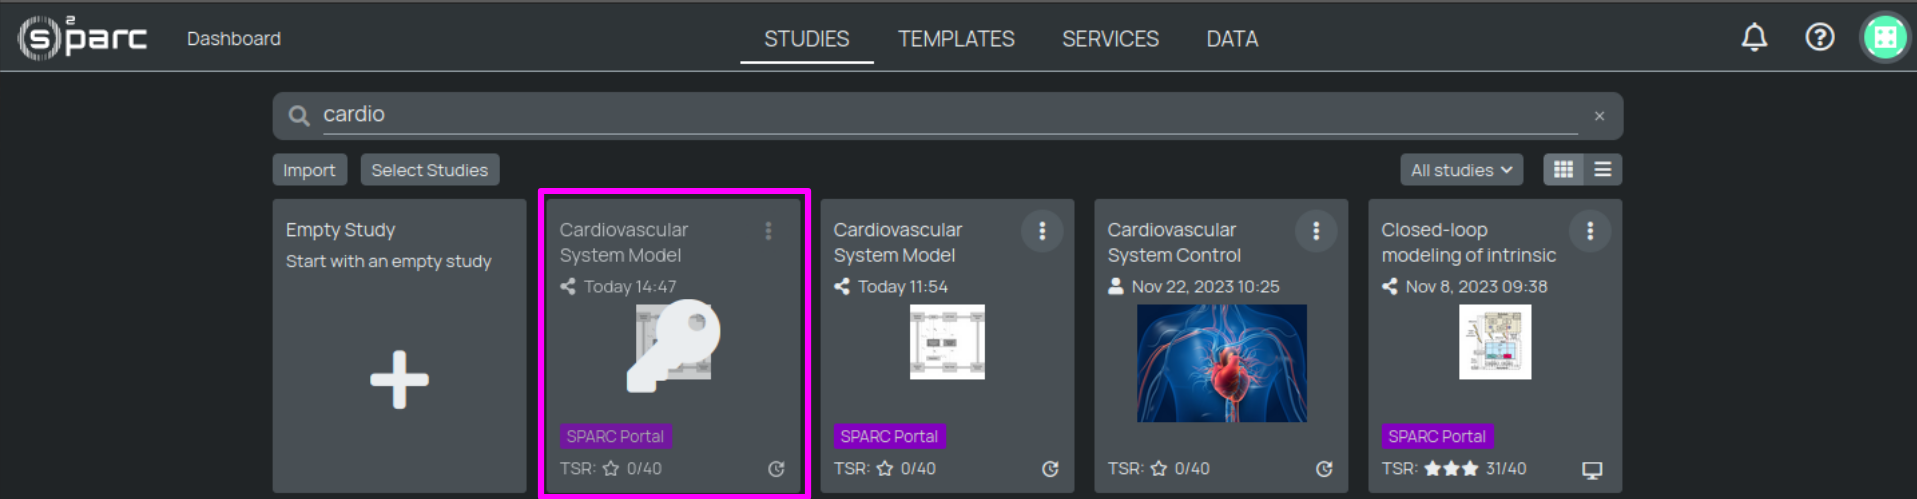
Figure 7: o²S²PARC Dashboard, while the model is being closed and saved (purple rectangle)
Appendix: What Happens Behind The Scenes?
In this section you will learn what is an o²S²PARC Study, a Template and how we enabled you to have your own copy of the Cardiovascular model via the collaborative framework available in o²S²PARC.
Public Template link: if you payed attention when you were on the SPARC Portal dataset page, before clicking on the Run Simulation button, a link was displayed. This is a link to a Template on o²S²PARC, to learn more about available Templates:
- Go to https://osparc.io/
- Click on the
TEMPLATEStab, and find the "Cardiovascular System Model" Template. - If you search using the Tag "SPARC Portal", you will also find all the other projects that are associated with some of the computational datasets on the SPARC Portal.
Public template links can also be added as supplemental material to scientific publications or other documents, so that the readers can access it interactively. We have many examples of this, and you can find more about that by searching the templates with the Tag Publication. Do not hesitate to get in touch with support if you are interested in publishing a supplemental material.
Your instance of the Template: a Study: when you click on a Template and you open it, it will create your own copy that you can edit, without modifying the original Template. This is clear as you will find a project with the same name of the original Template when you go to https://osparc.io/. Sharing a Study with the template mechanism is very useful in case you want to share a project with someone else or publicly (see more about this on the Sharing section of the o²S²PARC manual.
Sharing a Study: Once you have your own Study, you can also share it directly with other users of the platform. You will be able to see other users, if there is at least one Organization where you all belong to. You can learn more about this on the Sharing section of the o²S²PARC manual, you will also find a link to a webinar on the same topic.
Would you like to know more? Check the resources at the bottom of this page.
Updated 11 months ago