Running ASCENT On o²S²PARC
With this tutorial you will learn how to run ASCENT (Automated Simulations to Characterize Electrical Nerve Thresholds), a pipeline for sample-specific computational modeling of electrical stimulation of peripheral nerves on the o²S²PARC Platform.
The ASCENT Pipeline was developed by SPARC investigators at the Grill Lab, Duke University. It is an open-source platform, please visit the ASCENT Documentation to learn more about it. You can run ASCENT on the o²S²PARC Platform, by accessing one of these three datasets on the SPARC Portal:
- ASCENT Guided Mode Demo: this dataset uses a limited set of user-defined parameters to run the pipeline. This is meant for users who have limited knowledge of ASCENT.
- ASCENT Tutorial: this dataset implements the ASCENT Tutorial, as explained in the ASCENT documentation. It allows users who have an intermediate knowledge of ASCENT to learn how a typical pipeline is configured, run it and retrieve the results.
- ASCENT Base: here, no pipeline is configured; this dataset can be used to set up custom simulations and analysis. It is meant for users who are already familiar with ASCENT. You can utilize it to re-run some of the published simulations (see this for example).
Prerequisites
- An active o²S²PARC account: if you don't have an account on o²S²PARC, please go to https://osparc.io/ and click on "Request Account". This will allow you to take advantage of the full o²S²PARC functionality.
- Basic knowledge of the JupyterLab environment: if you wish to only run the code and visualize the results, you really need only the basics. See here for an introduction. You will also need to launch few commands in the terminal (or command line)
Getting Started
Before starting, be sure to be logged in o²S²PARC (by visiting https://osparc.io/). If you are not logged in, you will see an error message prompting you to log in.
Once you are logged in:
- Go the the dataset page (e.g. ASCENT Guided Mode Demo).
- Click on the
Run Simulationbutton (see arrow in Figure 1). - An instance of dataset in the o²S²PARC platform will open in a new browser tab.
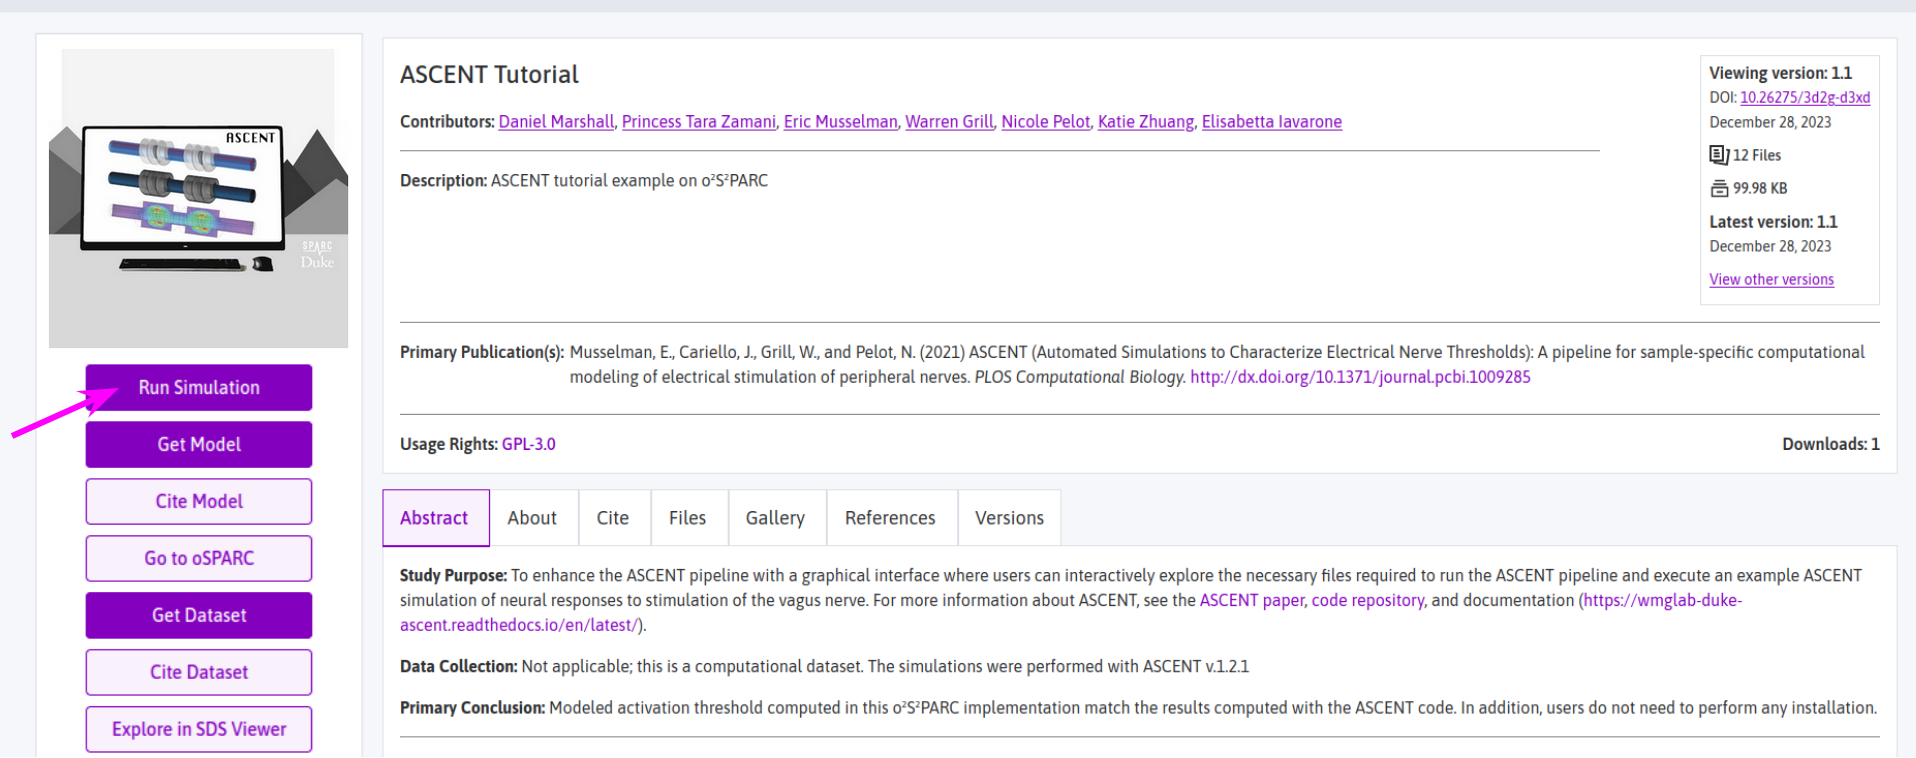
Figure 1: one of the ASCENT datasets on the SPARC Portal
ASCENT Guided Mode Demo
First Step: Select The Parameters And Run The Simulation
In the Settings windows (Figure 2), you can run the simulation with default parameters or change the parameter values. For some parameters you can choose between different options (such as "Nerve Morphology", can be "Rat" or "Human" vagus nerve ), or inserting numerical values (e.g. "List of Fiber Diameters"). You can understand what each parameter represents by hovering on the information button (Figure 2).
To run the simulation and proceed to the next step:
- Click on the "Run" button
- Wait for the simulation to finish
- Once completed the simulation status will change from "Running" to "Success".
- The "Run" button will become an "Arrow" button
- Click on the "Arrow" button to proceed to the next step
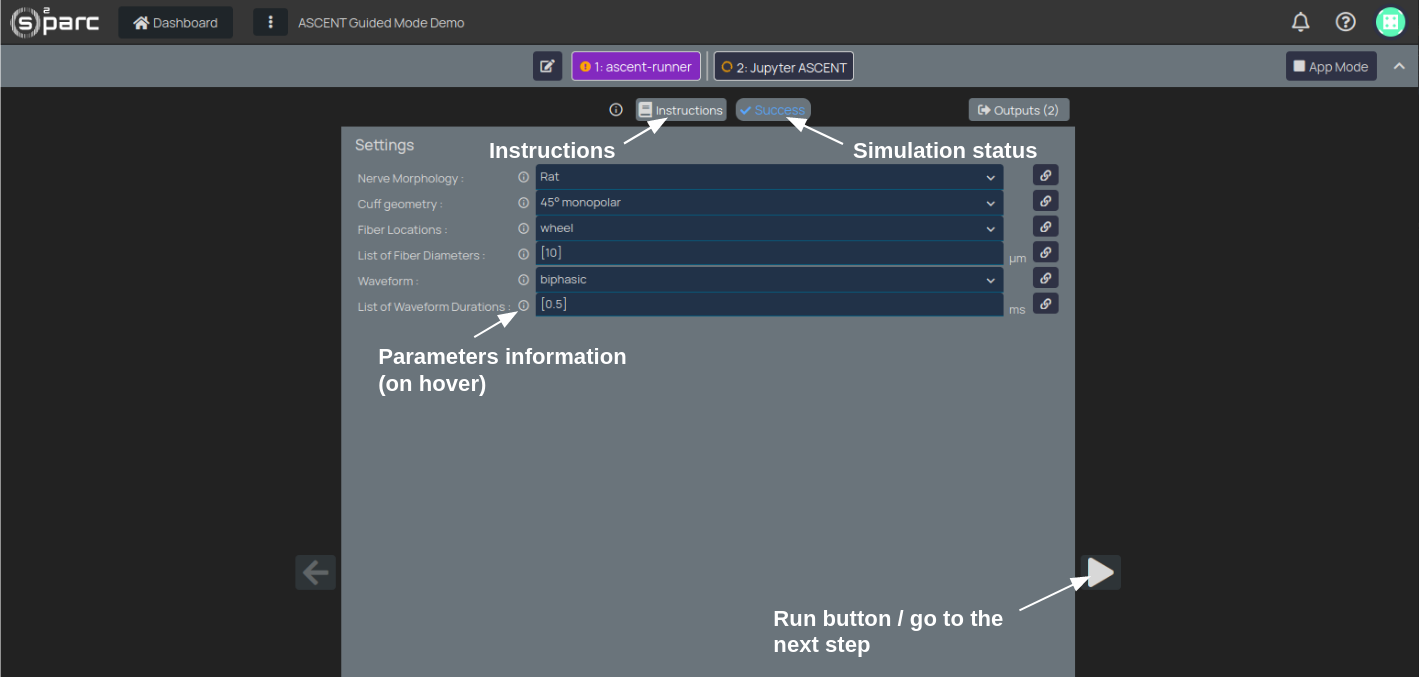
Figure 2: first step of the ASCEND Guided Mode Demo
Second Step: Visualize The Results
In the second step you retrieve the results from the previous step and visualize them, by utilizing a script in a JupyterLab environment. To do so (Figure 3):
- Click on the Launcher tab
- Click on the Terminal to start typing commands
- In the terminal, type
sh run_first.sh - A message saying that the figure is being saved will appear:
(ascent) jovyan@4fbd9cff2b56:~/work/workspace$ sh run_first.sh
Saving threshold heatmap figure to ascent/output/analysis...
TIP: Every dataset comes with guides and more explanations, so feel free to click on the "Instructions" button to learn what you can do in each step.
To visualize the output figure:
- Go to the left-most column (file browser)
- Double-click on the folder name to navigate to
ascent > output > analysis - Double-click on the
threshold_heatmap.pngfile to visualize the results (Figure 4)
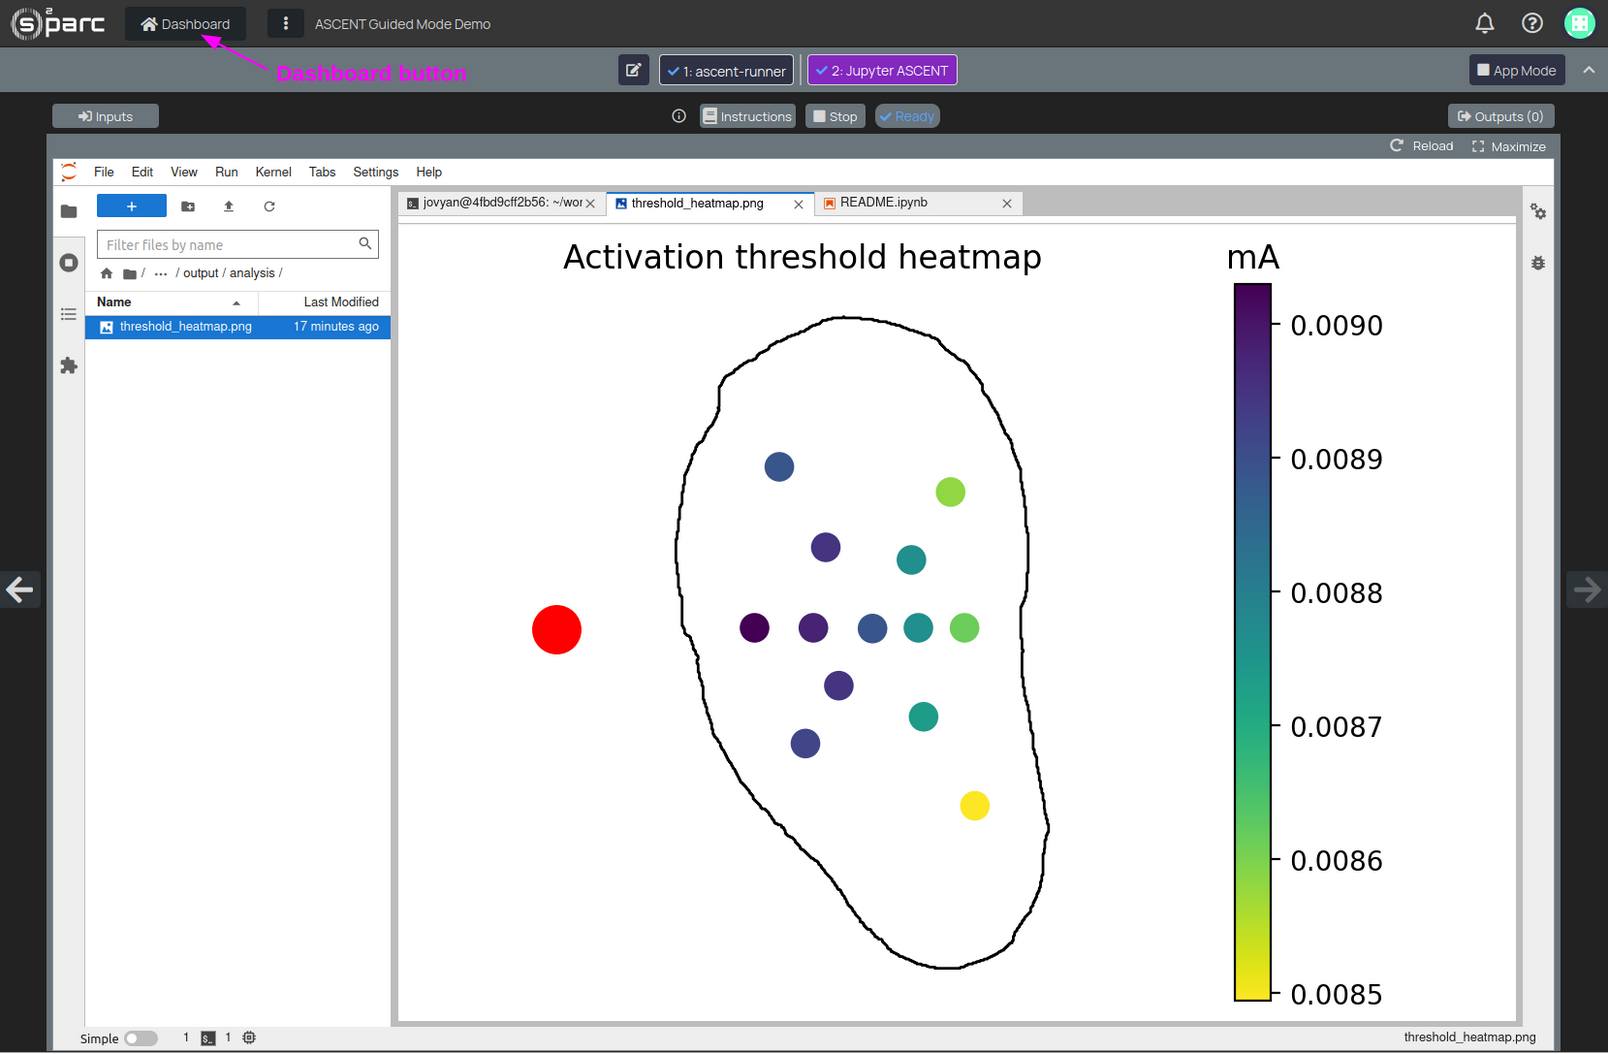
Figure 4: visualization of the simulation results showing a spatial map of activation thresholds
Once you have finished working on this dataset, click on the Dashboard button (Figure 4) to save and close the corresponding o²S²PARC Study.
ASCENT Tutorial
To access the ASCENT Tutorial on o²S²PARC, follow the same steps outlined in the section Getting Started above.
With this dataset, you can run an example pipeline of ASCENT. All the necessary configuration files have been already set up for you. Use the Instructions button to learn how to launch the simulations (Figure 5).

Figure 5: Instructions to run the ASCENT Tutorial simulations
The "Instructions" will guide you through all the steps, which involve:
- Launch the electromagnetic simulations (COMSOL).
- Launch the electrophysiology simulations (NEURON).
- Move the simulation results to the appropriate folder (ASCENT has already a script for that).
- Visualize the results.
Once you have finished working on this dataset, click on the Dashboard button (Figure 3) to save and close the corresponding o²S²PARC Study.
Note: the ASCENT Pipeline calls the COMSOL software to run the electromagnetic simulations. In o²S²PARC, there is a COMSOL license server available for you, so you don't have to worry about purchasing a license and installing the software. However, only one user can use the server at the same time. That means, if someone else is running simulations, you might have to wait to launch yours (a message saying the the license is being used is displayed in this case)
Advanced Use-cases: Re-run A Model From The SPARC Portal On o²S²PARC
ASCENT Base is what you need to set up and run your custom ASCENT pipeline. You will need to download the Model from the SPARC Portal, set-up the configuration files and run it.
Download the Model from the SPARC Portal to "ASCENT Base" on o²S²PARC
These are the steps to start "ASCENT Base" and download the dataset (there is also an animation in Figure 6 showing the same steps, click on the animation to see it larger):
- Follow the steps in the Getting Started section above (use the ASCENT Base dataset this time).
- If the "Run Simulation" button (Figure 1) is not present, you can start "ASCENT Base" directly from o²S²PARC, "Templates" tab (see the o²S²PARC documentation more details).
- Once "ASCENT Base" is up and running, use the button on the upper right side corner to stop the App Mode.
- Click on "New Node".
- Select and add a "File Picker".
- Go to the Model page, "Files" tab on the SPARC Portal.
- Right click on the button "Download full dataset" and then copy the link.
- Go back to o²S²PARC and paste the link in the "File Picker" url field (on the bottom of the page).
- Connect the "File Picker" to "Jupyter ASCENT", the download of the model will start.
- Click on Jupyter ASCENT.
- A "loading" icon will appear next to "input_files_1", the download might take around 15 minutes.
- When the download is complete, the loading icon will become a "checked" icon.
- You can also follow the download progress, by clicking on the "Logger" tab.
- Once the download is complete, use the button on the upper right side corner to start the App Mode.
Figure 6: import an ASCENT model from the SPARC Portal to o²S²PARC
Set Up The Simulations
Now we can copy the necessary files to run one of the samples (e.g. sample 526). These steps are also explained in the ASCENT Documentation.
- In the JupyterLab interface, click on the "+" button to start a "New Launcher" (Figure 7).
- Click on "Terminal" to start a new console.
- Copy one sample (e.g. sample 526) to the appropriate ASCENT folder:
cp -r ~/work/inputs/input_1/Pennsieve-dataset-311-version-3/files/primary/sub-46/sam-2-sub-46/samples/526/ ascent/samples/ - Take note of the sample, model and simulation numbers, by listing the content of the sample directory:
ls ascent/samples/526/models/108/sims/1168/n_sims/ - Create the run configuration file and edit it with the appropriate sample, model and simulation number:
a) Copy (and rename) the run file from the templates:b) Edit the filecp ascent/config/templates/run.json ascent/config/user/runs/0.json0.jsonwith the model and simulation numbers from point 4:- In the file browser (Figure 7), navigate to:
ascent/config/user/runs/. - Double click on the file
0.jsonto edit it. - Change the sample number from
0to526. - Change the model number from
0to108. - Change the sims number from
0to1168. - Save the
0.jsonfile
- In the file browser (Figure 7), navigate to:
- Copy (and rename) the simulation configuration file:
cp ~/work/inputs/input_1/Pennsieve-dataset-311-version-3/files/code/ascent_configs/sims/1168.json ascent/config/user/runs/1168.json - Optionally, delete the
n_simsfolder. This deletion is required if the user wants to re-run the NEURON simulations to find thresholds:
For backward compatibility with the older ASCENT version (1.1.1) that was used to run the simulations published on the Portal dataset, you will also need to edit the model file we copied from the SPARC Portal.
To do so:
- Open
ascent/samples/526/models/108/model.json - Replace
MIN_CIRCLE_BOUNDARYwithNAIVE_ROTATION_MIN_CIRCLE_BOUNDARY
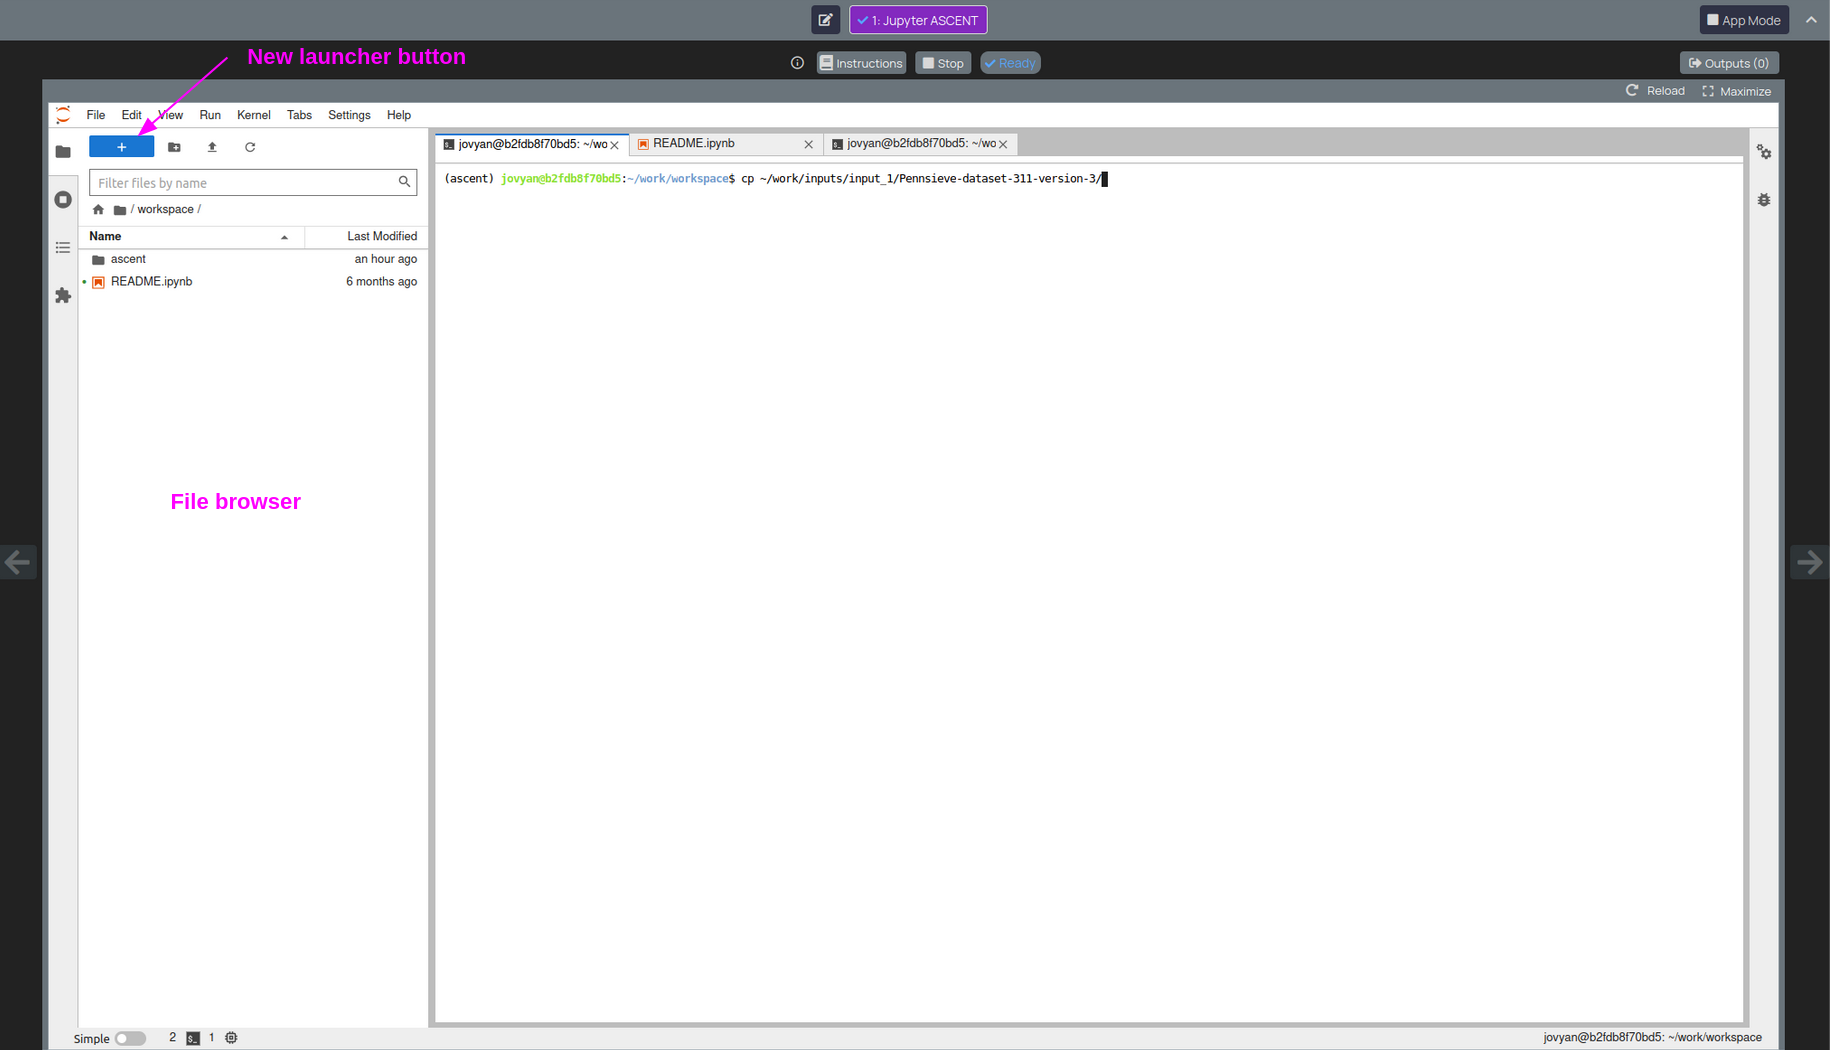
Figure 7: ASCENT JupyterLab interface on o²S²PARC
Run The Simulations
Now you are ready to run the COMSOL and NEURON simulations.
- In the terminal, go into the
ascentfolder and run the following commands:cd ascent python run pipeline 0 - Wait for the COMSOL simulation to finish, it will take around 20 minutes.
- Run the NEURON simulations from the appropriate path:
cd /home/jovyan/work/workspace/ascent/out python submit.py 0 -n 4 -s - Wait for the NEURON simulation to finish, it will take around 3 minutes.
Inspect The Results
You fill find the activation thresholds in the output folder, you can e.g. show the value with:
cat ~/work/workspace/ascent/out/n_sims/526_108_0_0/data/outputs/thresh_inner0_fiber0.datYou can also plot the results with the commands shown in Figure 5.
Please note that in o²S²PARC, the ASCENT code is version v1.2.1, so you might need to adapt the ASCENT code and you might find small differences in the results. You can also replace the ASCENT version pre-installed in o²S²PARC with another one.
ASCENT On The SPARC Portal Tools And Resource Pages
The three datasets described above utilize two services that you can find on the o²S²PARC Services page, by searching for "ASCENT".
- ASCENT Computations corresponds to the first step of the ASCENT Guided Mode Demo
- Jupyter ASCENT: corresponds to the second step of the ASCENT Guided Mode Demo, and it is also used in ASCENT Tutorial and ASCENT Base
You can learn more on how to use the o²S²PARC services from the SPARC Portal here.
Appendix: What Happens Behind The Scenes?
In this section you will learn what the App Mode view is in o²S²PARC and what are the different Jupyterlab environments.
App Mode: in o²S²PARC, you can build complex pipelines by connecting different reusable modules (or services). In order to do that, you typically work in the Workbench. Another way of presenting a pipeline, for example for an external audience or to prepare a tutorial, is to turn it into a Guided Mode application thanks to App Mode view. In the App Mode view, you can also add "Instructions" to help users understand the different steps of a pipeline.
Jupyterlab environments: on o²S²PARC, we offer the powerful Jupyterlab scripting environment in combination with different software relevant for autonomous nervous system modelling and beyond: for example ASCENT, Octave, Tensorflow, PyTorch, and much more.
You can find all the available flavors by logging in to osparc.io and visiting the Services tab or the o²S²PARC Services page on the SPARC Portal. More information is available as well on the o²S²PARC Documentation.