Publishing Generic Organ Scaffold as a SPARC Dataset
Make a generic organ scaffold available to the SPARC community for reuse and reference.
In this tutorial, we will demonstrate how to prepare a generic organ scaffold for publication as a SPARC dataset using the Scaffold mapping tools. This protocol will ensure that a generic organ scaffold is made available and reusable to the community in a reproducible manner.
Step 1
Use the latest official version of the Scaffold mapping tools to generate your organ scaffold.
Do not use a developer installation to generate a scaffold.
Step 2:
Use the standard generic organ scaffold workflow to generate organ scaffold files. The workflow is installed by default with the mapping tools MAP Client installer and it is also available from Github. In this tutorial, as we are using the generic human stomach scaffold as an example, save a copy of the workflow under “sparc-generic-scaffold-stomach-human”.
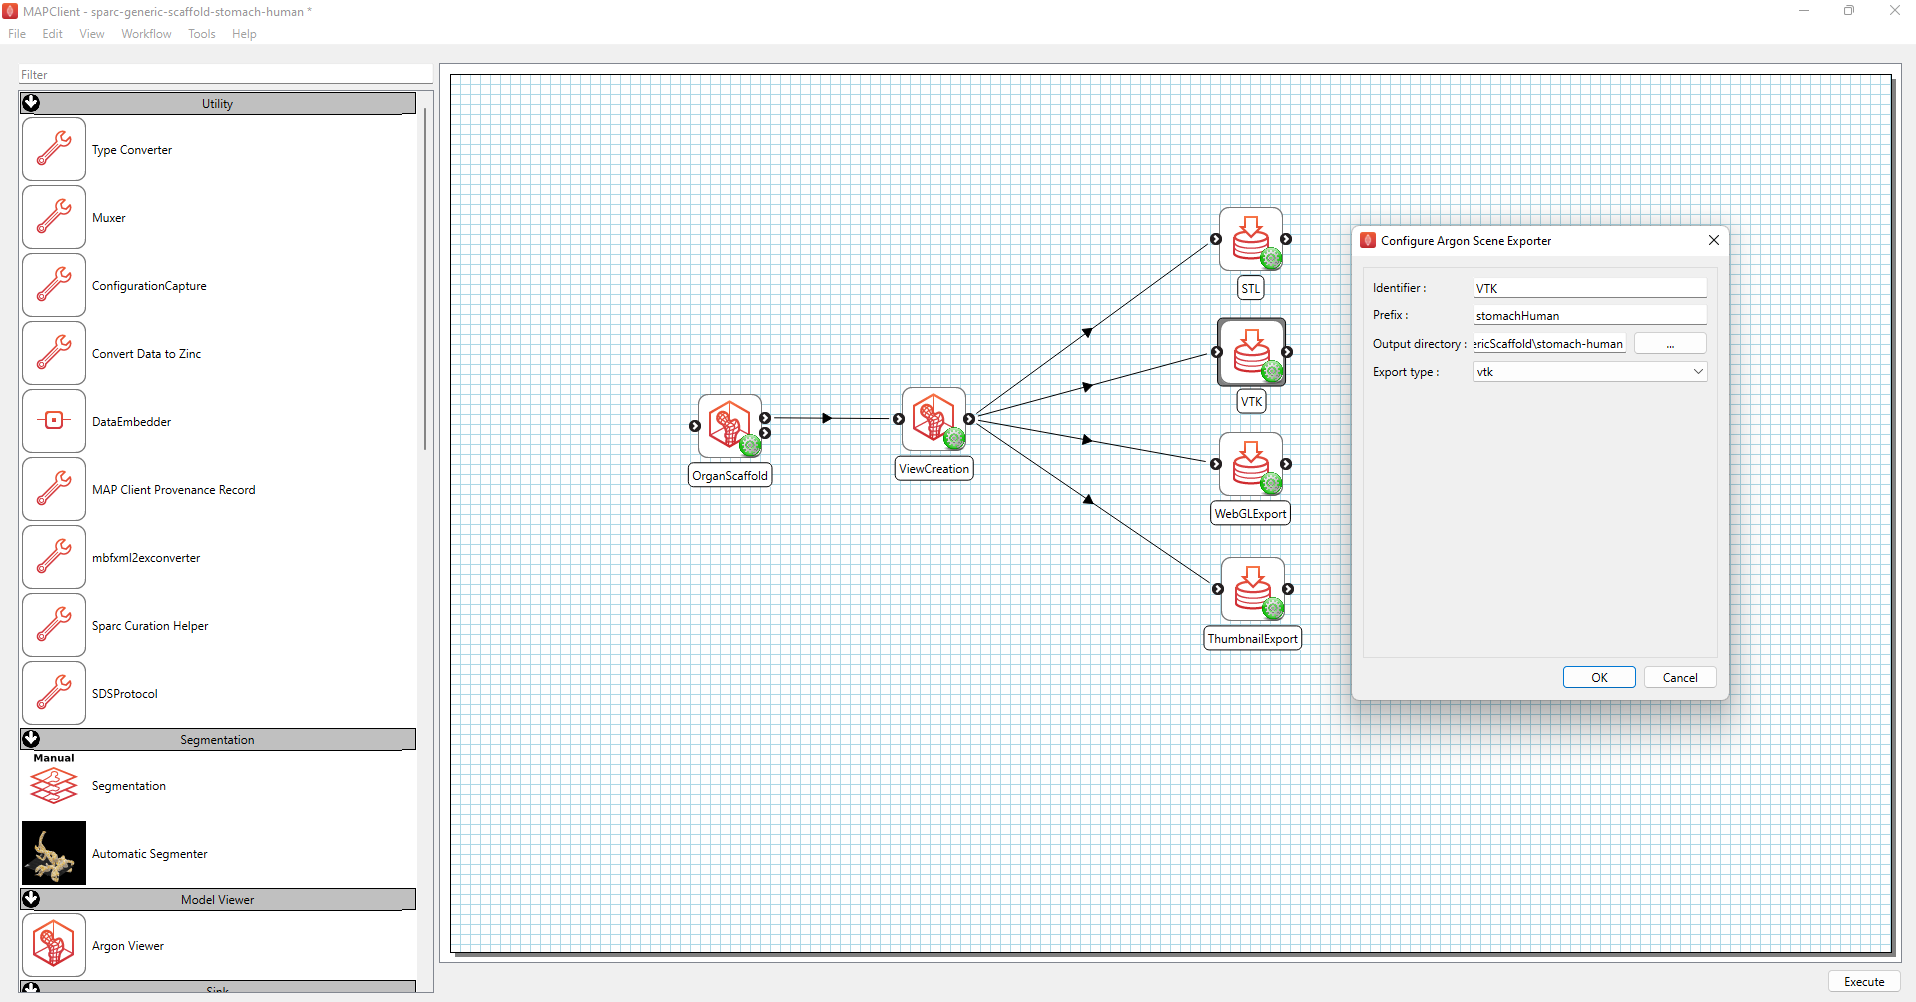
Figure 1 Standard generic organ scaffold workflow.
Ensure that the prefixes in the configuration settings for VTK and STL exporter are the same as the prefix used for the thumbnail exporter. Select the same output directory for each of the webGL, thumbnail, VTK, and STL exports.
After setting up the workflow as shown in Figure 1, save the workflow (Ctrl-s) and execute the workflow by pressing the Execute button (or Ctrl-x).
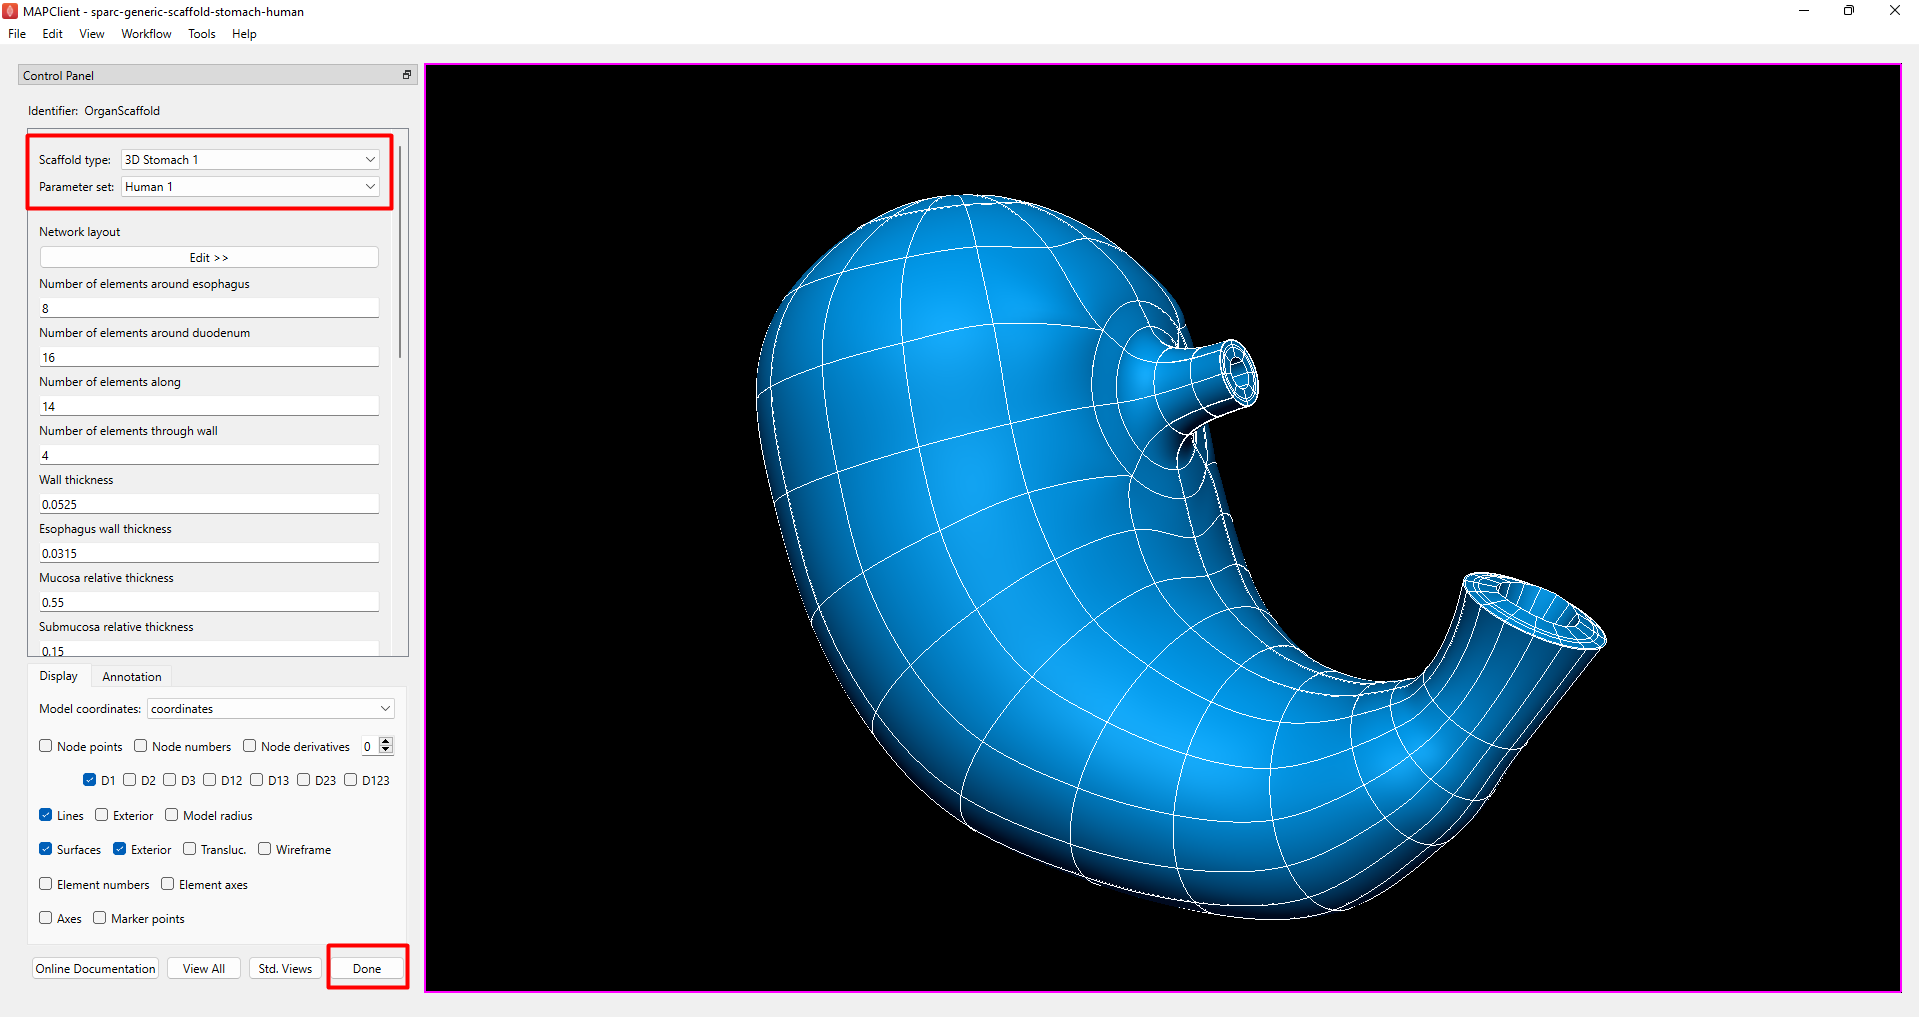
Figure 2: Scaffold creator interface for configuring organ scaffold and species.
In the scaffold creator interface (Figure 2), select the organ scaffold and species you wish to publish as a dataset. Click Done.
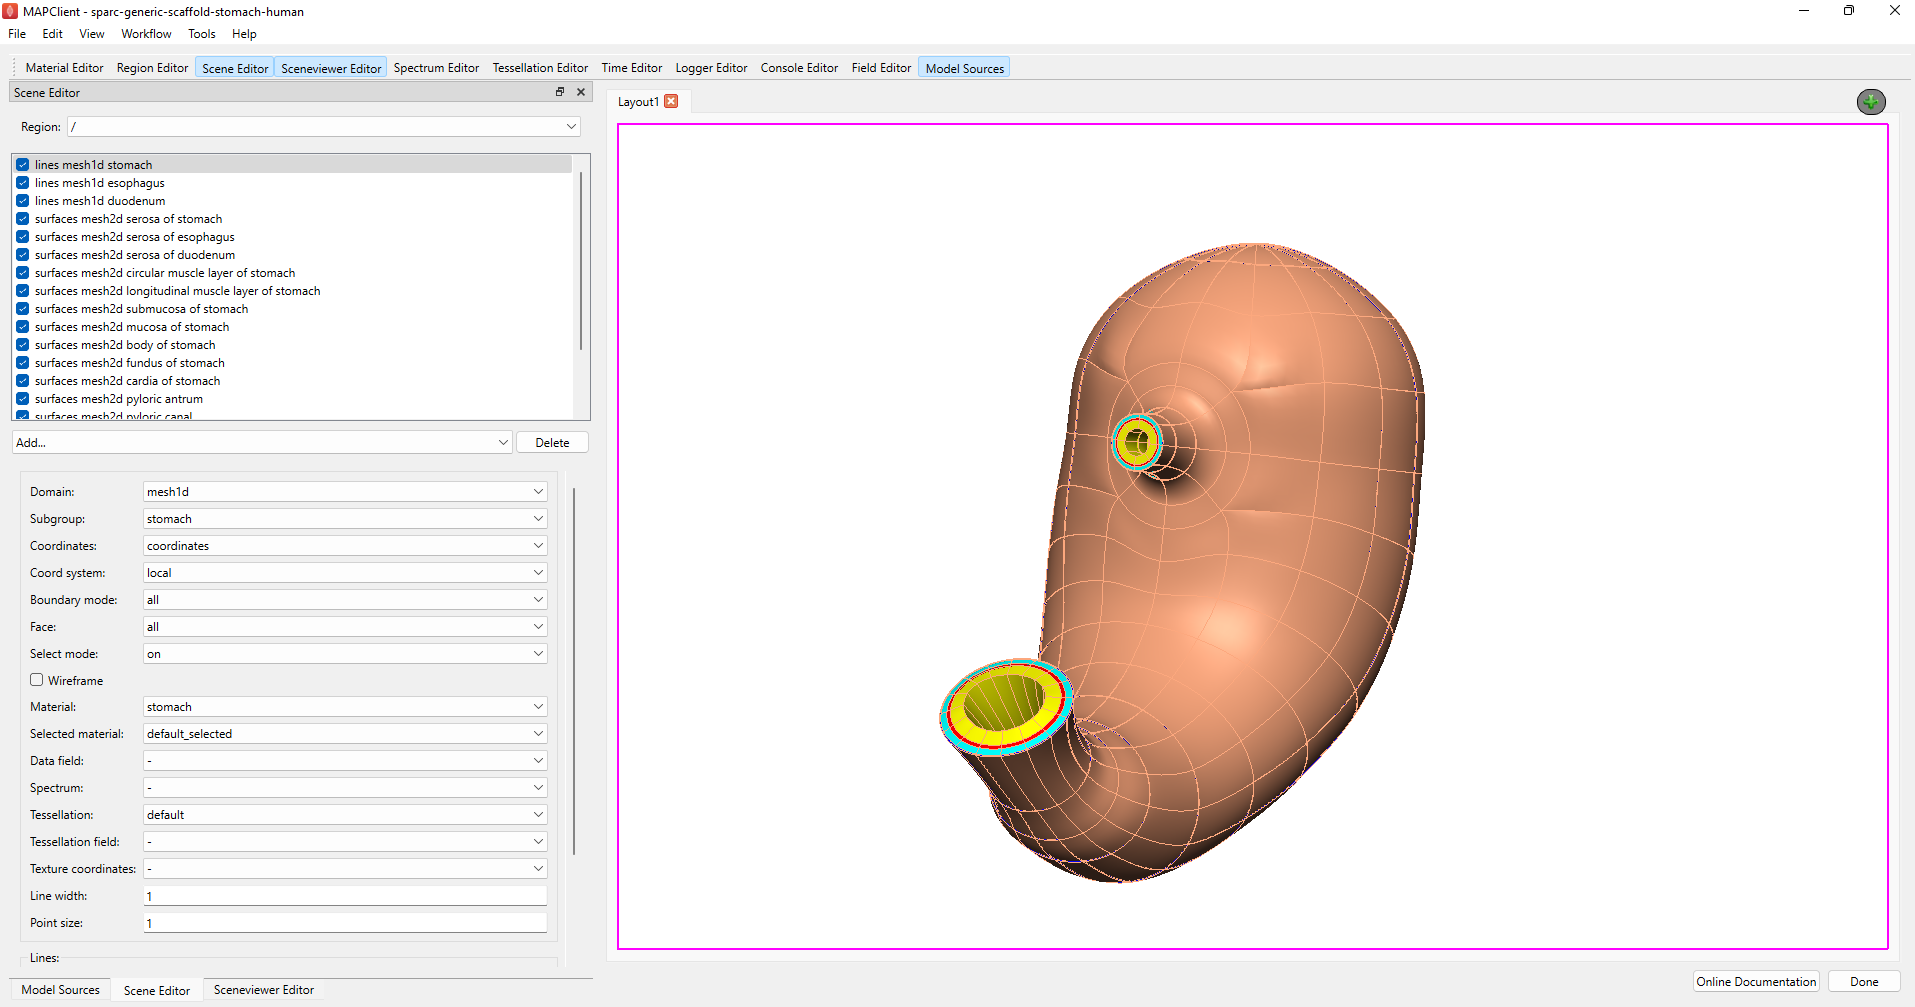
Figure 3: Argon Viewer for configuring graphics for the organ scaffold.
The next step involves configuring Argon Viewer to generate the graphics for the organ scaffold (Figure 3). Add relevant nodes, lines, and surfaces to showcase the annotated markers and groups in the webGL export. Adjust the visualization viewpoint to an aesthetically pleasing angle and click Done. The workflow will create a snapshot of the visualization and use it as the thumbnail for the dataset, for this reason the viewpoint should show the best representation of the organ scaffold.
Upon clicking Done, the workflow will generate the webGL, thumbnail, VTK, and STL files in the output directory that was set in Step 2.
Step 3
Check that your webGL visualisation works in ScaffoldVuer. ScaffoldVuer is what the SPARC portal uses to display your scaffolds in the web browser. You can drag and drop webGL files generated by scaffold mapping tool to ScaffoldVuer to check that the webGL files are generating all scaffold features required for your scaffold on the portal. (You can also zip up your files and drop the zipped archive on ScaffoldVuer.)
Step 4
Use the official scaffold SDS creation workflow to prepare a dataset for submission to Pennsieve. The workflow must be cloned from Github, git clonehttps://github.com/mapclient-workflows/official-scaffold-sds-creation-workflow -b v0.1.1. The information on the workflow is recorded in the provenance information to aide reuse.
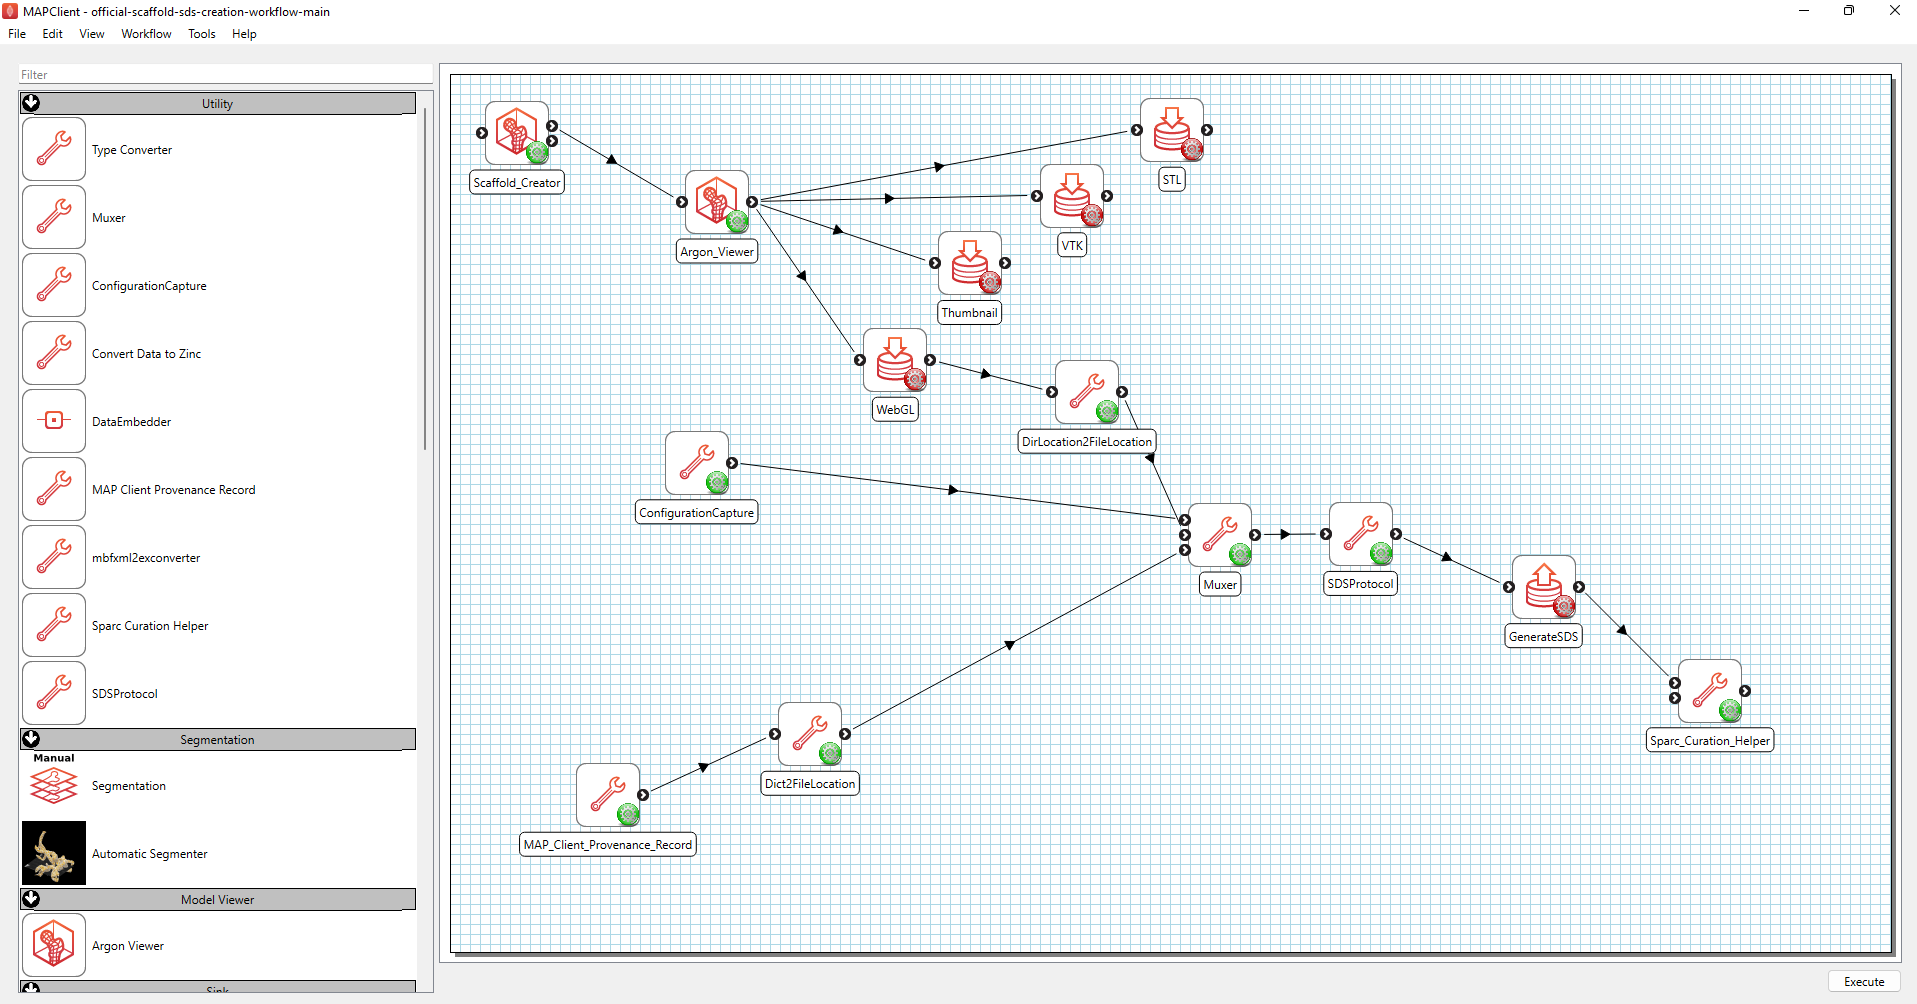
Figure 4: The official scaffold SDS creation workflow.
First, configure the GenerateSDS step (Figure 5). Enter the dataset name in the “Dataset Name” field, select Scaffold under “Dataset type” and set where you would like to save the generated SDS dataset in the “Output directory”.
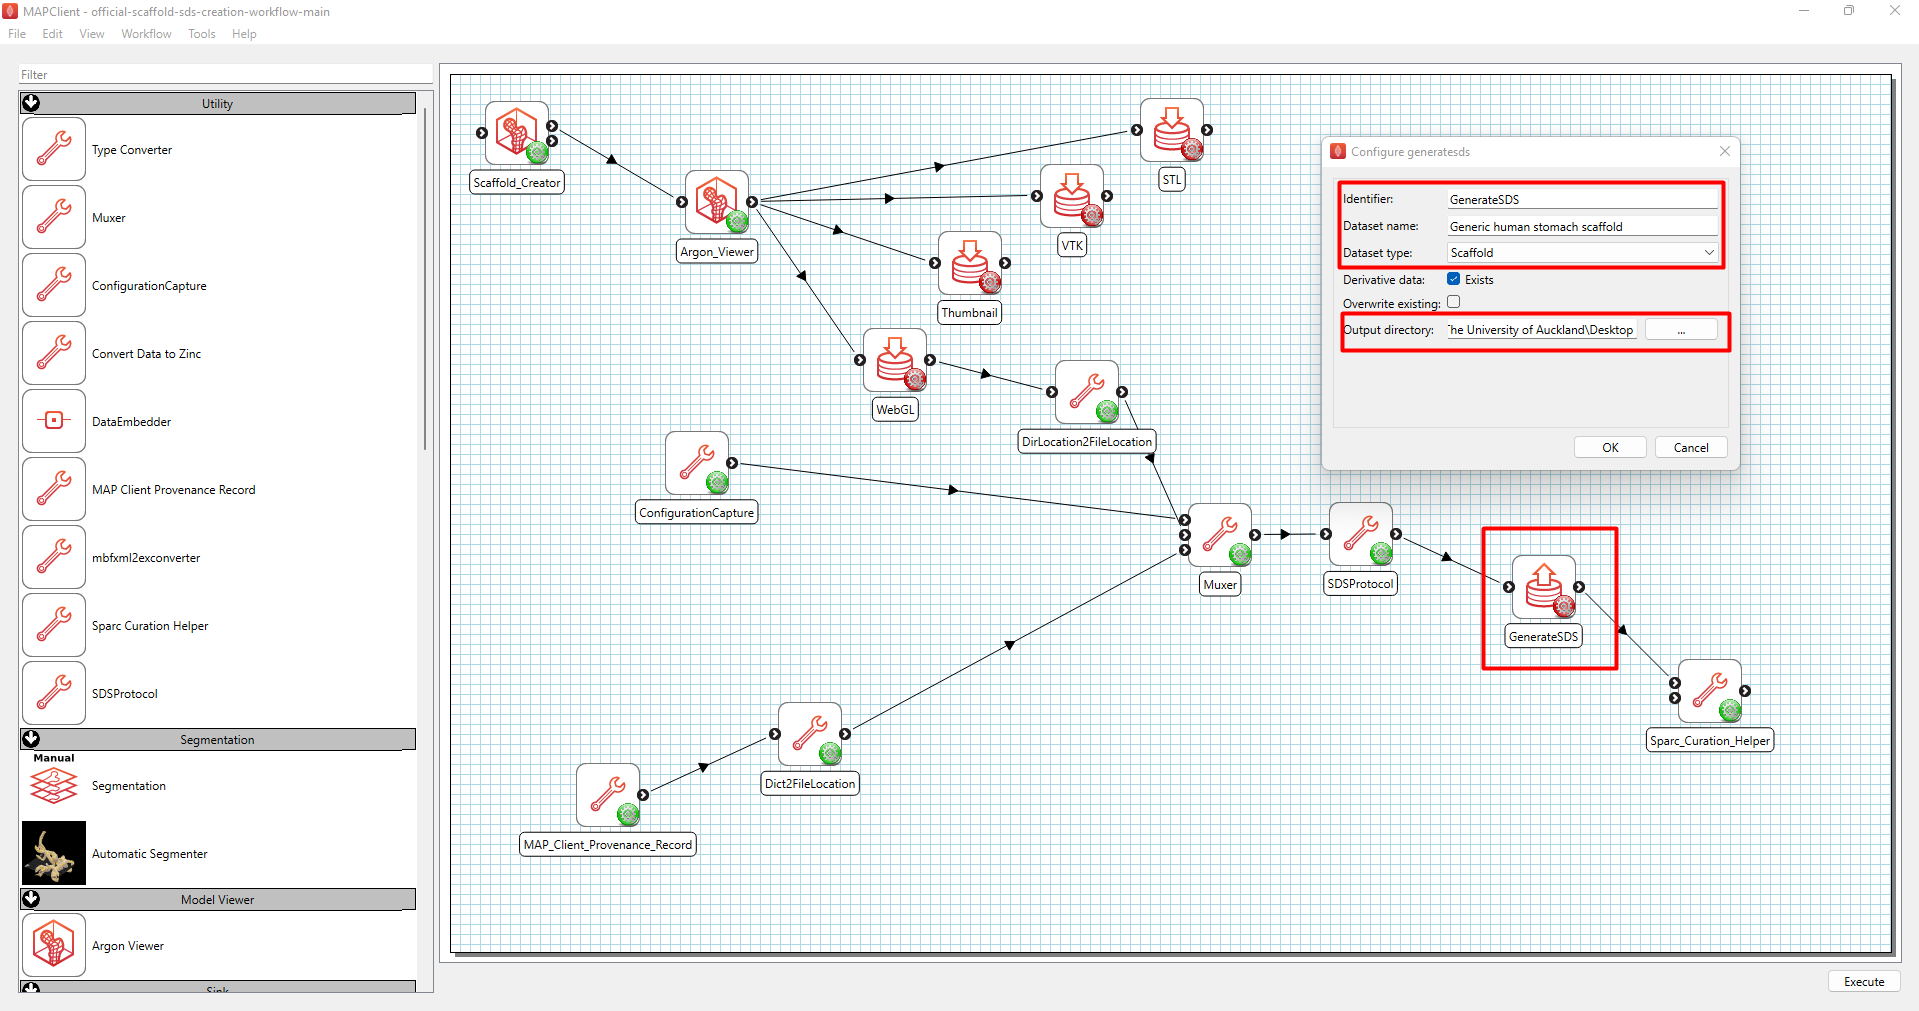
Figure 5: Configuring the GenerateSDS step.
Next, import configuration settings from the standard generic organ scaffold workflow by going to “Import Config” under the “File” tab (Figure 6).
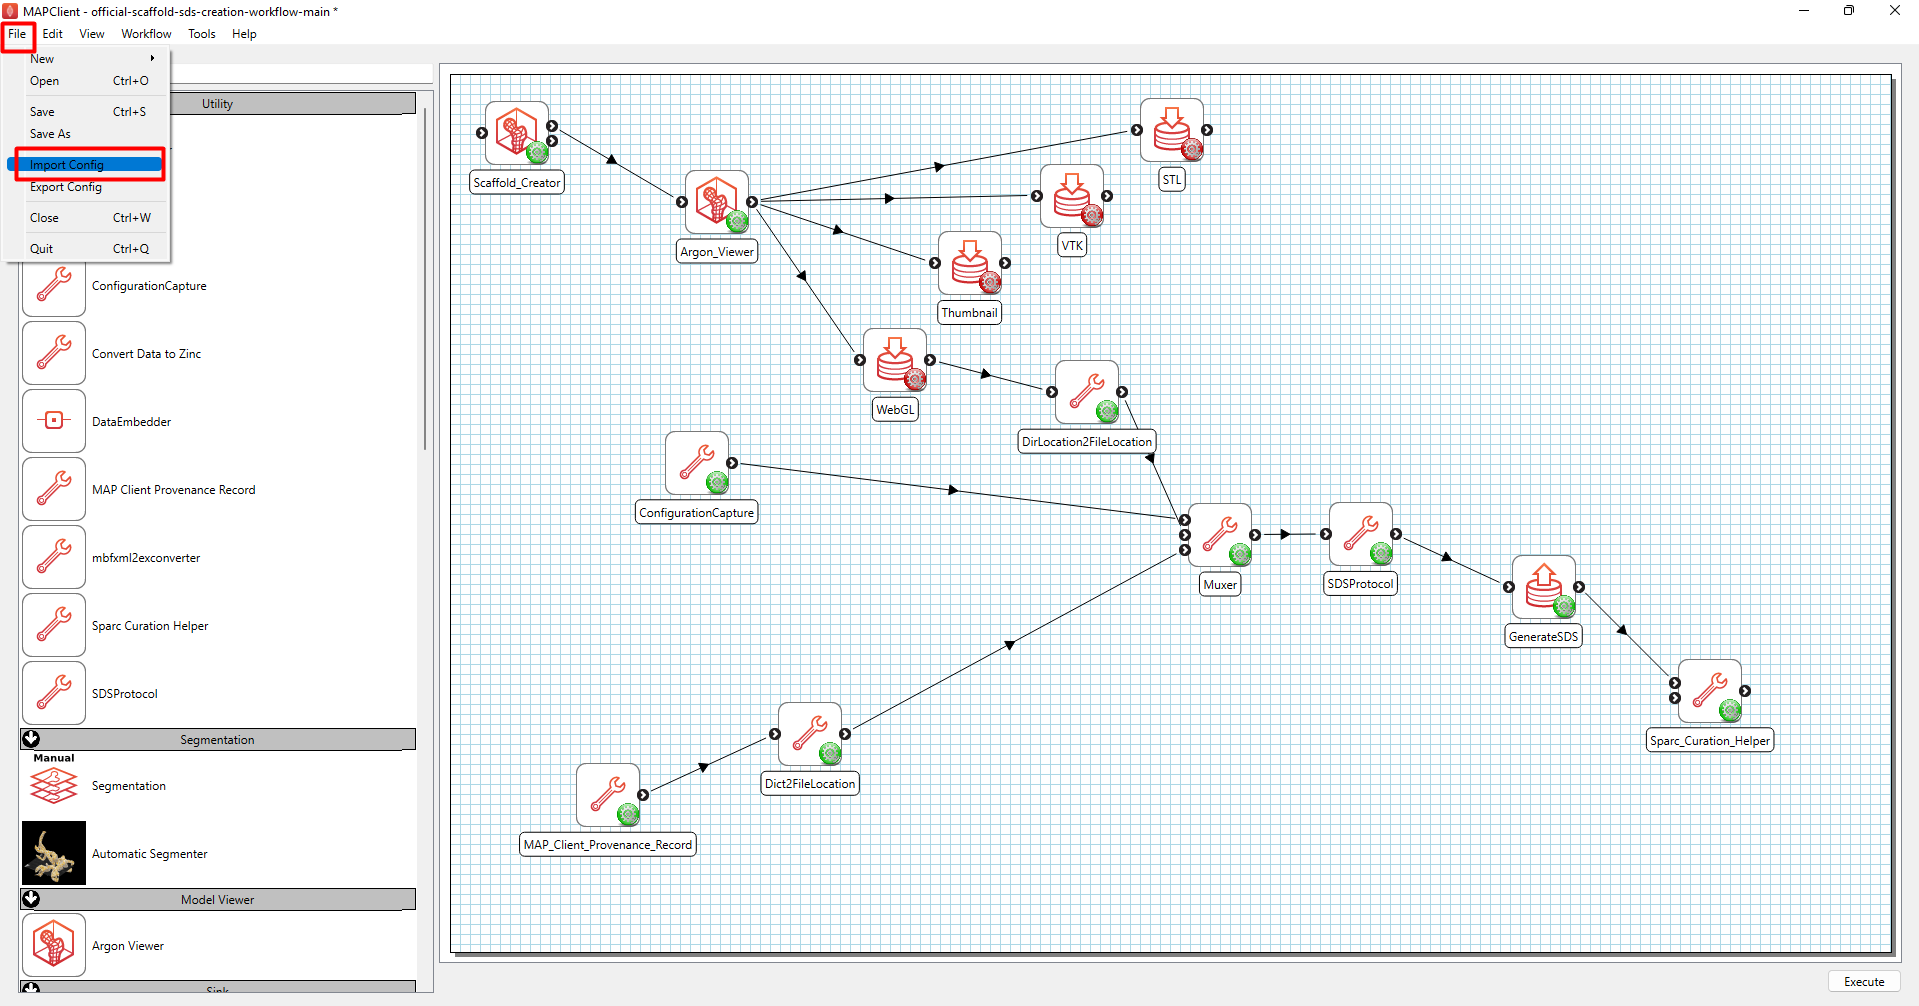
Figure 6: Import configuration settings.
Go to the directory where the standard generic organ scaffold workflow was saved in Step 2. Open the filter file type list at the bottom right corner of the dialog and select “MAP Client Project file (map-client-workflow.proj) so that the workflow description file becomes available for selection (Figure 7).
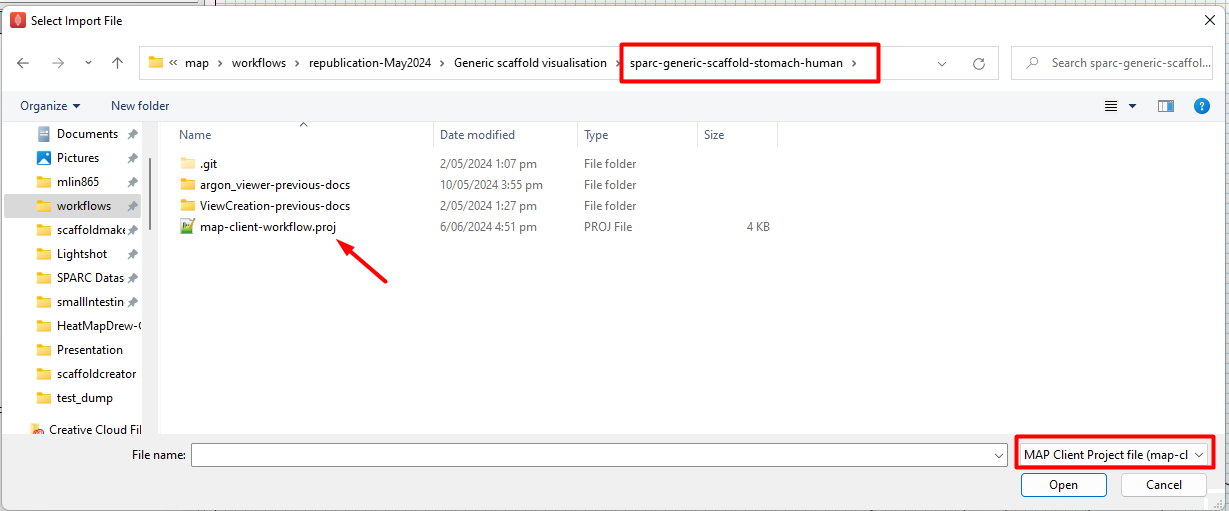
Figure 7: Selection of workflow file for import.
Next, an “Import Workflow Configuration” window will appear. Select the matching configurations as shown in Figure 8 and click Import, followed by Close. A prompt will appear indicating that the selected configurations have been successfully imported.
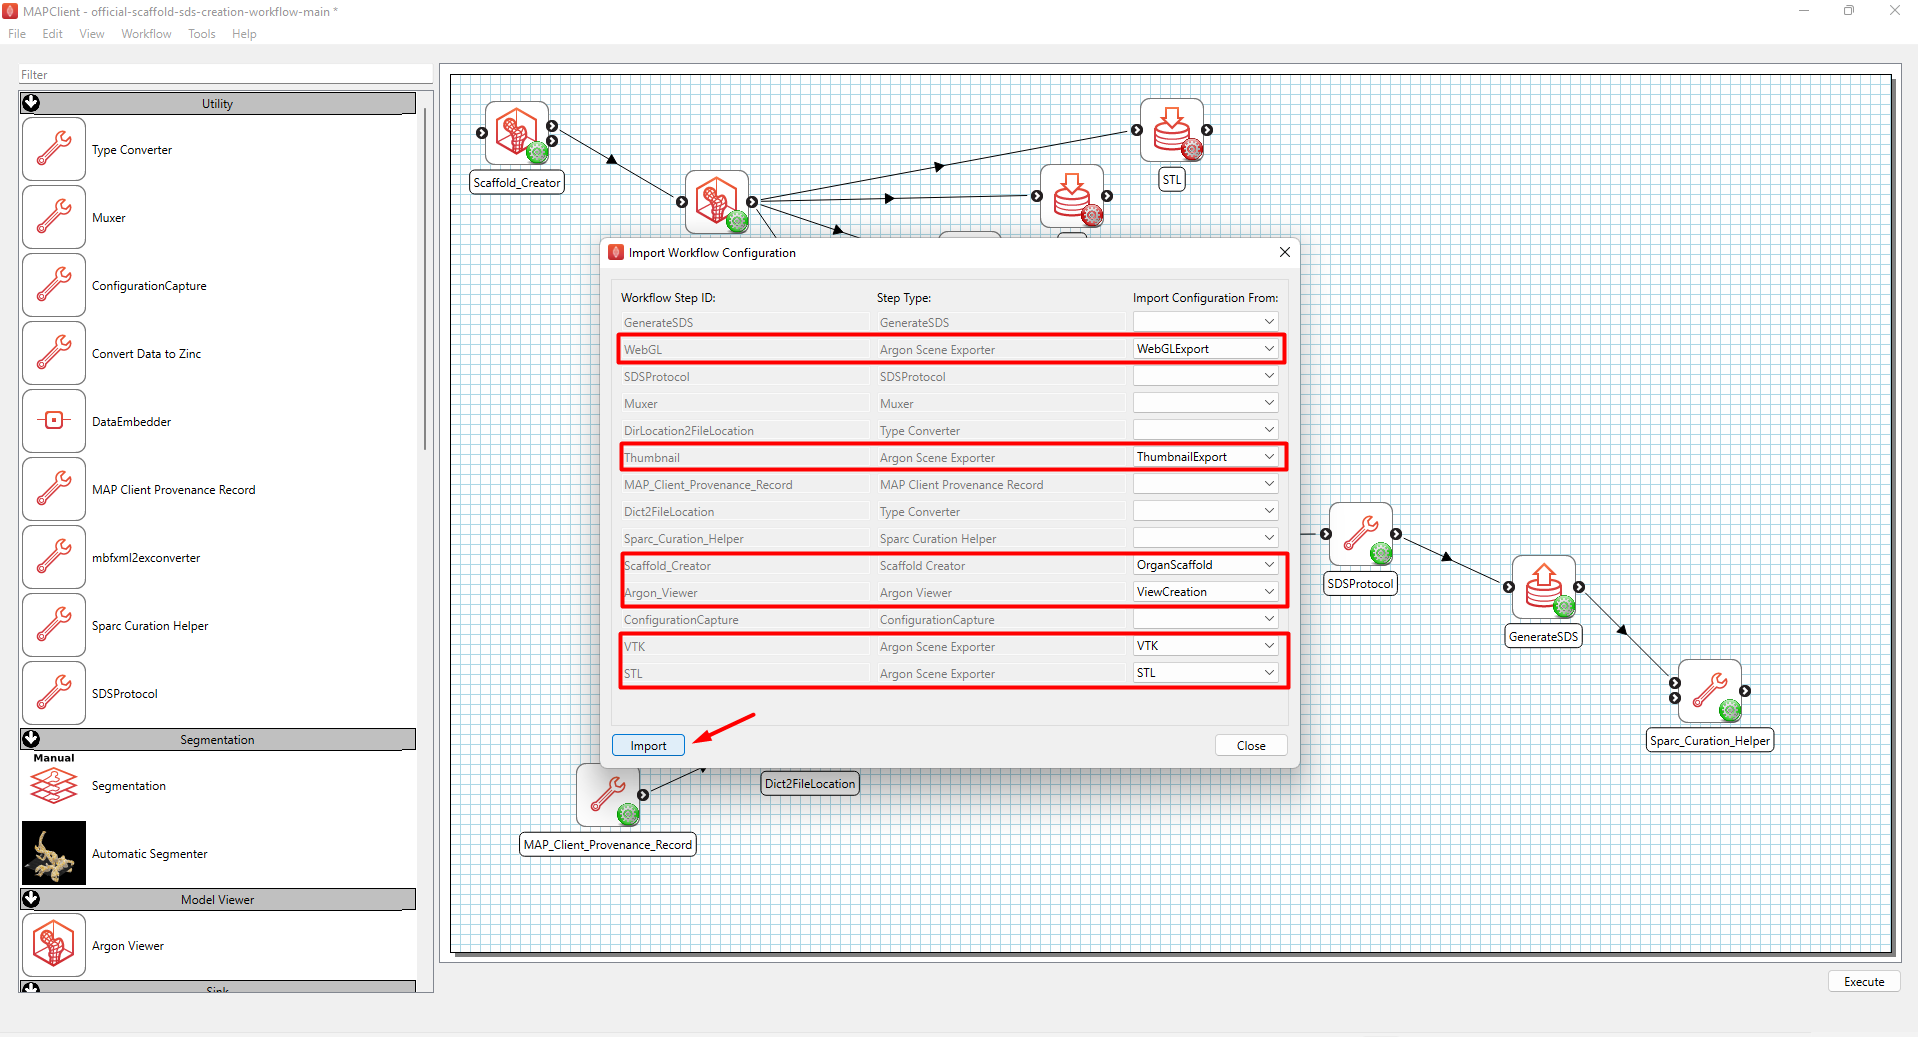
Figure 8: Import workflow configuration settings.
Currently, relative references to the paths or directories can be incorrect when importing configurations. This happens when you import a configuration to a workflow that has a different relative location to the files or directories from the source workflow. If this is the case, when you import configurations from a workflow that is properly configured the corresponding configurations for the importing steps may be/stay improperly configured (an improperly configured step shows a red gear icon). In this situation you will need to reset the relative path for the effected steps.
When following this tutorial, this can be done by clicking on the red gear icon and updating the output directory to point to the output directory set in the “sparc-generic-scaffold-stomach-human” workflow in Step 2. The red gear icon should then become green (once the path to the output directory has been updated correctly). This process needs to be repeated for all four export steps. For convenience, the output directory can be copied and pasted from one step configuration to the next. Once all wheels are green, the workflow is ready to be saved (Ctrl+s) and executed (Ctrl+x).
Step 5
You will see the organ scaffold interface. If the scaffold creator settings have been imported correctly, you should see the correct organ and species on the interface. Click Done to get to the Argon Viewer interface and check that the graphics are imported correctly and generated as per what were configured in Step 2. Click Done.
Step 6
As shown in Figure 9, the next interface is a list of fields for information required for populating the dataset description, submission and manifest files for the dataset. Note that input history is stored for most of the fields and you can click on the downwards arrow to review the previously saved text and reuse them if appropriate. Otherwise, enter the required information.
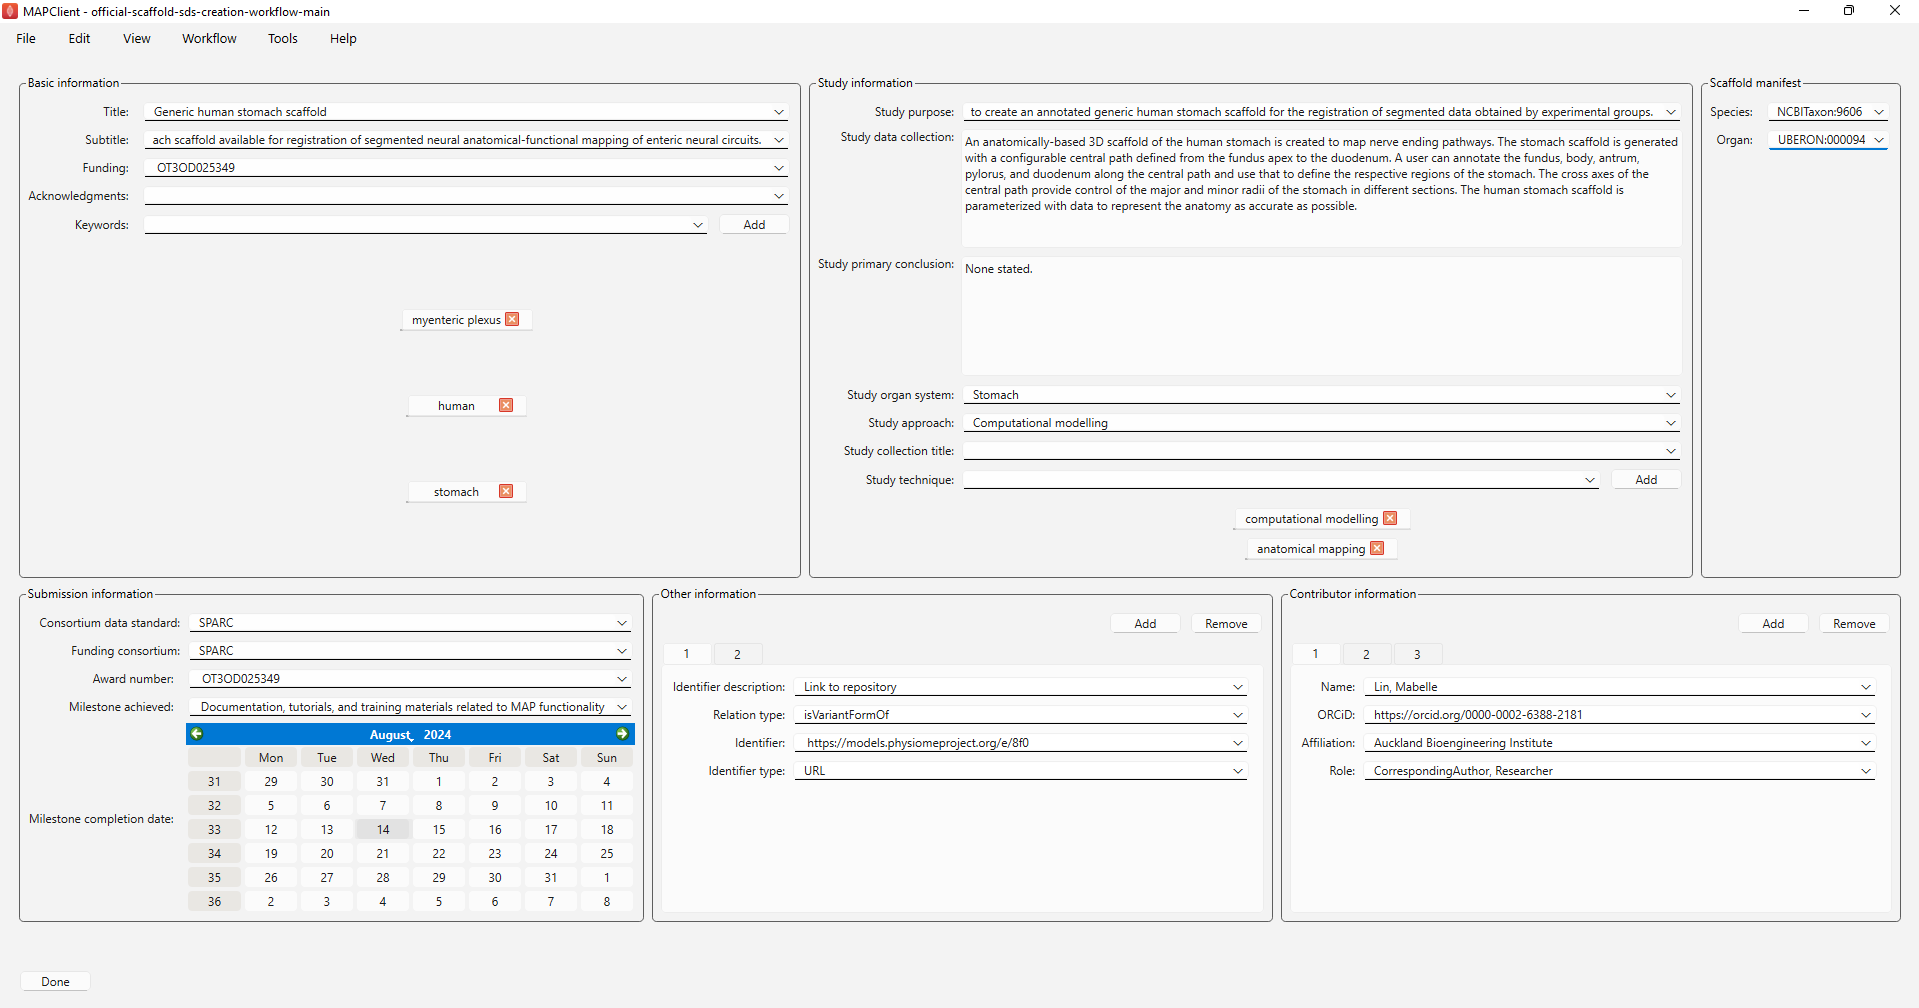
Figure 9: Information required for generating a dataset description file, submission file and manifest files for the dataset.
Of particular interest to such organ scaffold datasets, under “Other information”, make sure that there is an entry for the link to the PMR repository. The details to be entered are as follows:
Identifier description: Link to repository
Relation type: isVariantFormOf
Identifier: https://models.physiomeproject.org/e/8f0 [Should be link to the latest PMR exposure for the organ scaffold]
Identifier type: URL
Click Add to add a second entry. In this entry, we will include the link to Scaffold Mapping Tools and the details are as follows:
Identifier description: Link to Scaffold Mapping Tools
Relation type: hasSoftware
Identifier: https://sparc.science/tools-and-resources/1mv8q3JckdpSYpPK9dvdKx
Identifier type: URL
Under “Contributor information”, make sure that the ORCID is provided as a link to the contributor's ORCID identifier and one of the contributors is assigned as “CorrespondingAuthor” in the “Role” field.
Click Done on the bottom left hand corner when all fields have been filled.
Step 7
The dataset curation helper tool will guide us through the process for annotating the manifest file for the derivative folder and add context information to the dataset.
Under the “Scaffold Annotation” tab (Figure 10), click on Fix All Errors and Yes when a confirmation window pops up asking you to “Let this magic tool fix all errors for you?”. Perform this repeatedly until there is no more errors reported in the “Errors” box.
If you expand the directory shown under “Annotations”, you should see that the VTK, STL and thumbnail files are at the bottom of the list. The thumbnail will also show up in the preview window if you click on the thumbnail path (Figure 10).
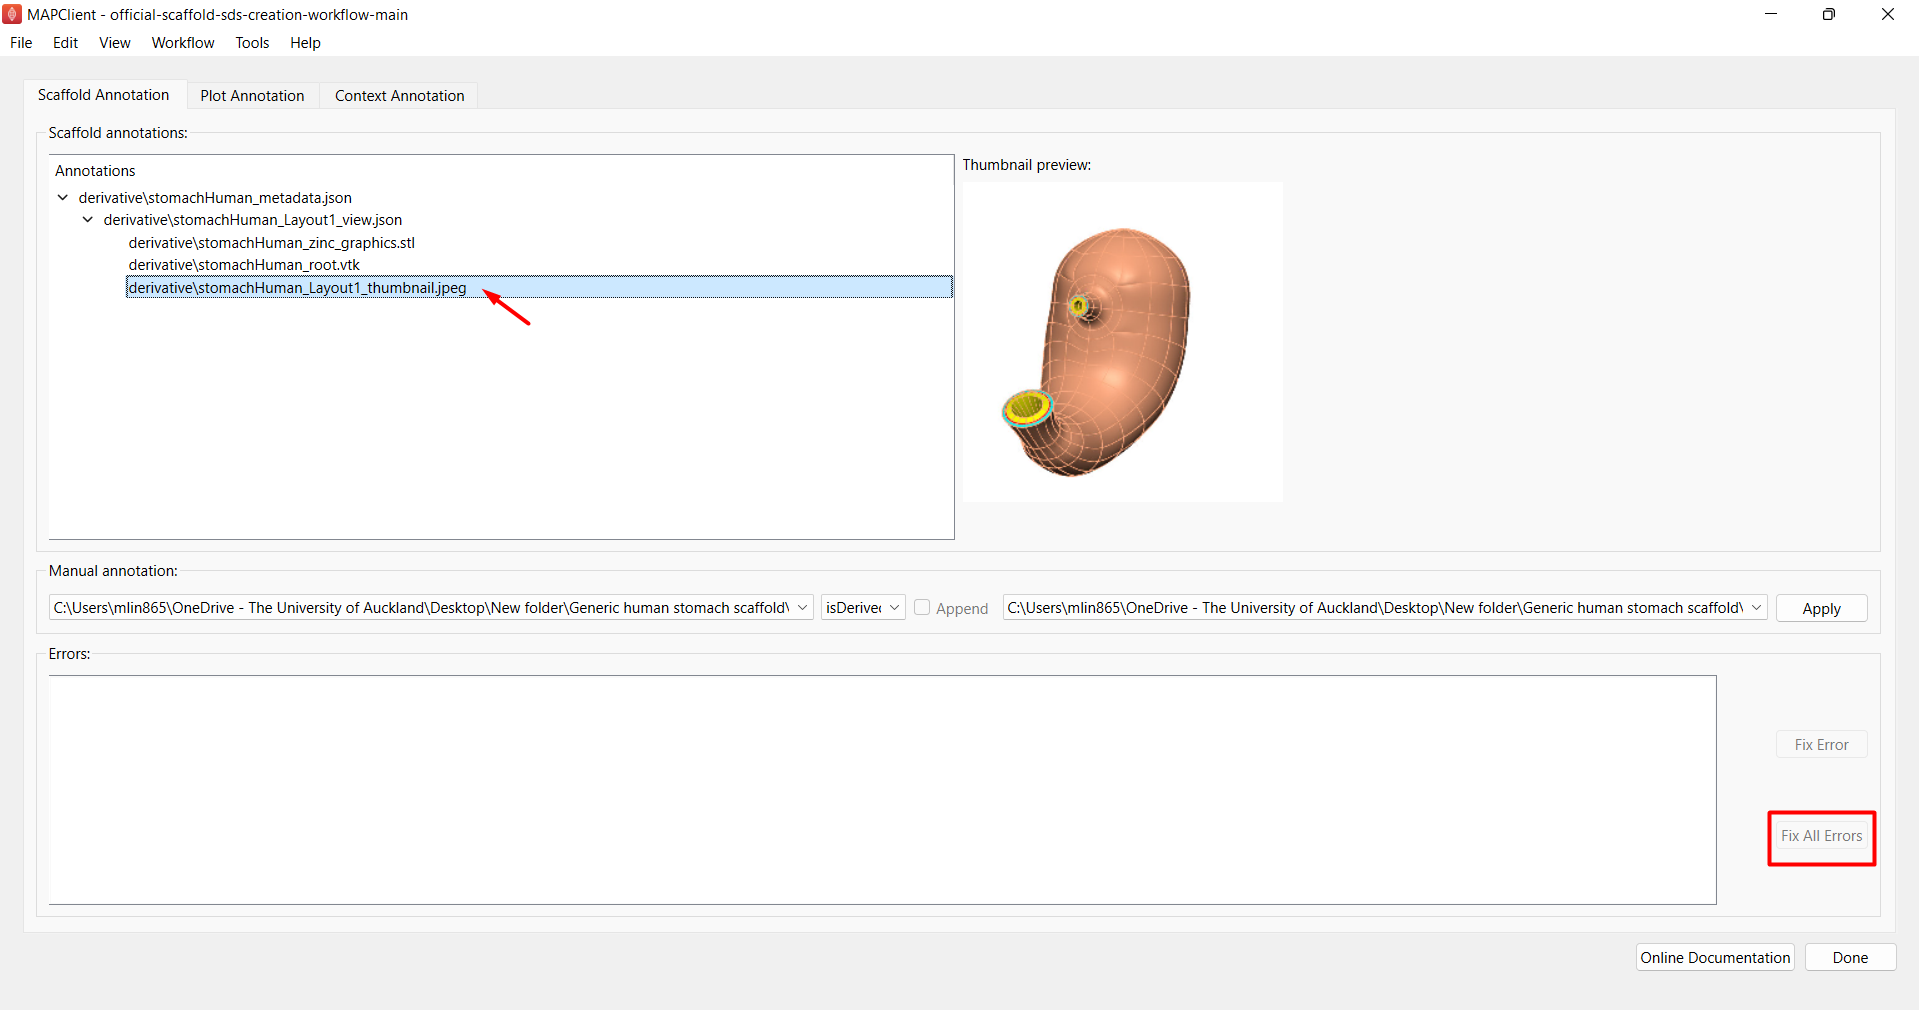
Figure 10: Dataset curation tool for annotating the manifest file for the derivative folder.
Next, click on the Context Annotation tab. Here, we are creating a context card which can be used as a sample template for all the other generic organ scaffolds.
First, under “Summary”, enter information as shown in Figure 11 but tweak the contents to match the organ species you are working on.
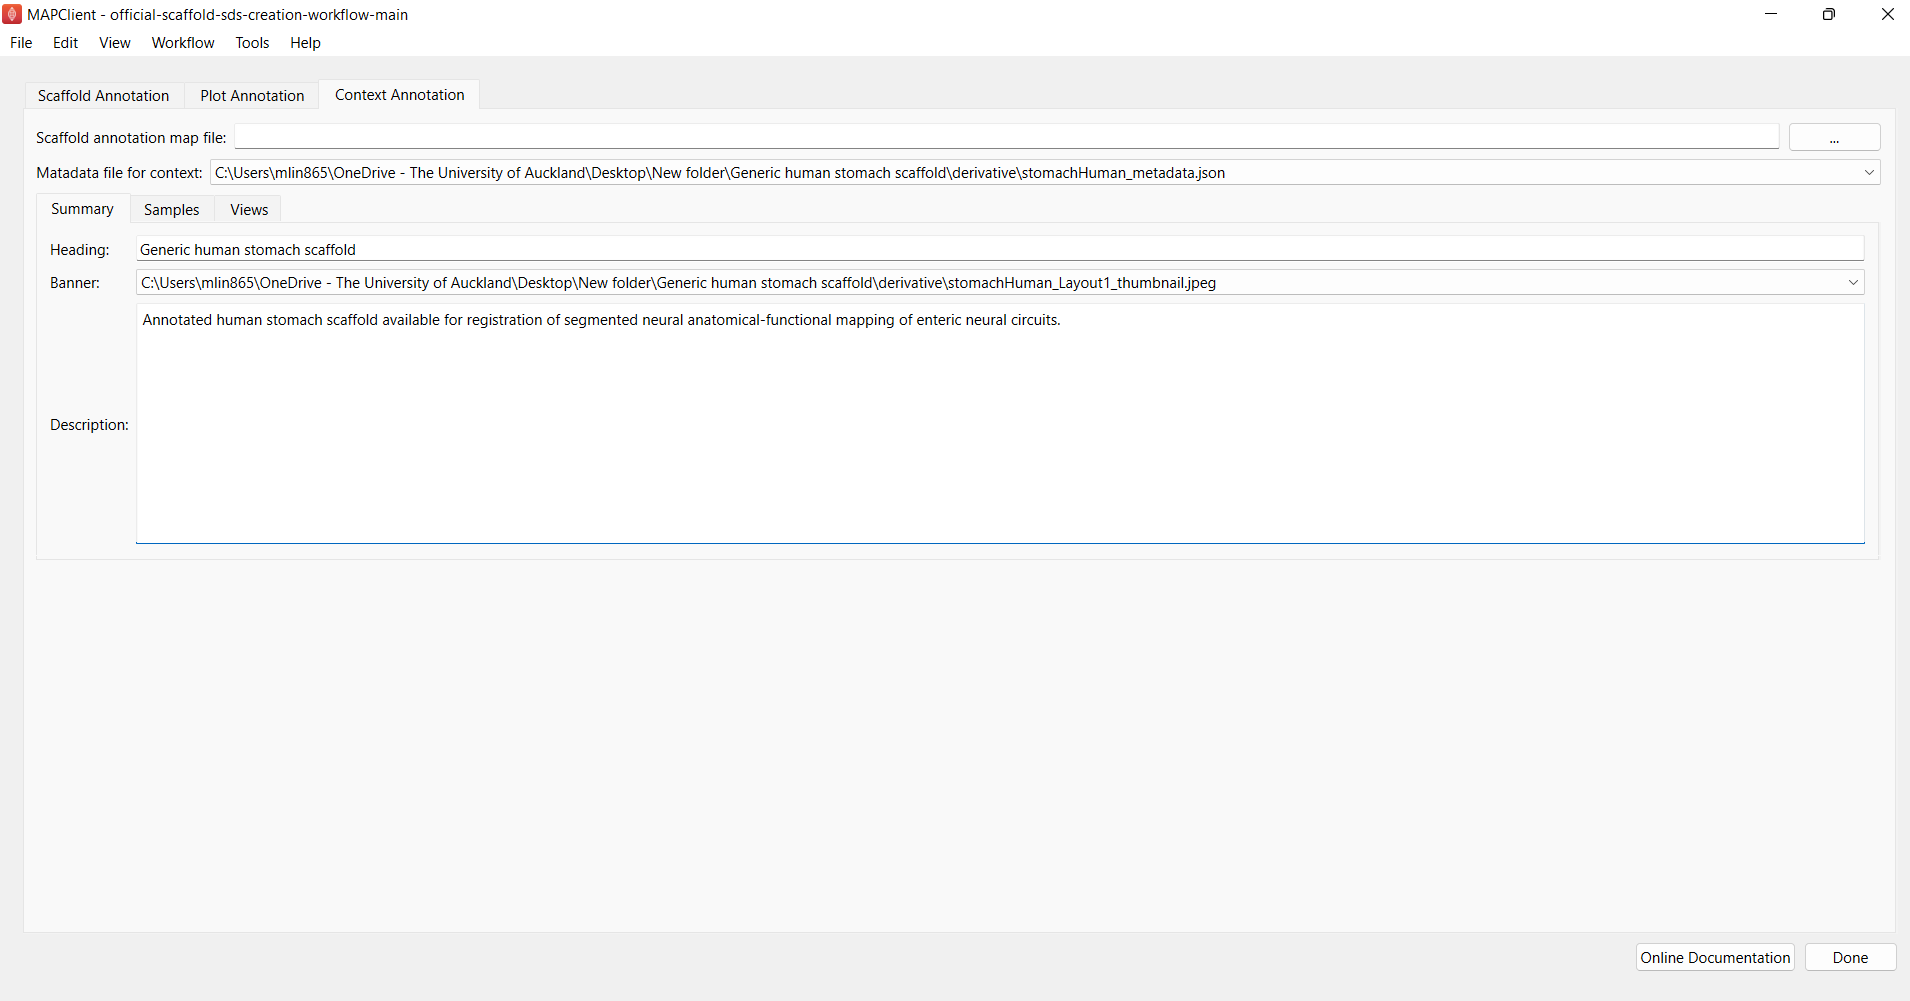
Figure 11: Summary for context card annotation.
Click on the View tab next to add views to the context card (Figure 12). Multiple scaffold views can be added to capture specific views. The different view options will be listed on the context card when published and portal users can select a particular view and the scaffold will be displayed in the captured view. This feature is useful for showcasing specific details of the scaffold or its mapped data. In your case, you will only need to add scaffold views if there are specific anatomical features that are useful to highlight so it is entirely up to you to decide if you want to include views for your generic scaffold. Here we will add a perspective view of the scaffold to document how a view can be added.
Select the Path of the view via browsing to the specific view json file that can be found in the derivative folder in the output directory that was set up during the “GenerateSDS” step in Step 4. The same goes for the “Thumbnail” field. Lastly, add a description to describe the details of the specific field. Perform the same for other views if you choose to add multiple views of the scaffold.
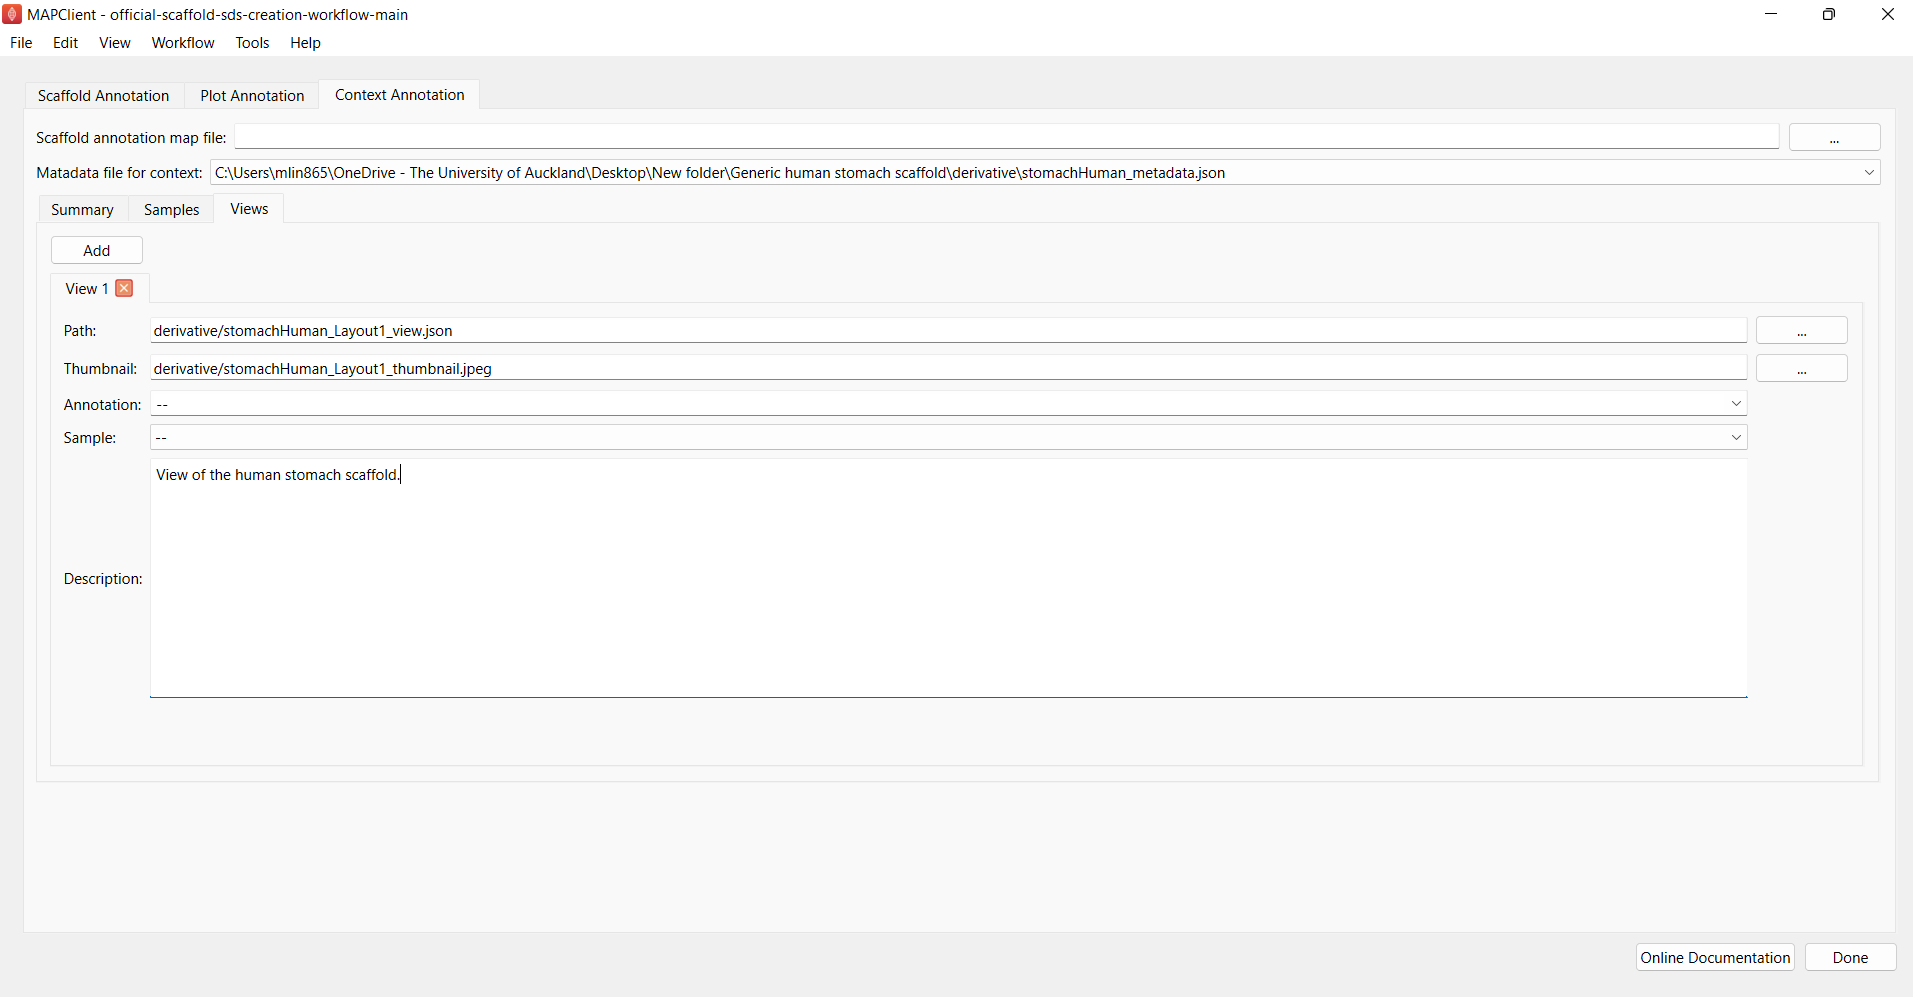
Figure 12: Adding views to the context card.
Step 8
After clicking Done, go to your generated SDS dataset (output directory set in “GenerateSDS” step in Step 4. You should see that the directory contains a folder with the same name as the “Dataset name” set in Step 4. There will be the following files:
- derivative folder (manifest.xlsx, webGL files in json, thumbnail file in jpeg, context information file in json, VTK, and STL files)
- primary folder (see Figure 13 for expected files and folders)
- dataset_description.xlsx
- submission.xlsx
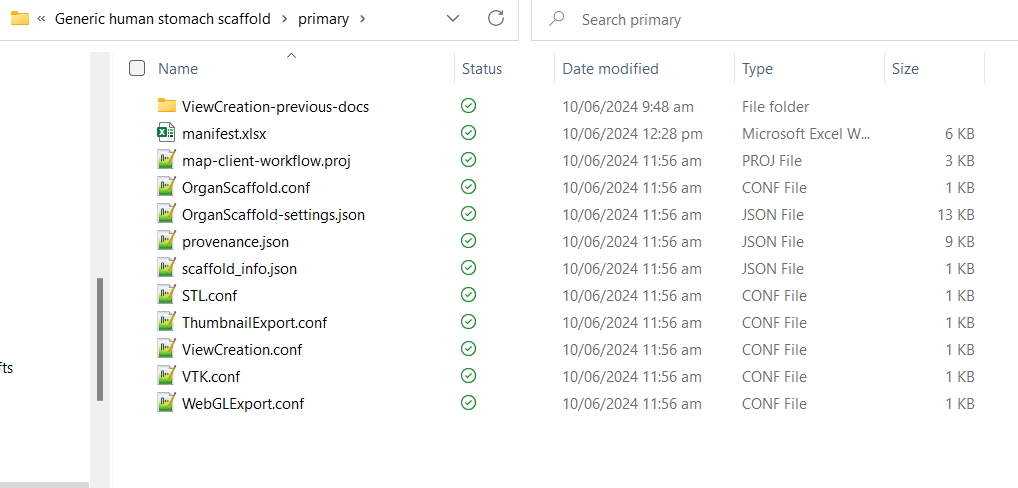
Figure 13: Contents of the primary folder in a generated SDS dataset.
Check that the contents in the generated SDS dataset are correct. For reference, you can use the “Generic human stomach scaffold” dataset as a gold standard for reference as that dataset has been published and meets all curation requirements.
Step 9
If the scaffold has not been published before, we will need to create a new PMR workspace and exposure for it. If it is an existing dataset and the exposure has been revised since its last PMR exposure, we will need to update the PMR workspace to include the latest files in the primary folder of the generated SDS folder. Apart from these files, the PMR workspace should also include an updated version (if changed):
- README.rst
- *_thumbnail.jpeg (from derivative folder of generated SDS dataset)
Create a new PMR exposure and retrieve a URL link to the new PMR exposure. You can either update the PMR link in your dataset_description.xlsx file directly or run the saved official scaffold sds creation workflow again to update the exposure link.
Step 10
Log in to Pennsieve. Create a new dataset if it is a new organ scaffold. If the dataset already exists, go to the existing organ scaffold dataset. Click on Files on the left column and delete all files from the dataset. Upload the following files from your generated SDS dataset:
- derivative
- primary
- dataset_description.xlsx
- submission.xlsx
In the “Overview” section, on the top right hand corner of the “Description” section, click on the word “Update”. Edit the “Primary vs derivative data” and “Code Availability” sections under “Curator’s Notes” to read as follow and save your changes:
Primary vs derivative data: The primary folder contains the mapping tool provenance data file needed to produce the generic organ scaffold. The mapping tool will be accessible from the release download page on the SPARC Portal. The primary folder also contains the MAP-Client workflow and settings files to reproduce the files. The derivative folder contains JSON files that are used to generate a visualization of the scaffold on the web portal as well as the VTK and STL version of the scaffold.
Code Availability: [Scaffold Mapping Tools][1]
Then click on “Update” in “Changelog” to add and save an update describing the changes that have been made to the dataset. For instance,
[Insert date] - Files in primary and derivative folders are replaced by files generated using the sds creation workflow in MAPClient [insert version number]. Dataset description has been updated to the latest SDS format and Curator's Notes have been updated with information about the primary and derivative data and the link in Code Availability has been updated with a link to the Scaffold Mapping Tools. Submission doc is updated with the latest milestone and completion date.
When done, navigate to “Publishing” on the left column and click on the “Request to Publish” button. The dataset will then be reviewed by the curation team. Once curation is complete, you will receive an email confirming that the dataset has been accepted and republished.
Updated about 1 year ago