Download public data, scaffolds and run computations
Objectives
In this tutorial, we'll walk through a step-by-step scenario of a user who wants to explore public datasets, download relevant data, and use the Open Simulation Platform for Advanced Research (o²S²PARC) to transform the data. Using the sparc client you will go through the steps of searching for datasets, downloading and storing data, creating an o²S²PARC instance, running a data analysis pipeline, and finally, visualizing the results.
Credit: the use case presented here was inspired by one of the projects presented at the SPARC FAIR Codeathon 2022, in particular the tutorial "Mapping 2D data to a 3D organ scaffold".
Prerequisites
In order to run this tutorial, you need to have:
- Basic python knowledge
- Internet access
- An active o²S²PARC account
- If you don't have one, please go to https://osparc.io/ and click on "Request Account"
- installed SPARC Python Client and other required libraries
- You could install it by running
pip install sparc.client requests pathlib tqdmfrom your console/command line.
- You could install it by running
Getting set up
To run a simulation, we need to configure access to osparc.io by providing access tokens. For that, you need to log into your o²S²PARC account, and create credentials on their website by navigating to your user profile (click on the image in the upper right corner) and choosing Preferences. Then choose API tag and generate api_key and api_secret- here is how to do it. The values will be displayed once only. More information could be found in Generating o²S²PARC Tokens section here.
Next, please create a text file config.ini in you working directory and fill the value from Key field into O2SPARC_USERNAME variable, and value from Secret into O2SPARC_PASSWORD
[global]
default_profile=prod

[prod]
pennsieve_profile_name=prod
O2SPARC_HOST=https://api.osparc.io
O2SPARC_USERNAME=<YOUR_API_KEY>
O2SPARC_PASSWORD=<YOUR_API_SECRET>
Your config.ini file needs to have 2 sections: global with the name of a default profile used (prod) and a section indicated by default_profile with 4 variables: pennsieve_profile_name, O2SPARC_HOST, O2SPARC_USERNAME and O2SPARC_PASSWORD.
Note: please do not use single (') or double (") quotation marks in the configuration file, just insert plain text.
Searching for Published Datasets
This section introduces metadata search services which query an Elasticsearch endpoint. This endpoint contains the same metadata that powers search on the SPARC portal. There are two basic ways to retrieve information on SPARC datasets:
- Retrieve a full list of datasets and associated metadata
- Submit a valid Elasticsearch query to retrieve selected dataset information
Query results are returned as JSON in Elasticsearch format. Information on specific fields and content can be found in a K-Core API Handbook.
In order to get started, you must add information about an API Key you can register* for. Instructions for registering and receiving an API key are available as a walk-through tutorial. This API Key must be added to your config.ini file with 1 variable: scicrunch_api_key
[global]
default_profile=prod

[prod]
pennsieve_profile_name=prod
scicrunch_api_key=<YOUR_API_KEY>*Note: After registering for your API Key it may take 15 minutes for the API key to sync with API service endpoints
Get a list of datasets to process or download
The following example retrieves a list of datasets and associated metadata. Getting a list of datasets will also allow you to view the JSON structure and content of the metadata.
import json
from sparc.client import SparcClient

# Get a list of datasets from Elasticsearch
response = {}
response = client.metadata.list_datasets()

number_of_records = response['hits']['total']
# Can now process individual records as needed
Search datasets via POST based query
The search is a basic search for dataset based on dataset identifier (in this example we will be retrieving SPARC datasets 10, 11, and 12 that are used in other sections of this tutorial). The query is created as a JSON body that is submitted via POST. The dataset identifiers used in the example below refer to:
- Dataset with ID 10: Spatial distribution and morphometric characterization of vagal afferents associated with the myenteric plexus of the rat stomach
- Dataset with ID 11: Spatial distribution and morphometric characterization of vagal afferents (intramuscular arrays (IMAs)) within the longitudinal and circular muscle layers of the rat stomach
- Dataset with ID 12: Spatial distribution and morphometric characterization of vagal efferents associated with the myenteric plexus of the rat stomach
import json
from sparc.client import SparcClient

# ES search via JSON object
response = {}
body = "{\"query\": {\"terms\": {\"_id\": [ \"10\", \"11\", \"12\" ] } } }"
body_json = json.loads(body)

response = client.metadata.search_datasets(body_json)

number_of_records = response['hits']['total']
# Can now process individual records as needed
The query can be any valid Elasticsearch query. For more information on Elasticsearch queries, please consult their documentation of the Elasticsearch Query DSL. Examples of SPARC queries can be found in the K-Core API Documentation.
Once you have a set of datasets and associated data you can now use DAT-CORE services (described in the next section) to download files from a dataset.
Downloading files
After installation of sparc.client and other requited libraries, we will download the datasets required for the analysis. We need the following datasets that contain 3D coordinates:
- Dataset with ID 10: Spatial distribution and morphometric characterization of vagal afferents associated with the myenteric plexus of the rat stomach
- Dataset with ID 11: Spatial distribution and morphometric characterization of vagal afferents (intramuscular arrays (IMAs)) within the longitudinal and circular muscle layers of the rat stomach
- Dataset with ID 12: Spatial distribution and morphometric characterization of vagal efferents associated with the myenteric plexus of the rat stomach
from sparc.client import SparcClient
client = SparcClient(connect=False, config_file='config.ini') #we assume config.ini is in the current directory

#searching for the relevant files
ima_data=client.pennsieve.list_files(dataset_id=11, query="files/derivative/IMA_analyzed_data.xlsx") # Derivative file from the SPARC Portal
efferent_data=client.pennsieve.list_files(dataset_id=12, query="files/derivative/Efferent_data.xlsx") # Derivative file from the SPARC Portal
igle_data=client.pennsieve.list_files(dataset_id=10, query="files/derivative/IGLE_data.xlsx") # Derivative file from the SPARC Portal

#downloading files
client.pennsieve.download_file(file_list=ima_data[0])
client.pennsieve.download_file(file_list=efferent_data[0])
client.pennsieve.download_file(file_list=igle_data[0])
We also need 2 additional files:
- A zip file containing the Python code you want to run and a
requirements.txtfor your additional Python packages. - The 3D mesh of an organ, in .stl format. It can be downloaded here.
import requests


# Make http request for remote file with code
code_input = requests.get('https://raw.githubusercontent.com/elisabettai/sparc.client/main/docs/tutorial-readme-assets/code_input.zip')

# Save file data to local copy
with open('code_input.zip', 'wb')as file:
  file.write(code_input.content)

# Download organ mesh for simulation
organ_mesh = requests.get('https://raw.githubusercontent.com/elisabettai/sparc.client/main/docs/tutorial-readme-assets/scaffold_zinc_graphics.stl')

# Save file data to local copy
with open('scaffold_zinc_graphics.stl', 'wb')as file:
  file.write(organ_mesh.content)

!dir
At this point you should see 6 files in your current directory: config.ini, Efferent_data.xlsx, IGLE_data.xlsx, IMA_analyzed_data.xlsx, code_input.zip and scaffold_zinc_graphics.stl.
Spinning Up an o²S²PARC Instance
Let's confirm that now that we can connect to o²S²PARC. We need to import o²S²PARC module from the SPARC Client and check if we are connected.
from sparc.client import SparcClient
from sparc.client.services.o2sparc import (
  O2SparcService,
  O2SparcSolver
)

o2sparc: O2SparcService = client.o2sparc

# Check that you are connect to o²S²PARC (you should see your e-mail address)
print(o2sparc.get_profile())
If the response is the e-mail that we registered with, we can start our simulation!
Simulation Creation for the Downloaded Datasets
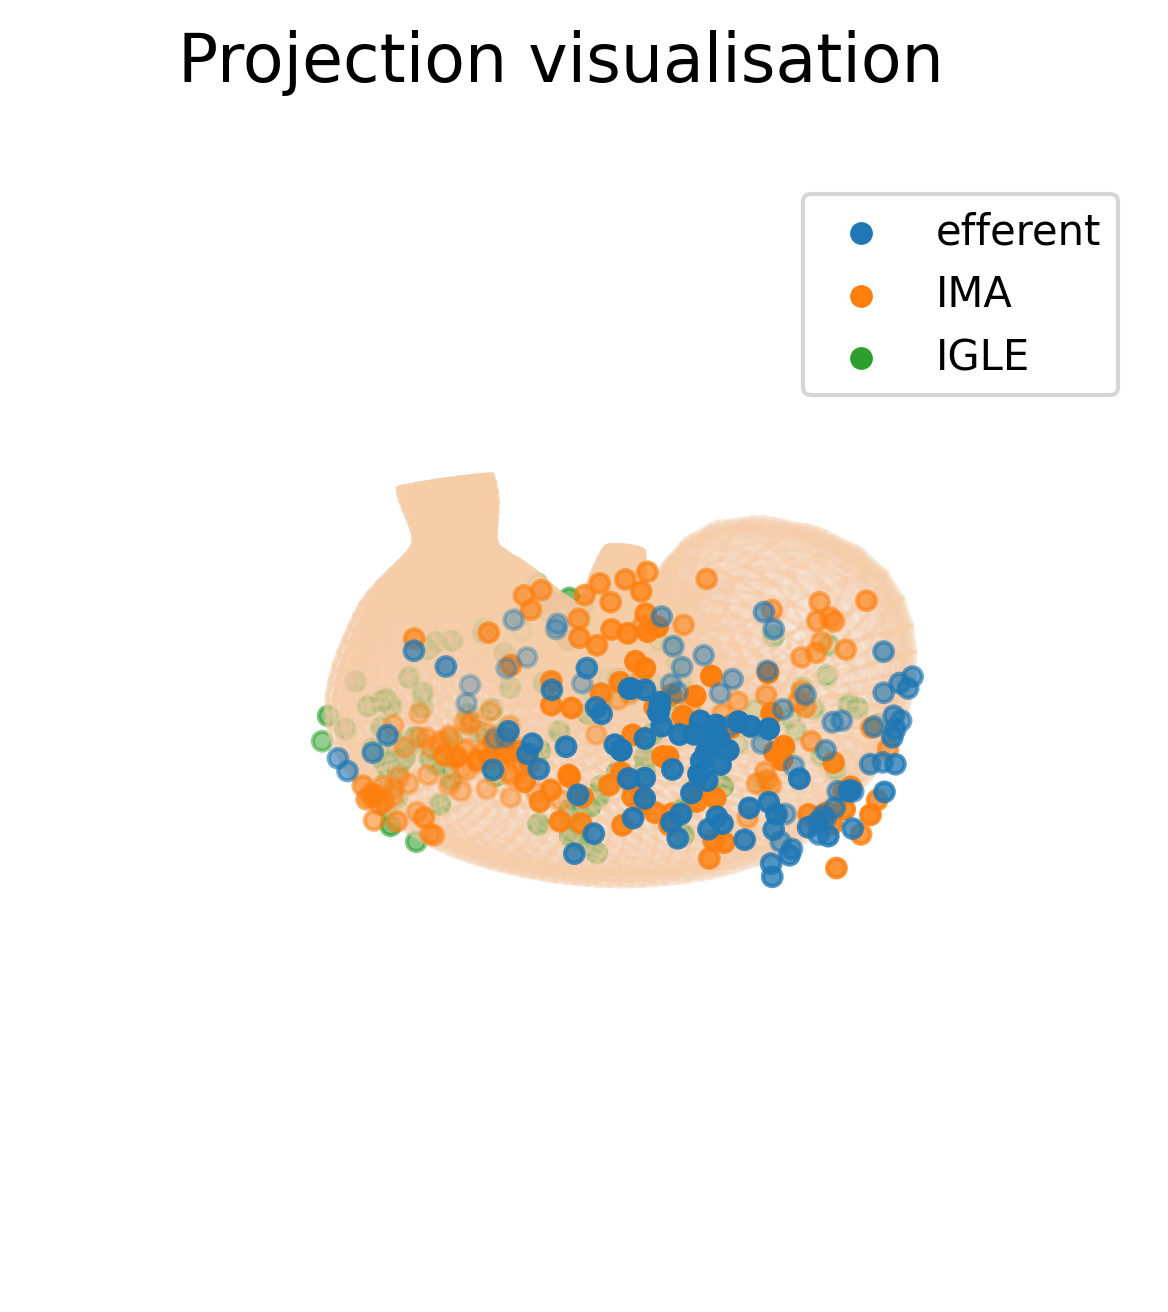
In this section we will use the o²S²PARC Service Python Runner to execute Python code on the SPARC datasets that we have just downloaded. The o²S²PARC Python Runner executes the code to transform the 2D data from the portal, expressed as distances in percentages, to 3D data that be visualized on an organ scaffold of the rat stomach.
The inputs to the Python Runner, for this particular use-case, are:
- A zip file containing the Python code you want to run and a
requirements.txtfor your additional Python packages (it can be downloaded here). - The three data files downloaded in the previous section with the DAT-Core functionality.
- The 3D mesh of an organ, in .stl format. It can be downloaded here.
The output is a figure showing a 2D projection of the input anatomical data onto the rat stomach scaffold.
from pathlib import Path
from tqdm import tqdm
from time import sleep
import zipfile
import shutil

with Path().absolute() as tmp_dir:
    input_file_1: Path = Path(tmp_dir) / "code_input.zip" # Zip file containing a Python script to be executed and a requirements.txt for additional Python packages
    input_file_2: Path = Path(tmp_dir) / "IMA_analyzed_data.xlsx" # Derivative file from the SPARC Portal
    input_file_3: Path = Path(tmp_dir) / "Efferent_data.xlsx" # Derivative file from the SPARC Portal
    input_file_4: Path = Path(tmp_dir) / "IGLE_data.xlsx" # Derivative file from the SPARC Portal
    input_file_5: Path = Path(tmp_dir) / "scaffold_zinc_graphics.stl" # Stomach surface mesh
    job: dict = {
        "input_5": input_file_5,
        "input_4": input_file_4,
        "input_3": input_file_3,
        "input_2": input_file_2,
        "input_1": input_file_1
      }
    solver: O2SparcSolver = o2sparc.get_solver(solver_key="simcore/services/comp/osparc-python-runner",solver_version="1.2.0")

    job_id = solver.submit_job(job)

    pbar = tqdm(total=1.0)
    progress: float = 0
    while not solver.job_done(job_id):
        sleep(1)
        if solver.get_job_progress(job_id) > progress:
          pbar.update(solver.get_job_progress(job_id) - progress)
          progress = solver.get_job_progress(job_id)

    # Get results
    res = solver.get_results(job_id)

    # The oSPARC Python runner service has 1 output
    output_path = res['output_1']

    # The output_path contains a zip archive, let's extract it
    with zipfile.ZipFile(output_path,"r") as zip_ref:
        zip_ref.extractall("computation_output")

    # Copy the content of the archive to the current working directory for convenience
    shutil.copyfile("computation_output/data_projected_on_scaffold.png", "data_projected_on_scaffold.png")
If the code run successfully, you will a file data_projected_on_scaffold.png appearing in your current directory.
This is how the output figure will look like.
Troubleshooting
If you don't get the expected output, you can retrieve the o²S²PARC job logs with:
from tempfile import TemporaryDirectory

print("job log:")
log_dir: TemporaryDirectory = solver.get_job_log(job_id)
for elm in Path(log_dir.name).rglob("*"):
    if elm.is_file():
        print(elm.read_text())
Updated 11 months ago